Page 2 - Visitate il nostro sito web per:; SERVIZIO CLIENTI E MANUTENZIONE
INDICE 1. ISTRUZIONI DI SICUREZZA . . . . . . . . . . . . . . . . . . . . . . . . . . . . . . . . . . . . . . . . . . . . . . . . . . . . 3 2. DESCRIZIONE DEL PRODOTTO . . . . . . . . . . . . . . . . . . . . . . . . . . . . . . . . . . . . . . . . . . . . . . . 6 3. ACCESSORI . . . . . . . . . . . ....
Page 3 - ISTRUZIONI DI SICUREZZA; Sicurezza dei bambini e
1. ISTRUZIONI DI SICUREZZA Leggere attentamente le istruzioni forni-te prima di installare e utilizzare l'appa-recchiatura. Il produttore non è respon-sabile se un'installazione ed un uso noncorretto dell'apparecchiatura provocanolesioni e danni. Tenere sempre le istru-zioni a portata di mano in cas...
Page 6 - DESCRIZIONE DEL PRODOTTO
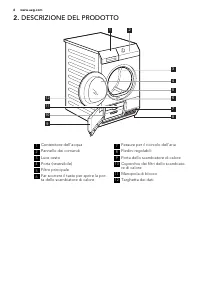
2. DESCRIZIONE DEL PRODOTTO 1 2 7 3 4 5 6 9 10 11 12 8 1 Contenitore dell'acqua 2 Pannello dei comandi 3 Luce cesto 4 Porta (reversibile) 5 Filtro principale 6 Far scorrere il tasto per aprire la por-ta dello scambiatore di calore 7 Fessure per il ricircolo dell'aria 8 Piedini regolabili 9 Porta del...
Page 7 - ACCESSORI; Kit di installazione in
3. ACCESSORI 3.1 Kit di installazione in colonna Nome dell'accessorio: SKP11, STA8,STA9Disponibile presso il vostro rivenditoreautorizzato. Il kit per il montaggio puòessere usato solo con le lavabiancheriaspecificate nel foglietto. Vedere il fo-glietto allegato.Leggere attentamente le istruzioni fo...
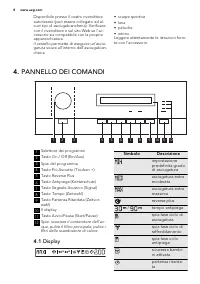
Page 8 - PANNELLO DEI COMANDI; Display; Simbolo; reverse plus
Disponibile presso il vostro rivenditoreautorizzato (può essere collegato ad al-cuni tipi di asciugabiancheria). Verificarecon il rivenditore o sul sito Web se l'ac-cessorio sia compatibile con la propriaapparecchiatura.Il cestello permette di eseguire un’asciu-gatura sicura all’interno dell’asciuga...
Page 12 - USO DELL'APPARECCHIATURA; Preparazione della
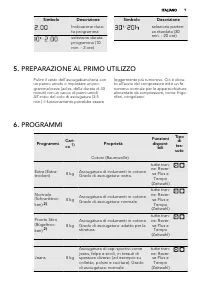
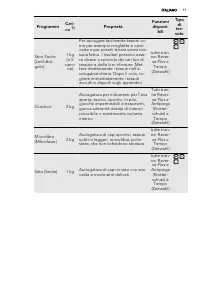
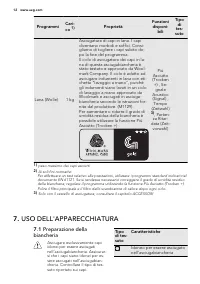
Programmi Cari-co 1) Proprietà Funzioni disponi- bili Tipo di tes- suto Lana (Wolle) 1 kg Asciugatura di capi in lana. I capidiventano morbidi e soffici. Consi-gliamo di togliere i capi subito do-po la fine del programma.Il ciclo di asciugatura dei capi in la-na di questa asciugabiancheria èstato te...
Page 13 - Caratteristiche; Caricare la biancheria; ATTENZIONE; Accensione
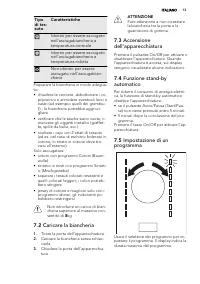
Tipodi tes-suto Caratteristiche Idoneo per essere asciugatonell'asciugabiancheria atemperatura normale Idoneo per essere asciugatonell'asciugabiancheria atemperatura ridotta Non idoneo per essereasciugato nell'asciugabian-cheria Preparare la biancheria in modo adegua-to:• chiudere le cerniere, abbot...
Page 15 - CONSIGLI E SUGGERIMENTI UTILI
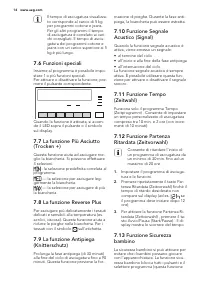
non blocca il pulsante On/Off ). Per atti-vare la funzione di sicurezza bambinopremere i pulsanti Più Asciutto (Trocken+) e Reverse Plus contemporaneamentefino a quando sul display appare il sim-bolo . Per disattivare la funzione pre- mere di nuovo gli stessi pulsanti fino aquando il simbolo scompar...
Page 16 - Pulire il filtro principale
8.2 Regolazione del grado di umidità della biancheriarestante Per modificare il grado di umidità dellabiancheria restante predefinito: 1. Ruotare il selettore dei programmisul programma disponibile. 2. Premere contemporaneamente i ta-sti Più Asciutto (Trocken +) e Anti-piega (Knitterschutz) . Tenere...
Page 18 - Svuotamento del; Pulizia dei filtri dello
9.2 Svuotamento del contenitore dell'acqua dicondensa Svuotare il contenitore dell'acqua dicondensa dopo ogni ciclo di asciugatu-ra.Se il contenitore dell'acqua di condensaè pieno, il programma si interrompe au-tomaticamente e il LED svuotare il con- tenitore dell'acqua di condensa si accen- de. Per...
Page 21 - Pulizia del cesto; Pulizia del pannello dei
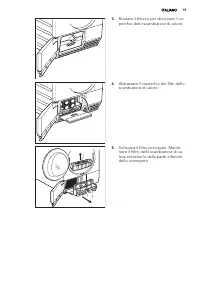
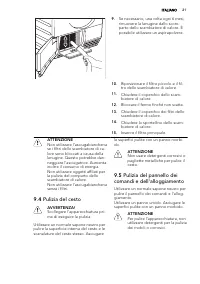
9. Se necessario, una volta ogni 6 mesi,rimuovere la lanugine dallo scom-parto dello scambiatore di calore. Èpossibile utilizzare un aspirapolvere. 10. Riposizionare il filtro piccolo e il fil-tro dello scambiatore di calore. 11. Chiudere il coperchio dello scam-biatore di calore. 12. Bloccare il fe...
Page 22 - RISOLUZIONE DEI PROBLEMI ED ASSISTENZA; Risoluzione dei problemi; Problema; Il filtro è ostruito.; Err; Errore
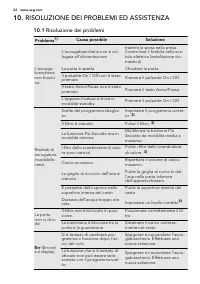
10. RISOLUZIONE DEI PROBLEMI ED ASSISTENZA 10.1 Risoluzione dei problemi Problema 1) Causa possibile Soluzione L'asciuga-biancherianon funzio-na. L'asciugabiancheria non è col-legata all’alimentazione. Inserire la spina nella presa.Controllare il fusibile nella sca-tola elettrica (installazione do-m...
Page 23 - Luce del cesto difettosa.; DATI TECNICI; altezza x larghezza x profondità
Problema 1) Causa possibile Soluzione Nessuna lu-ce interna 5) Luce del cesto difettosa. Contattare il Centro di assi-stenza per sostituire la luce delcesto. Il temposcorre inmaniera in-solita sul di-splay. Il tempo residuo al termine delciclo viene calcolato in base alvolume e all’umidità della bia...
Page 24 - INSTALLAZIONE; Disimballo
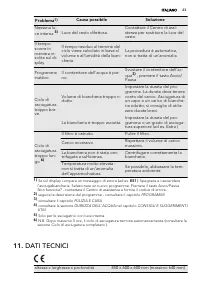
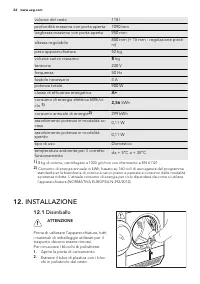
volume del cesto 118 l profondità massima con porta aperta 1090 mm larghezza massima con porta aperta 950 mm altezza regolabile 850 mm (+ 15 mm - regolazione piedi-ni) peso apparecchiatura 52 kg volume carico massimo 8 kg tensione 230 V frequenza 50 Hz fusibile necessario 4 A potenza totale 900 W cl...
Page 25 - CONSIDERAZIONI AMBIENTALI
È possibile regolare l’altezza dell’asciu-gabiancheria. Per farlo, regolare i piedini(vedere la figura). 15mm 12.2 Installazione sotto un piano L'apparecchiatura può essere montatasenza nessun supporto oppure sotto ilbanco della cucina con la corretta spa-ziatura (vedere figura). > 850 mm 600 mm ...
Page 26 - Visit our website for:; CUSTOMER CARE AND SERVICE
CONTENTS 1. SAFETY INSTRUCTIONS . . . . . . . . . . . . . . . . . . . . . . . . . . . . . . . . . . . . . . . . . . . . . . . . . . . . . 27 2. PRODUCT DESCRIPTION . . . . . . . . . . . . . . . . . . . . . . . . . . . . . . . . . . . . . . . . . . . . . . . . . . . . 29 3. ACCESSORIES . . . . . . . ...
Page 27 - SAFETY INSTRUCTIONS; Children and vulnerable
1. SAFETY INSTRUCTIONS Before the installation and use of the ap-pliance, carefully read the supplied in-structions. The manufacturer is not re-sponsible if an incorrect installation anduse causes injuries and damages. Alwayskeep the instructions with the appliancefor future reference. 1.1 Children ...
Page 29 - PRODUCT DESCRIPTION
The type of light bulb or halogenlamp used for this appliance, isonly for household appliances.Do not use it for house lighting.To replace the internal light, con-tact the Service. 1.6 Disposal WARNING! Risk of injury or suffocation. • Disconnect the appliance from the mains supply. • Cut off the ma...
Page 30 - ACCESSORIES; Stacking kit
3. ACCESSORIES 3.1 Stacking kit Accessory name: SKP11, STA8, STA9Available from your authorized vendor.Stacking kit can be used only with thewashing machines specified in the leaf-let. See the leaflet attached.Read carefully the instructions suppliedwith the accessory. 3.2 Draining kit Accessory nam...
Page 31 - CONTROL PANEL; Symbol
Drying rack accessory let to dry safely inthe tumble dryer:• sport shoes• wool • soft toys• lingerieRead carefully the instructions suppliedwith the accessory. 4. CONTROL PANEL 1 10 12 2 4 5 6 7 8 9 11 3 1 The programme dial 2 The On/Off (Ein/Aus) push button 3 Programme indicators 4 The Dry Plus (T...
Page 35 - USING THE APPLIANCE; Preparing the laundry
Programmes Load 1) Properties Availablefunctions Fab- ric mark Wool (Wolle) 1 kg To dry the cloths made of wool .The cloths become soft and cosy.We recommend to remove thecloths immediately after the pro-gramme end.The wool drying cycle of this tum-ble drying machine has been tes-ted and approved by...
Page 36 - Property; Loading the laundry
Fabricmark Property Applicable to dry in thetumble dryer at decreasedtemperature Not applicable to dry in thetumble dryer Correctly prepare the laundry:• close zips, button up duvet covers and attach loose ties or ribbons (e.g. rib-bons of aprons) - laundry can tangle • make sure the pockets are emp...
Page 38 - HINTS AND TIPS; Ecological hints
7.14 Starting a programme To activate the programme push theStart/Pause button. The LED above thepush button changes the colour to red. 7.15 Change a programme To change a programme, push the On/Off (Ein/Aus) button to deactivate appli-ance. Push the On/Off (Ein/Aus) to acti-vate the appliance and t...
Page 39 - Cleaning the primary filter
8.3 Water container full — indication By default the indication LED is alwayson. It comes into the view at the end ofthe cycle or when the water container isfull. When you use an external equip-ment to drain the container, the LED canbe off. To activate or deactivate the indication: 1. Turn the prog...
Page 40 - Draining the condensed
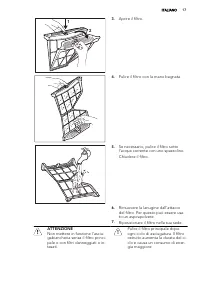
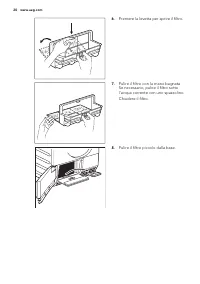
4. Use a moist hand to clean the filter. 5. If necessary clean the filter withwarm water using a brush.Close the filter. 6. Remove fluff from the filter socket.For this a vacuum cleaner can beused. 7. Put the filter inside the filter socket. CAUTION! Do not operate the tumble dryerwithout the primar...
Page 41 - Cleaning the heat
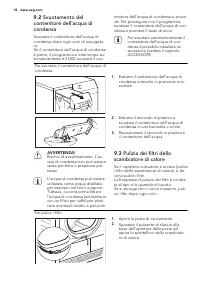
To drain the condensed water container: 1. Pull the condensed water containerand keep it in horizontal position. 2. Move the plastic connection out anddrain the condensed water containerinto a sink or equivalent receptacle. 3. Move plastic connection in and in-stall water container. WARNING! Risk of...
Page 44 - TROUBLE SHOOTER AND SERVICE; Troubleshooting; Problem; The loading door is opened.
CAUTION! Do not operate the tumble dryerwhen the heat exchanger filtersare blocked with fluff. This couldcause the damage to the tumbledryer. This also increases energyconsumption.Do not use sharp objects toclean the heat exchanger com-partment.Do not operate the tumble dryerwithout the filters. 9.4...
Page 45 - Error
Problem 1) Possible cause Remedy The airflow grill is clogged. Clean the airflow grill in thebottom of the appliance. Dirt on the inner surface of thedrum. Clean the inner surface of thedrum. Too high water hardness. Set applicable water hard-ness 4) . The doordoes notclose. The filter not locked in...
Page 46 - TECHNICAL INFORMATION
2) follow the programme description — see PROGRAMMES chapter 3) see CARE AND CLEANING chapter 4) see section WATER HARDNESS in HINTS AND TIPS chapter 5) Only the tumble dryers with drum light. 6) Note: After maximum 5 hours the drying cycle ends automatically (see Drying cycle complete section). 11....
Page 47 - INSTALLATION; Unpacking; ENVIRONMENT CONCERNS
12. INSTALLATION 12.1 Unpacking CAUTION! Before use all parts of the transportpackaging must be removed.To remove the polystyrene blockages: 1. Open the load door. 2. Pull plastic hose with the polystyreneblockages out from the drum. It is possible to adjust the height of thetumble dryer. To do that...