Page 2 - Visit the webshop at:
FOR PERFECT RESULTS Thank you for choosing this AEG product. We have created it to give you impeccable performance for many years, with innovative technologies that help make life simpler – features you might not find on ordinary appliances. Please spend a few minutes reading to get the very best fr...
Page 3 - CONTENTS
CONTENTS 4 Safety information 6 Control panel 11 First use 12 Daily use 15 Helpful hints and tips 16 Care and cleaning 18 What to do if… 20 Technical data 20 Installation 24 Environmental concerns The following symbols are used in this user manual: Important information concerning your personal safe...
Page 4 - manufacturer is not responsible for damages caused by omission.; Children and vulnerable people safety; dren to suffer electric shock or to close themselves into it.; General safety; as explained in this instruction booklet.
SAFETY INFORMATION In the interest of your safety and to ensure the correct use, before installing and first using the appliance, read this user manual carefully, including its hints and warnings. To avoid unnecessary mistakes and accidents, it is important to ensure that all people using the ap - p...
Page 6 - Installation; In that case retain packing.; Service; a qualified electrician or competent person.; Environment Protection; CONTROL PANEL; Control panel
• Regularly examine the drain in the refrigerator for defrosted water. If necessary, clean the drain. If the drain is blocked, water will collect in the bottom of the appliance. Installation For electrical connection carefully follow the instructions given in specific paragraphs. • Unpack the applia...
Page 7 - Display; Switching on
1 Appliance ON/OFF button 2 Fridge Temperature colder button 3 Fridge Temperature warmer button 4 Mode button 5 OK button 6 Freezer Temperature colder button 7 Freezer Temperature warmer button 8 Display It is possible to change predefined sound of buttons to a loudly one by pressing together Mode b...
Page 8 - The Fridge Off indicator flashes.; Temperature regulation; The temperature indicators show the set temperature.; Minute Minder function; To switch on the function:
Switching off To switch off the appliance do these steps:1. Press the appliance ON/OFF button for 5 seconds.2. The display switches off.3. To disconnect the appliance from the power disconnect the mains plug from the power socket. Switching off the fridge To switch off the fridge:1. Press the Mode b...
Page 9 - Press the Mode button until the corresponding icon appears.; Child Lock function; The Child Lock indicator is shown.; High temperature alarm; seconds. Then show again the set temperature.
1. Press the Mode button until the corresponding icon appears. The Minute Minder indicator flashes.The Timer shows the set value (30 minutes) for a few seconds. 2. Press the Fridge Temperature button to change the Timer set value from 1 to 90 mi - nutes. 3. Press the OK button to confirm. The Minute...
Page 10 - The COOLMATIC indicator flashes.; Holiday function; The Holiday indicator is shown.
Door open alarm An acoustic alarm will sound if the fridge door is left open for a few minutes. The door open alarm conditions are indicated by:• flashing Alarm indicator• acoustic buzzer When normal conditions are restored (door closed), the alarm will stop. COOLMATIC function If you need to insert...
Page 11 - FIRST USE; Cleaning the interior
DYNAMICAIR function To switch on the function:1. Press the Mode button until the corresponding icon appears. The DYNAMICAIR indicator flashes. 2. Press the OK button to confirm. The DYNAMICAIR indicator is shown. To switch off the function:1. Press the Mode button until the DYNAMICAIR indicator flas...
Page 12 - DAILY USE; Storage of frozen food
DAILY USE Storage of frozen food When first starting-up or after a period out of use, before putting the products in the com - partment let the appliance run at least 2 hours on the higher settings.In the event of accidental defrosting, for example due to a power failure, if the power has been off f...
Page 15 - Removal of freezing baskets from the freezer; HELPFUL HINTS AND TIPS; Normal Operating Sounds; through the coils or tubing. This is correct.; Hints for energy saving; Helpful hints and tips
Removal of freezing baskets from the freezer 1 2 2 1 The freezing baskets have a limit stop to prevent their accidental removal or falling out. At the time of its removal from the freezer, pull the basket towards yourself and, upon reaching the end point, remove the basket by tilting its front upwar...
Page 16 - CARE AND CLEANING
Meat (all types) : wrap in polythene bags and place on the glass shelf above the vegetable drawer. For safety, store in this way only one or two days at the most. Cooked foods, cold dishes, etc..: these should be covered and may be placed on any shelf. Fruit and vegetables: these should be thoroughl...
Page 18 - Defrosting of the freezer; ment, driven by an automatically controlled fan.; WHAT TO DO IF...; Before troubleshooting, disconnect the power supply.; What to do if...
Defrosting of the freezer The freezer compartment of this model, on the other hand, is a "no frost" type. This means that there is no buildup of frost when it is in operation, neither on the internal walls nor on the foods. The absence of frost is due to the continuous circulation of cold ai...
Page 19 - Closing the door
Problem Possible cause Solution Water flows on the ground. The melting water outlet does not flow in the evaporative tray above the compressor. Attach the melting water outlet to the evaporative tray. There is too much frost and ice. Products are not wrapped prop - erly. Wrap the products better. Th...
Page 20 - TECHNICAL DATA; appliance and in the energy label.; INSTALLATION; ance before installing the appliance.; Positioning; mate class indicated on the rating plate of the appliance:; Technical data
TECHNICAL DATA Dimension Height 1850 mm Width 595 mm Depth 658 mm Rising Time 18 h Voltage 230 - 240 V Frequency 50 Hz The technical information are situated in the rating plate on the internal left side of the appliance and in the energy label. INSTALLATION WARNING! Read the "Safety Information...
Page 24 - ENVIRONMENTAL CONCERNS
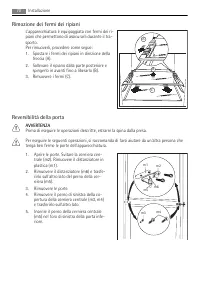
10. Install the handle in the opposite side. Re-screw the handle bracket on the door (h4). Turn the handle bracket with the handle and screw them to the door (h5) and the fitted handle bracket (h6). 11. Re-insert the lower door on the lower hinge pivot (b2). 12. Insert the middle hinge (m2) into the...
Page 25 - Visitez la boutique en ligne sur
POUR DES RÉSULTATS PARFAITS Merci d'avoir choisi ce produit AEG. Nous l'avons créé pour vous offrir la meilleure performance pour une longue durée, avec des technologies innovantes qui vous simplifient la vie - autant de caractéristiques que vous ne trouverez pas sûrement pas sur d'autres appareils....
Page 26 - SOMMAIRE
SOMMAIRE 27 Consignes de sécurité 30 Bandeau de commande 35 Première utilisation 35 Utilisation quotidienne 38 Conseils utiles 40 Entretien et nettoyage 41 En cas d'anomalie de fonctionnement 43 Caractéristiques techniques 44 Installation 48 En matière de sauvegarde de l'environnement Les symboles s...
Page 27 - CONSIGNES DE SÉCURITÉ; avec son fonctionnement et sa sécurité.; Sécurité des enfants et des personnes vulnérables; des enfants ne restent enfermés à l'intérieur.; Consignes générales de sécurité; AVERTISSEMENT; pour accélérer le processus de dégivrage.
CONSIGNES DE SÉCURITÉ Pour votre sécurité et garantir une utilisation correcte de l'appareil, lisez attentivement cet - te notice, y compris les conseils et avertissements, avant d'installer et d'utiliser l'appareil pour la première fois. Pour éviter toute erreur ou accident, veillez à ce que toute ...
Page 28 - Utilisation quotidienne; Consignes de sécurité
• Le circuit frigorifique de l’appareil contient de l’isobutane (R600a), un gaz naturel offrant un haut niveau de compatibilité avec l’environnement mais qui est néanmoins inflam - mable.Pendant le transport et l'installation de votre appareil, assurez-vous qu'aucune partie du circuit frigorifique n...
Page 30 - Protection de l'environnement; BANDEAU DE COMMANDE; Affichage
Protection de l'environnement Le système frigorifique et l'isolation de votre appareil ne contiennent pas de C.F.C. contri - buant ainsi à préserver l'environnement. L'appareil ne doit pas être mis au rebut avec les ordures ménagères et les déchets urbains. La mousse d'isolation contient des gaz inf...
Page 33 - Le voyant Sécurité enfants apparaît.; Alarme haute température; tionnement soient rétablies.; Alarme porte ouverte; déjà stockées dans le réfrigérateur.
2. Le voyant Sécurité enfants clignote.3. Appuyez sur la touche OK pour confirmation. Le voyant Sécurité enfants apparaît. Pour désactiver la fonction :1. Appuyez sur la touche Mode jusqu'à ce que le voyant Sécurité enfants clignote.2. Appuyez sur la touche OK pour confirmation.3. Le voyant Sécurité...
Page 35 - Cette fonction s'arrête automatiquement au bout de 52 heures.; PREMIÈRE UTILISATION; Nettoyage intérieur; UTILISATION QUOTIDIENNE; Conservation des aliments congelés; cuisson est plus longue.
L'indicateur FROSTMATIC s'affiche. Cette fonction s'arrête automatiquement au bout de 52 heures. Pour désactiver la fonction avant sa désactivation automatique :1. Appuyez sur la touche Mode jusqu'à ce que l'indicateur FROSTMATIC clignote.2. Appuyez sur la touche OK pour confirmer.3. L'indicateur FR...
Page 38 - Retrait des paniers de congélation du congélateur; CONSEILS UTILES; Bruits de fonctionnement normaux; phénomène normal et sans gravité. Ce phénomène est normal.; Conseils pour la réfrigération de denrées fraîches; Conseils utiles
Retrait des paniers de congélation du congélateur 1 2 2 1 Les paniers de congélation sont équipés d'un arrêt afin d'empêcher leur retrait accidentel ou leur chute. Pour retirer le panier du compartiment congélateur, tirez-le vers vous et, lorsque vous atteignez le point d'arrêt, retirez-le en inclin...
Page 40 - • respecter la durée de conservation indiquée par le fabricant.; ENTRETIEN ET NETTOYAGE; ATTENTION; Nettoyage périodique; te accumulation de déchets.; Dégivrage du réfrigérateur; Entretien et nettoyage
• respecter la durée de conservation indiquée par le fabricant. ENTRETIEN ET NETTOYAGE ATTENTION débrancher l'appareil avant toute opération d'entretien. Cet appareil contient des hydrocarbures dans son circuit réfrigérant : l'entretien et la re - charge ne doivent donc être effectués que par du per...
Page 41 - Dégivrage du congélateur; EN CAS D'ANOMALIE DE FONCTIONNEMENT
Il est important de nettoyer régulièrement l'orifice d'écoulement de la gouttière d'évacuation de l'eau de dégivrage située au milieu du compartiment réfrigérateur pour empêcher l'eau de déborder et de couler sur les aliments qui se trouvent à l'inté - rieur. Nettoyez l'orifice d'écoulement de l'eau...
Page 42 - En cas d'anomalie de fonctionnement
Problème Cause possible Solution La température du produit est trop élevée. Laissez le produit revenir à tem - pérature ambiante avant de le placer dans l'appareil. La température ambiante est trop élevée. Réduisez la température ambian - te. La fonction FROSTMATIC est ac - tivée. Consultez le parag...
Page 43 - Fermeture de la porte; CARACTÉRISTIQUES TECHNIQUES; Caractéristiques techniques
Problème Cause possible Solution L'appareil ne fonctionne pas. L'appareil est à l'arrêt. Remettez en fonctionnement l'appareil. La fiche du cordon d’alimenta - tion n'est pas correctement branchée à la prise de courant. Branchez correctement la fiche du cordon d’alimentation dans la prise de courant...
Page 44 - Emplacement; Branchement électrique
INSTALLATION AVERTISSEMENT Pour votre sécurité et le bon fonctionnement de l'appareil, veuillez lire attentivement les "Consignes de sécurité" avant d'installer l'appareil. Emplacement Installez cet appareil à un endroit où la température ambiante correspond à la classe clima - tique indiqué...
Page 45 - Entretoises arrière; Vous trouverez les deux filtres dans le sac avec la; Mise à niveau; des deux pieds réglables se trouvant à l'avant de
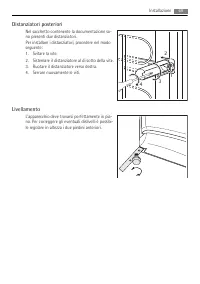
Entretoises arrière Vous trouverez les deux filtres dans le sac avec la documentation. Pour installer les filtres, procédez comme suit :1. Desserrez la vis.2. Insérez le filtre sous la vis.3. Tournez le filtre dans la bonne position.4. Resserrez les vis. Mise à niveau Lors de la mise en place de l'a...
Page 48 - EN MATIÈRE DE SAUVEGARDE DE L'ENVIRONNEMENT
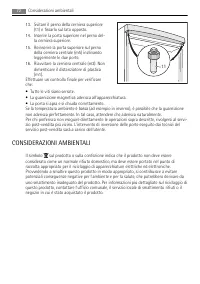
13. Dévissez le gond de la charnière supéri - eure (t1) et placez-le sur le côté opposé. 14. Installez la porte supérieure sur le gond supérieur. 15. Replacez la porte supérieure sur le gond de la charnière centrale (m5) en incli - nant légèrement les deux portes. 16. Revissez la charnière centrale ...
Page 49 - Visitate il webshop su
PER RISULTATI PERFETTI Grazie per aver scelto di acquistare questo prodotto AEG. Lo abbiamo creato per fornirvi prestazioni impeccabili per molti anni, grazie a tecnologie innovative che vi semplificheranno la vita - funzioni che non troverete sui normali elettrodomestici. Vi invitiamo di dedicare q...
Page 50 - INDICE
INDICE 51 Informazioni per la sicurezza 54 Pannello dei comandi 59 Primo utilizzo 59 Utilizzo quotidiano 62 Consigli e suggerimenti utili 64 Pulizia e cura 65 Cosa fare se… 67 Dati tecnici 68 Installazione 72 Considerazioni ambientali In questo manuale sono riportati i seguenti simboli: Informazioni...
Page 51 - INFORMAZIONI PER LA SICUREZZA; Sicurezza dei bambini e delle persone fragili; AVVERTENZA
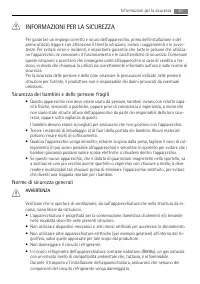
INFORMAZIONI PER LA SICUREZZA Per garantire un impiego corretto e sicuro dell'apparecchio, prima dell'installazione e del primo utilizzo leggere con attenzione il libretto istruzioni, inclusi i suggerimenti e le avver - tenze. Per evitare errori e incidenti, è importante garantire che tutte le perso...
Page 52 - della luce in; Uso quotidiano; Informazioni per la sicurezza
In caso di danneggiamento del circuito refrigerante:– Evitare fiamme libere e scintille– Aerare bene il locale in cui si trova l'apparecchiatura • È pericoloso cambiare le specifiche o modificare il prodotto in qualunque modo. Un dan - neggiamento del cavo potrebbe provocare cortocircuiti, incendi e...
Page 54 - PANNELLO DEI COMANDI; Accensione
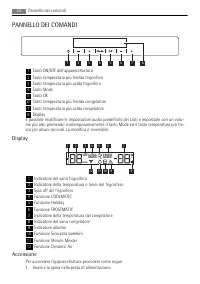
PANNELLO DEI COMANDI 1 2 3 4 5 6 7 8 1 Tasto ON/OFF dell'apparecchiatura 2 Tasto temperatura più fredda frigorifero 3 Tasto temperatura più calda frigorifero 4 Tasto Mode 5 Tasto OK 6 Tasto temperatura più fredda congelatore 7 Tasto temperatura più calda congelatore 8 Display È possibile modificare ...
Page 55 - regolatori temperatura.
2. Premere il tasto ON/OFF se il display è spento.3. Il segnale acustico d'allarme potrebbe attivarsi dopo alcuni secondi. Per resettare l'allarme, consultare la sezione "Allarme di alta temperatura". 4. Se "dEMo" appare sul display, l'apparecchiatura si trova in modalità dimostrazio...
Page 56 - Viene visualizzato l'indicatore Sicurezza Bambini.; Allarme di alta temperatura; Pannello dei comandi
Dopo un'interruzione di corrente la temperatura impostata rimane in memoria. Funzione Minute Minder La Minute Minder funzione deve essere usata per impostare un segnale acustico in un pre - ciso momento, utile per esempio quando una pietanza richiede il raffreddamento di alimen - ti misti per un cer...
Page 57 - La spia COOLMATIC viene visualizzata.; Funzione Holiday
• lampeggiamento degli indicatori di allarme e della temperatura del congelatore• emissione di un segnale acustico. Per resettare l'allarme:1. Premere un tasto qualsiasi.2. Il segnale acustico si spegne.3. L'indicatore della temperatura del congelatore visualizza per alcuni secondi la tempera - tura...
Page 58 - Funzione DYNAMICAIR; La spia DYNAMICAIR viene visualizzata.; Funzione FROSTMATIC; La spia FROSTMATIC viene visualizzata.
L'indicatore Holiday lampeggia.L'indicatore della temperatura del frigorifero visualizza la temperatura impostata. 2. Premere il tasto OK per confermare. Viene visualizzato l'indicatore Holiday. Per disattivare la funzione:1. Premere il tasto Mode fino a quando l'indicatore Holiday non lampeggia.2. ...
Page 59 - Conservazione dei surgelati
PRIMO UTILIZZO Pulizia dell'interno Prima di utilizzare l'apparecchio per la prima volta, lavare l'interno e gli accessori interni con acqua tiepida e un po' di sapone neutro in modo a togliere il tipico odore dei prodotti nuovi, quindi asciugare accuratamente.Non usare detergenti corrosivi o polver...
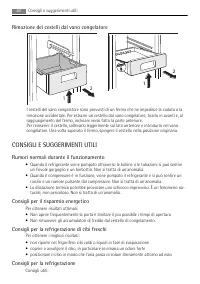
Page 62 - Rimozione dei cestelli dal vano congelatore; CONSIGLI E SUGGERIMENTI UTILI; Rumori normali durante il funzionamento; un fievole gorgoglio e un borbottio. Non si tratta di un'anomalia.; Consigli per il risparmio energetico; Consigli e suggerimenti utili
Rimozione dei cestelli dal vano congelatore 1 2 2 1 I cestelli del vano congelatore sono provvisti di un fermo che ne impedisce la caduta o la rimozione accidentale. Per estrarre un cestello dal vano congelatore, tirarlo in avanti e, al raggiungimento del fermo, inclinare verso l'alto la parte anter...
Page 64 - PULIZIA E CURA; ATTENZIONE; Pulizia periodica; Pulizia e cura
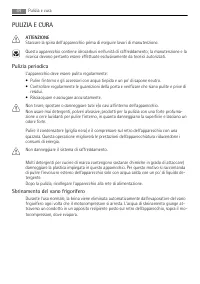
PULIZIA E CURA ATTENZIONE Staccare la spina dell'apparecchio prima di eseguire lavori di manutenzione. Questo apparecchio contiene idrocarburi nell'unità di raffreddamento; la manutenzione e la ricarica devono pertanto essere effettuate esclusivamente da tecnici autorizzati. Pulizia periodica L'appa...
Page 65 - Sbrinamento del vano congelatore; COSA FARE SE...
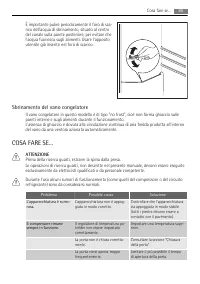
È importante pulire periodicamente il foro di sca - rico dell'acqua di sbrinamento, situato al centro del canale sulla parete posteriore, per evitare che l'acqua fuoriesca sugli alimenti. Usare l'apposito utensile già inserito nel foro di scarico. Sbrinamento del vano congelatore Il vano congelatore...
Page 66 - Cosa fare se...
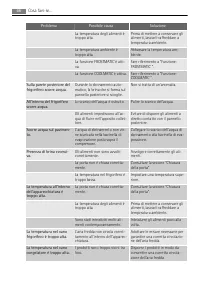
Problema Possibile causa Soluzione La temperatura degli alimenti è troppo alta. Prima di mettere a conservare gli alimenti, lasciarli raffreddare a temperatura ambiente. La temperatura ambiente è troppo alta. Abbassare la temperatura am - biente. La funzione FROSTMATIC è atti - va. Fare riferimento ...
Page 67 - Chiusura della porta; DATI TECNICI; Dati tecnici
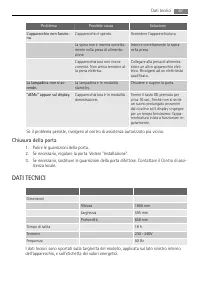
Problema Possibile causa Soluzione L'apparecchio non funzio- na. L'apparecchio è spento. Accendere l’apparecchiatura. La spina non è inserita corretta - mente nella presa di alimenta - zione. Inserire correttamente la spina nella presa. L'apparecchiatura non riceve corrente. Non arriva tensione al -...
Page 68 - INSTALLAZIONE; Posizionamento; Posizione; Collegamento elettrico
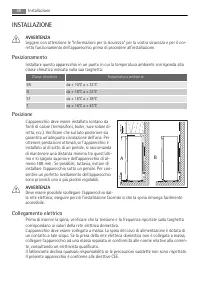
INSTALLAZIONE AVVERTENZA Leggere con attenzione le "Informazioni per la sicurezza" per la vostra sicurezza e per il cor - retto funzionamento dell'apparecchio prima di procedere all'installazione. Posizionamento Installare questo apparecchio in un punto in cui la temperatura ambiente corrisp...
Page 72 - CONSIDERAZIONI AMBIENTALI
13. Svitare il perno della cerniera superiore (t1) e fissarlo sul lato opposto. 14. Inserire la porta superiore nel perno del - la cerniera superiore. 15. Reinserire la porta superiore sul perno della cerniera centrale (m5) inclinando leggermente le due porte. 16. Riavvitare la cerniera centrale (m2...