Page 2 - CUSTOMER CARE AND SERVICE; SAFETY INFORMATION
CONTENTS 1. SAFETY INFORMATION............................................................................................. 2 2. SAFETY INSTRUCTIONS.............................................................................................4 3. CONTROL PANEL............................................
Page 4 - SAFETY INSTRUCTIONS; Installation
• If the supply cord is damaged, it must be replaced by the manufacturer, its Authorised Service Centre or similarly qualified persons in order to avoid a hazard. 2. SAFETY INSTRUCTIONS 2.1 Installation WARNING! Only a qualified person must install this appliance. • Remove all the packaging and the ...
Page 5 - CONTROL PANEL
• Do not store flammable gas and liquid in the appliance. • Do not put flammable products or items that are wet with flammable products in, near or on the appliance. • Do not touch the compressor or the condenser. They are hot. • Do not remove or touch items from the freezer compartment if your hand...
Page 7 - DAILY USE; CARE AND CLEANING
4. DAILY USE 4.1 Freezing fresh food The freezer compartment is suitable for freezing fresh food and storing frozen and deep-frozen food for a long time.To freeze fresh food activate the FROSTMATIC function at least 24 hours before placing the food to be frozen in the freezer compartment.Place the f...
Page 8 - TROUBLESHOOTING
to remove the typical smell of a brand- new product, then dried thoroughly. CAUTION! Do not use detergents, abrasive powders, chlorine or oil-based cleaners as they will damage the finish. 5.2 Periodic cleaning CAUTION! Do not pull, move or damage any pipes and/or cables inside the cabinet. CAUTION!...
Page 10 - Replacing the lamp; INSTALLATION; Positioning
Problem Possible cause Solution Many food products werestored at the same time. Store less food products at thesame time. The FROSTMATIC functionis switched on. Refer to "FROSTMATIC func-tion". Side panels of the appli-ance are warm. This is a normal statecaused by operation of theheat excha...
Page 11 - Location; Levelling
7.2 Location It must be possible to disconnect the appliance from the mains power supply. The plug must therefore be easily accessible after installation. The appliance should be installed well away from sources of heat such as radiators, boilers, direct sunlight etc. Ensure that air can circulate f...
Page 13 - INFORMATIONS DE SÉCURITÉ; soigneusement les instructions fournies. Le fabricant ne
TABLE DES MATIÈRES 1. INFORMATIONS DE SÉCURITÉ............................................................................... 13 2. CONSIGNES DE SÉCURITÉ......................................................................................15 3. BANDEAU DE COMMANDE.......................................
Page 15 - CONSIGNES DE SÉCURITÉ
• Ne pulvérisez pas d'eau ni de vapeur pour nettoyer l'appareil. • Nettoyez l'appareil avec un chiffon doux humide. Utilisez uniquement des produits de nettoyage neutres. N'utilisez pas de produits abrasifs, de tampons à récurer, de solvants ni d'objets métalliques. • Ne conservez aucune substance e...
Page 17 - BANDEAU DE COMMANDE; Mise en marche
3. BANDEAU DE COMMANDE 1 2 3 4 1 Échelle de température 2 Symbole ECO 3 Symbole FROSTMATIC 4 Touche de température 3.1 Mise en marche 1. Branchez l'appareil à une prise de courant. 2. Pour mettre l'appareil en marche, appuyez sur la touche de température jusqu'à ce que tous les voyants s'allument. L...
Page 18 - UTILISATION QUOTIDIENNE
mode, appuyez sur la touche de température. 3.5 Mode ECO Avec ce mode, la température est réglée entre +3 °C et +4 °C. Il s'agit de la meilleure température pour garantir une bonne conservation des aliments et une consommation d'énergie minimale. Pour activer le mode ECO, appuyez à plusieurs reprise...
Page 19 - ENTRETIEN ET NETTOYAGE
Si vous devez stocker une grande quantité d'aliments, retirez tous les tiroirs et placez directement les aliments sur les clayettes en verre pour obtenir des performances optimales. En cas de décongélation accidentelle, due par exemple à une coupure de courant, si la coupure a duré plus longtemps qu...
Page 20 - EN CAS D'ANOMALIE DE FONCTIONNEMENT; En cas d'anomalie de fonctionnement
2. Vérifiez régulièrement les joints de porte et essuyez-les pour vous assurer qu'ils sont propres et ne contiennent pas de résidus. 3. Rincez et séchez soigneusement. 4. S'ils sont accessibles, nettoyez le condenseur et le compresseur situés à l'arrière de l'appareil avec une brosse. Cette opératio...
Page 22 - Remplacement de
Problème Cause probable Solution Trop de produits ont été in-troduits simultanément. Introduisez moins de produitsen même temps. La fonction FROSTMATICest activée. Consultez le paragraphe« Fonction FROSTMATIC ». Les parois de l'appareil sontchaudes. Il s'agit d'un phénomènenormal dû au fonctionne-me...
Page 23 - Emplacement; Mise de niveau
Classeclimati-que Température ambiante N +16 °C à + 32 °C ST +16 °C à + 38 °C T +16 °C à + 43 °C 7.2 Emplacement L'appareil doit pouvoir être débranché de l'alimentation électrique. C'est pourquoi la prise électrique doit être facilement accessible après l'installation. L'appareil ne doit pas être i...
Page 24 - DONNÉES TECHNIQUES; EN MATIÈRE DE PROTECTION DE
Un technicien du service après-vente agréé procédera à la réversibilité de la porte à vos frais. 8. DONNÉES TECHNIQUES Hauteur 1850 mm Largeur 595 mm Profondeur 647 mm Autonomie de fonction-nement 18 h Tension 230 - 240 V Fréquence 50 Hz Les caractéristiques techniques figurent sur la plaque signalé...
Page 25 - REPARATUR- UND KUNDENDIENST; SICHERHEITSHINWEISE; Lesen Sie vor der Montage und dem Gebrauch des
INHALTSVERZEICHNIS 1. SICHERHEITSHINWEISE........................................................................................... 25 2. SICHERHEITSANWEISUNGEN.................................................................................27 3. BEDIENFELD.............................................
Page 27 - SICHERHEITSANWEISUNGEN; Montage
• Reinigen Sie das Gerät nicht mit einem Wasser- oder Dampfstrahl. • Reinigen Sie das Gerät mit einem weichen, feuchten Tuch. Verwenden Sie ausschließlich Neutralreiniger. Benutzen Sie keine Scheuermittel, scheuernde Reinigungsschwämmchen, Lösungsmittel oder Metallgegenstände. • Bewahren Sie in dem ...
Page 29 - BEDIENFELD; Einschalten des Geräts
• Der Kältekreislauf und die Isolierungsmaterialien dieses Gerätes sind ozonfreundlich. • Die Isolierung enthält entzündliches Gas. Für Informationen zur korrekten Entsorgung des Gerätes wenden Sie sich an Ihre kommunale Behörde. • Achten Sie darauf, dass die Kühleinheit in der Nähe des Wärmetausche...
Page 30 - TÄGLICHER GEBRAUCH; Einfrieren frischer
Inneren des Geräts von folgenden Faktoren abhängt: • Raumtemperatur • Häufigkeit der Türöffnung • Menge der gelagerten Lebensmittel • Aufstellungsort des Geräts. 3.4 Stromsparmodus der Anzeige Vergehen 30 Sekunden ohne Aktivität am Gerät, schaltet die Anzeige wieder auf den Sparmodus um. Nur die LED...
Page 31 - REINIGUNG UND PFLEGE
Unter diesen Umständen kann die Temperatur im Kühlschrank unter 0 °C fallen. Ist dies der Fall, drehen Sie den Temperaturregler auf eine wärmere Einstellung. 4.2 Lagern von gefrorenen Lebensmitteln Lassen Sie das Gerät vor der ersten Inbetriebnahme oder nach einer Zeit, in der das Gerät nicht benutz...
Page 32 - FEHLERSUCHE
5.2 Regelmäßige Reinigung VORSICHT! Ziehen Sie nicht an Leitungen und/oder Kabeln im Innern des Geräts und achten Sie darauf, diese nicht zu verschieben oder zu beschädigen. VORSICHT! Bitte achten Sie darauf, das Kühlsystem nicht zu beschädigen. VORSICHT! Wenn Sie das Gerät verschieben möchten, hebe...
Page 35 - Austauschen der Lampe; MONTAGE; Aufstellung; Standort
Bitte wenden Sie sich an den nächsten autorisierten Kundendienst, wenn alle genannten Abhilfemaßnahmen nicht zum gewünschten Erfolg führen. 6.2 Austauschen der Lampe Das Gerät ist mit einer langlebigen LED- Innenbeleuchtung ausgestattet. Die Beleuchtung darf nur von einer Fachkraft ausgetauscht werd...
Page 36 - TECHNISCHE DATEN
7.3 Ausrichten Bei der Aufstellung des Geräts ist dieses waagerecht auszurichten. Dies lässt sich mit zwei Schraubfüßen am vorderen Sockel des Gerätes erreichen. 7.4 Elektrischer Anschluss • Kontrollieren Sie vor der ersten Benutzung des Geräts, ob die Netzspannung und -frequenz Ihres Hausanschlusse...
Page 37 - SERVIZIO CLIENTI E MANUTENZIONE; INFORMAZIONI DI SICUREZZA; Leggere attentamente le istruzioni fornite prima di
INDICE 1. INFORMAZIONI DI SICUREZZA............................................................................... 37 2. ISTRUZIONI DI SICUREZZA...................................................................................... 39 3. PANNELLO COMANDI..................................................
Page 39 - ISTRUZIONI DI SICUREZZA; Installazione
• Non nebulizzare acqua né utilizzare vapore per pulire l'apparecchiatura. • Pulire l'apparecchiatura con un panno inumidito e morbido. Utilizzare solo detergenti neutri. Non usare prodotti abrasivi, spugnette abrasive, solventi od oggetti metallici. • Non conservare in questa apparecchiatura sostan...
Page 41 - PANNELLO COMANDI; Accensione
• Non danneggiare i componenti dell'unità refrigerante che si trovano vicino allo scambiatore di calore. 3. PANNELLO COMANDI 1 2 3 4 1 Scala della temperatura 2 Icona modalità ECO 3 Icona FROSTMATIC 4 Tasto temperatura 3.1 Accensione 1. Collegare l'apparecchiatura all'alimentazione. 2. Per accendere...
Page 42 - UTILIZZO QUOTIDIANO; Congelamento di alimenti
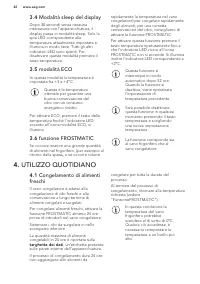
3.4 Modalità sleep del display Dopo 30 secondi senza nessuna interazione con l'apparecchiatura, il display passa in modalità sleep. Solo la spia LED corrispondente alla temperatura attualmente impostata si illumina in modo lieve. Tutti gli altri indicatori LED sono spenti. Per disattivare questa mod...
Page 43 - PULIZIA E CURA
4.2 Conservazione dei surgelati Al primo avvio o dopo un periodo di non utilizzo, lasciare in funzione l'apparecchiatura per almeno 2 ore attivando la funzione FROSTMATIC prima di introdurre gli alimenti.Per conservare grandi quantità di cibo, togliendo dall'apparecchiatura tutti i cassetti e sistem...
Page 44 - RISOLUZIONE DEI PROBLEMI
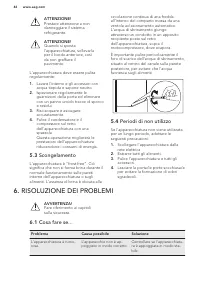
ATTENZIONE! Prestare attenzione a non danneggiare il sistema refrigerante. ATTENZIONE! Quando si sposta l'apparecchiatura, sollevarla per il bordo anteriore, così da non graffiare il pavimento. L'apparecchiatura deve essere pulita regolarmente: 1. Lavare l'interno e gli accessori con acqua tiepida e...
Page 46 - Sostituzione della
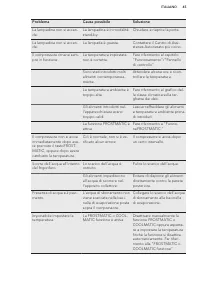
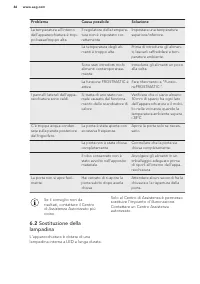
Problema Causa possibile Soluzione La temperatura all'internodell'apparecchiatura è trop-po bassa/troppo alta. Il regolatore della tempera-tura non è impostato cor-rettamente. Impostare una temperaturasuperiore/inferiore. La temperatura degli ali-menti è troppo alta. Prima di introdurre gli alimen-t...
Page 47 - INSTALLAZIONE; Luogo d'installazione; Luogo di utilizzo; Livellamento
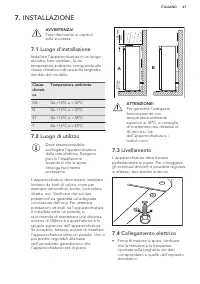
7. INSTALLAZIONE AVVERTENZA! Fare riferimento ai capitoli sulla sicurezza. 7.1 Luogo d'installazione Installare l'apparecchiatura in un luogo asciutto, ben ventilato, la cui temperatura ambiente corrisponda alla classe climatica indicata sulla targhetta dei dati del modello: Classeclimati-ca Tempera...
Page 48 - DATI TECNICI
• L'apparecchiatura deve disporre di una messa a terra. La spina del cavo di alimentazione è dotata di un apposito contatto. Se la presa di corrente dell'impianto domestico non è collegata a terra, allacciare l'apparecchiatura a una presa di terra separata in conformità alle norme in vigore, rivolge...