Page 2 - УКРАЇНСЬКА; Зміст; Inhalt
2 3 Deutsch Inhalt Übersicht der Bedienelemente ................................... Seite 3 Bedienungsanleitung ..................................................... Seite 4 Technische Daten ............................................................. Seite 8 Garantiebedingungen ......................
Page 3 - Übersicht der Bedienelemente; Розташування органів керування
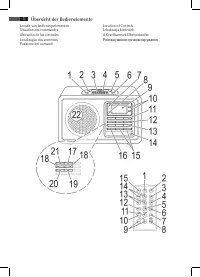
2 3 Übersicht der Bedienelemente Locatie van bedieningselementen Situation des commandes Ubicación de los controles Localização dos controlos Posizione dei comandi Location of Controls Lokalizacja kontrolek A Kezelőszervek Elhelyezkedése Розташування органів керування
Page 4 - Deutsch; Allgemeine Sicherheitshinweise; Kinder und gebrechliche Personen
4 Deutsch Allgemeine Sicherheitshinweise Lesen Sie vor Inbetriebnahme dieses Gerätes die Bedie- nungsanleitung sehr sorgfältig durch und bewahren Sie diese inkl. Garantieschein, Kassenbon und nach Möglich- keit den Karton mit Innenverpackung gut auf. Falls Sie das Gerät an Dritte weitergeben, geben ...
Page 5 - Rückseite; Inbetriebnahme des Gerätes/Einführung; Stromversorgung
5 Deutsch Rückseite (ohne Abbildung) AUX IN Buchse Fernbedienung 1 FUNC Funktionswahltaste 2 DISPLAY Taste 3 (Wiedergabe/Pause) Taste 4 CLK-ADJ/MEM Taste 5 BAND/i-MENU Taste 6 i-REPEAT/ Taste 7 SNOOZE Taste 8 EQ Taste 9 VOLUME+/VOLUME- (Lautstärke) Tasten 10 ALARM 1 Taste 11 ALARM 2 Taste 12 i-ENTER...
Page 6 - iPod Kompatibilität; Lautstärke; Sendereinstellung; nicht
6 Deutsch iPod Kompatibilität Aufgrund der vielen verschiedenen iPod-Modelle und Generationen, die zurzeit auf dem Markt erhältlich sind, kann eine volle Kompatibilität nicht gewährleistet werden. Vergewissern Sie sich vor Anschluss Ihres iPod davon, dass dieser eine kompatible Schnittstelle besitzt...
Page 7 - Weckfunktion ausschalten; Musik vom iPod wiedergeben
7 Deutsch Modus des iPods. Die Lautstärke steigt langsam an. HINWEIS: • Beachten Sie die Bedienungsanleitung Ihres iPods, um den gewünschten Modus auszuwählen. • Wurde kein iPod angeschlossen, schaltet das Gerät automatisch auf die TUNER Funktion. • Abschließend wählen Sie nun mit den / Tasten die L...
Page 8 - iPod Ladefunktion; Konformitätserklärung
8 Deutsch i-REPEAT/ (6 an der FB) Zum Aktivieren der Wiederholfunktion. i-MENU/BAND (19/5) Drücken Sie diese Taste, um das iPod Menü aufzurufen bzw. in das vorherige Menü zurückzukehren. i-ENTER (13/12) Drücken Sie diese Taste, um eine Funktion zu aktivieren bzw. um das nächste Menü anzeigen zu lass...
Page 9 - Garantieabwicklung
9 Deutsch zur Erbringung der Garantieleistungen zur Verfügung gestellt werden. 3. Mängel müssen innerhalb von 14 Tagen nach Erkenn- barkeit uns gegenüber schriftlich angezeigt werden. Besteht der Garantieanspruch zu Recht, entscheiden wir, auf welche Art der Schaden/Mangel behoben werden soll, ob du...
Page 10 - NEDERLANDS; Algemene veiligheidsrichtlijnen; Kinderen en gehandicapten; Locatie van bedieningselementen; Achterzijde
10 NEDERLANDS Algemene veiligheidsrichtlijnen Lees deze gebruiksaanwijzing zorgvuldig door voordat u dit apparaat in gebruik neemt, en bewaar hem samen met het Garantiecertificaat, het aankoopbewijs en, indien mo- gelijk, de originele verpakking inclusief het materiaal in de doos. Als u het apparaat...
Page 11 - Afstandsbediening; Eerste gebruik van het apparaat/inleiding; Voeding; geen
11 NEDERLANDS Afstandsbediening 1 FUNC functieselectietoets 2 DISPLAY toets 3 (afspelen/onderbreken) toets 4 CLK-ADJ/MEM toets 5 BAND/i-MENU toets 6 i-REPEAT/ toets7 SNOOZE toets 8 EQ toets 9 VOLUME+/VOLUME- geluidsniveau-toetsen 10 ALARM 1 toets 11 ALARM 2 toets 12 i-ENTER toets 13 i-SCROLL/PRESET ...
Page 12 - iPod compatibiliteit; Helderheid scherm; Radio afstemmen; niet
12 NEDERLANDS iPod compatibiliteit Doordat er tegenwoordig allerlei verschillende iPod- modellen en generaties op de markt zijn, kan volledige compatibiliteit niet gegarandeerd worden. Controleer dat uw iPod met dit apparaat gebruikt kan worden voordat u de iPod aansluit. Er kan ook niet gegarandeer...
Page 13 - Wekker uitschakelen; Muziekweergave via de iPod
13 NEDERLANDS OPMERKING: • Raadpleeg de gebruiksaanwijzing van uw iPod om de gewenste stand in te stellen. • Als er geen iPod is aangesloten, wekt het apparaat u met de TUNER. • Gebruik nu de / toetsen om het geluidsniveau van het weksignaal in te stellen. • Druk op de ALARM 1 of ALARM 2 toets. De i...
Page 14 - iPod opladen; Betekenis van het vuilnisbak-symbool
14 NEDERLANDS i-REPEAT/ (6 op de afstandsbediening) Activeert de herhaalfunctie. i-MENU/BAND (19/5) Druk op deze toets om het iPodmenu te openen, of om terug te keren naar het vorige menu. i-ENTER (13/12) Druk op deze toets om een functie te activeren of om het volgende menu te openen. / i-SCROLL / ...
Page 15 - FRANÇAIS; Indications générales de sécurité; Enfants et personnes invalides; Situation des commandes; Panneau arrière
15 FRANÇAIS Indications générales de sécurité Avant d’utiliser cet appareil, lire attentivement ce manuel et le conserver avec le Certificat de Garantie, la facture et, si possible, l’emballage d’origine, y compris l’emballage interne. Si cet appareil est donné à une tierce personne, transmettre le ...
Page 16 - Télécommande; Première utilisation de l’appareil/Introduc-; Alimentation électrique; Compatibilité iPod
16 FRANÇAIS Télécommande 1 Touche de sélection des fonctions (FUNC) 2 Touche DISPLAY 3 Touche (Lecture/Pause) 4 Touche CLK-ADJ/MEM 5 Touche BAND/i-MENU 6 Touche i-REPEAT/ 7 Touche SNOOZE 8 Touche EQ 9 Touche de contrôle du volume VOLUME+/VOLUME- 10 Touche ALARM 1 11 Touche ALARM 2 12 Touche i-ENTER ...
Page 17 - Fonctionnement général; Luminosité de l’écran; Fréquence Radio; pas
17 FRANÇAIS Une entière compatibilité des fonctions de télécommande ne peut pas non plus être garantie. Si nécessaire, utiliser l’iPod de façon normale en le laissant branché à la station de Docking. Fonctionnement général NOTE: Certains boutons peuvent se trouver aussi bien sur l’appareil que sur l...
Page 18 - Eteindre le réveil; Désactivation du réveil; Lecture de musique avec un iPod
18 FRANÇAIS • Mettre l’appareil en mode veille avec la touche / (11/15). Eteindre le réveil Appuyer sur / pour éteindre le réveil jusqu’au lende- main. NOTE: Si la fonction Snooze est activée, appuyer deux fois sur / pour désactiver la fonction réveil jusqu’au jour suivant. Fonction Snooze (réveil r...
Page 19 - Chargement de l’iPod; Signification du symbole de “Poubelle à
19 FRANÇAIS Chargement de l’iPod La batterie de l’iPod se met en charge une fois l’iPod connecté au dock iPod. Pour cela, l’appareil doit être branché à l’alimentation. NOTE: • Utiliser l’adaptateur fourni avec l’iPod afin de garan- tir une bonne insertion de l’iPod. • Les différentes versions d’iPo...
Page 20 - ESPAÑOL; Normas generales de seguridad; Niños y personas discapacitadas; Ubicación de los controles; Parte trasera
20 ESPAÑOL Normas generales de seguridad Antes de usar este dispositivo, lea cuidadosamente este manual del usuario y consérvelo junto con el certificado de garantía, el recibo de compra y, si es posible, el emba- laje original, incluyendo el embalaje interno. Si entrega el dispositivo a terceros, i...
Page 21 - Primer uso del dispositivo/Introducción
21 ESPAÑOL Mando a distancia 1 Botón de selección de funcionamiento FUNC 2 Botón DISPLAY 3 Botón (Reproducir/Pausa) 4 Botón CLK-ADJ/MEM 5 Botón BAND/i-MENU 6 Botón i-REPEAT/ 7 Botón SNOOZE 8 Botón EQ 9 Botones de control de volumen VOLUME+/VOLUME- 10 Botón ALARM 1 11 Botón ALARM 2 12 Botón i-ENTER 1...
Page 22 - Compatibilidad con el iPod; Brillo de pantalla; Sintonizar radio; no
22 ESPAÑOL Compatibilidad con el iPod Debido al gran número de modelos y generaciones de iPod disponibles en el mercado en la actualidad, no podemos garantizar la compatibilidad con todos ellos. Antes de co- nectar su iPod, compruebe que la interfaz es compatible. Asimismo, tampoco podemos garantiza...
Page 23 - Apagar la alarma; Reproducir música del iPod; Descripción de los controles del iPod
23 ESPAÑOL • La reproducción de su iPod comenzará en el modo establecido a la hora de alarma estableci- da. El volumen aumentará lentamente. NOTA: • Siga el manual de su iPod para seleccionar el modo deseado. • Si no hay ningún iPod conectado, el dispo- sitivo le despertará en modo TUNER. • Por últi...
Page 24 - Carga de iPod; Significado del símbolo “cubo de basura”
24 ESPAÑOL i-ENTER (13/12) Pulse este botón para activar una función o para abrir el siguiente menú. / i-SCROLL / PRESET (10/14) Pulse estos botones para desplazarse hacia arriba o hacia abajo en el menú del iPod. Carga de iPod Después de conectar su iPod a la toma del iPod la batería del iPod se ca...
Page 25 - PORTUGUÊS; Directrizes gerais de segurança; Crianças e pessoas débeis; Localização dos controlos; Parte posterior
25 PORTUGUÊS Directrizes gerais de segurança Antes de utilizar este aparelho, leia atentamente este manual do utilizador e guarde-o juntamente com o Certificado de Garantia, o talão de compra e, tanto quanto possível, a embalagem original com os elementos interiores. Se puser o aparelho à disposição...
Page 26 - Primeira Utilização do Aparelho/Introdução
26 PORTUGUÊS Controlo Remoto 1 Botão de selecção de operação de FUNC 2 Botão DISPLAY 3 Botão (Reprodução/Pausa) 4 Botão CLK-ADJ/MEM 5 Botão BAND/i-MENU 6 Botão i-REPEAT/ 7 Botão SNOOZE 8 Botão EQ 9 Botões de controlo de volume VOLUME+/VOLUME- 10 Botão ALARM 1 11 Botão ALARM 2 12 Botão i-ENTER 13 Bot...
Page 27 - Compatibilidade iPod; Luminosidade do visor; Sintonização do rádio; não
27 PORTUGUÊS Compatibilidade iPod Dados os vários e diferentes modelos do iPod e as gerações actualmente disponíveis no mercado, não podemos garan- tir uma compatibilidade total. Antes de ligar o seu iPod, assegure-se de que tem uma ligação compatível. A compatibilidade total das funções do controlo...
Page 28 - Desligar O Alarme; Temporizador De Inactividade (botão SLEEP
28 PORTUGUÊS • Por fim, seleccione agora o volume do sinal do alarme através dos botões / . • Pressione os botões ALARM 1 ou ALARM 2, os indica- dores “ ” ou “ ” aparecem no ecrã. A primeira ou a segunda hora de despertar é activada. • Mude a unidade para o modo de espera utilizando o botão / (11/15...
Page 29 - Carregamento do iPod; Significado do símbolo “contentor do lixo”
29 PORTUGUÊS i-ENTER (13/12) Pressione este botão para activar uma função ou para apresentar o menu seguinte. / i-SCROLL / PRESET (10/14) Pressione estes botões para percorrer para cima ou para baixo o menu do iPod. Carregamento do iPod Ao ligar o iPod ao acoplamento de iPod, a bateria do iPod é car...
Page 30 - ITALIANO; Linee guida generali sulla sicurezza; Bambini e persone disabili; Posizione dei comandi; Lato posteriore
30 ITALIANO Linee guida generali sulla sicurezza Prima di usare questo dispositivo, leggere attentamente il manuale dell‘utente e conservarlo con il Certificato di Garanzia, lo scontrino e, se possibile, la confezione origi- nale. Se il dispositivo viene consegnato a terzi, consegnare anche il manua...
Page 31 - Prima messa in funzione del dispositivo/in-
31 ITALIANO 10 Tasto ALARM 1 11 Tasto ALARM 2 12 Tasto i-ENTER 13 Tasti i-SCROLL/PRESET / 14 Tasti TUNING /SKIP / (Ricerca avanti/Indietro) 15 Tasto / Prima messa in funzione del dispositivo/in- troduzione • Al primo utilizzo del dispositivo leggere attentamente il manuale. • Scegliere un luogo idon...
Page 32 - Luminosità del display; Sintonizzatore radio; non
32 ITALIANO Accendere/spegnere il dispositivo (11/15) Premendo il tasto / , è possibile mettere il dispositivo in modalità standby. La spia di standby si accende. Premendo nuovamente il tasto si accende il dispositivo. Luminosità del display È possibile selezionare o spegnere la luminosità del displ...
Page 33 - Funzione Snooze; Riproduzione musicale dall‘iPod; Caricamento dell‘iPod
33 ITALIANO Funzione Snooze Premere il tasto SNOOZE (3/7) per disattivare la sveglia per ca. 9 minuti. Disattivazione della sveglia • Per disattivare il primo orario di sveglia, premere il tasto ALARM 1 (6). L'indicatore “ ” compare sul display. • Per disattivare il secondo orario di sveglia, premer...
Page 34 - Pulizia; Significato del simbolo “Cassonetto con
34 ITALIANO Presa AUX IN (retro del dispositivo) Collegare qualsiasi altra fonte analogica. È anche possibile ascoltare altre unità di riproduzione come lettore MP3, lettore CD ecc. attraverso l‘altoparlante mediante questo jack.1. Collegare il dispositivo esterno tramite presa stereo 3,5mm alla pre...
Page 35 - ENGLISH; General Safety Guidelines; Children and disabled persons; Location of Controls; Back Side
35 ENGLISH General Safety Guidelines Before using this device, carefully read this user manual and keep it together with the Warranty Certificate, cashier receipt and if possible, the original package inclusive its interior packing. If you hand on the device to any third person, include the user man...
Page 36 - First Use of the Device/Introduction; Power supply; iPod Compatibility
36 ENGLISH 9 VOLUME+/VOLUME- volume control buttons 10 ALARM 1 button 11 ALARM 2 button 12 i-ENTER button 13 i-SCROLL/PRESET / buttons 14 TUNING /SKIP / buttons (search fwd/bwd) 15 / button First Use of the Device/Introduction • Before the first use of the device, read the user manual carefully. • S...
Page 37 - Radio Tuning
37 ENGLISH Switch device on/off (11/15) By pressing the / button, you can put the device into standby mode. The Standby lamp Lights up. Pressing the button again will switch the device on. Display brightness You can select or switch off the display brightness with the DIMMER button (2). Volume By pr...
Page 38 - Deactivate Alarm; Music Playback from iPod; not; iPod Charging
38 ENGLISH Deactivate Alarm • To deactivate the first wake-up time, press the ALARM 1 button (6). The indicator “ ” goes out on the display. • To deactivate the second wake-up time, press the ALARM 2 button (5). The indicator “ ” goes out on the display. NOTE: If you have activated the Snooze functi...
Page 39 - Cleaning; Meaning of the “Wheelie Bin” Symbol
39 ENGLISH 3. You will find further instructions in the manual of your external sound source. 4. You can listen to the playback from the external unit via the speaker. You can adjust the volume with the VOL(UME)+/VOL(UME)- volume buttons (15/9). NOTE: Set the volume of the external device to a reaso...
Page 40 - JĘZYK POLSKI; Generalne wskazówki dotyczące bezpieczeń-; Dzieci i osoby niepełnosprawne; Lokalizacja kontrolek; Tylna część
40 JĘZYK POLSKI Generalne wskazówki dotyczące bezpieczeń- stwa Przed użyciem urządzenia, należy dokładnie przeczytać podręcznik użytkowania i zachować go wraz z gwarancją, paragonem oraz w razie możliwości wraz z oryginalnym opakowaniem zawierającym wewnętrzne elementy. W razie przekazania urządzeni...
Page 41 - Pilot; Pierwsze użycie urządzenia/wprowadzenie; Zasilanie
41 JĘZYK POLSKI Pilot 1 FUNC – przycisk wyboru funkcji operacyjnej 2 Przycisk DISPLAY 3 przycisk ( odtwarzanie/pauz a) 4 Przycisk CLK-ADJ/MEM 5 Przycisk BAND/i-MENU 6 Przycisk i-REPEAT/ 7 Przycisk SNOOZE 8 Przycisk EQ 9 VOLUME+/VOLUME- przycisk sterowania głośnością 10 Przycisk ALARM 1 11 Przycisk A...
Page 42 - Zgodność odtwarzacza iPod; Jasność wyświetlacza; Strojenie radia; nie
42 JĘZYK POLSKI Zgodność odtwarzacza iPod Z uwagi na dostępność na rynku wielu różnych modeli i generacji odtwarzaczy iPod, nie można zapewnić pełnej zgodności. Przed podłączeniem odtwarzacza iPod należy sprawdzić, czy jego interfejs jest zgodny. Nie można także zagwarantować pełnej zgodności funkcj...
Page 43 - Wyłączenie alarmu; Timer funkcji sen (przycisk funkcji drzemka/
43 JĘZYK POLSKI WSKAZÓWKA: • Skorzystać z instrukcji IPoda, aby wybrać odpowiedni tryb. • Jeśli nie ma podłączonego iPoda, urządze- nie budzi w trybie TUNER. • Na koniec ustawić głośność alarmu za pomocą przyci- sku / . • Nacisnąć przycisk ALARM 1 lub ALARM 2; na wyświe- tlaczu pojawi się wskazanie ...
Page 44 - Ładowanie iPoda; Warunki gwarancji; Gwarancja nie obejmuje:
44 JĘZYK POLSKI i-MENU/BAND (19/5) Nacisnąć ten przycisk, aby wyświetlić menu odtwarzacza iPod lub wrócić do poprzedniego menu. i-ENTER (13/12) Nacisnąć ten przycisk, aby uaktywnić funkcję lub wyświe- tlić następne menu. / i-SCROLL / PRESET (10/14) Nacisnąć te przyciski, aby przewinąć w górę/w dół m...
Page 45 - Znaczenie symbolu „kubła na kółkach“
45 JĘZYK POLSKI zmiana napięcia zasilania i innych zdarzeń losowych, • nieprawidłowego ustawienia wartości napięcia elektrycznego, zasilanie z nieodpowiedniego gniazda zasilania, • sznurów połączeniowych, sieciowych, żarówek, baterii, akumulatorów, • uszkodzeń wyrobu powstałych w wyniku niewłaściweg...
Page 46 - MAGYARUL; Általános Biztonsági Rendszabályok; Gyermekek És Fogyatékkal Élő Személyek; A Kezelőszervek Elhelyezkedése; Hátlap
46 MAGYARUL Általános Biztonsági Rendszabályok A készülék használata előtt figyelmesen olvassa el a használati útmutatót és őrizze meg a garancialevéllel, a számlával és – amennyiben lehetséges – az eredeti cso- magolással, valamint a belső csomagolóanyaggal együtt. Amennyiben a készüléket harmadik ...
Page 47 - Első használat / Bevezetés
47 MAGYARUL Távirányító 1 FUNC funkcióválasztó gomb 2 DISPLAY gomb 3 (lejátszás/megállítás) gomb 4 CLK-ADJ/MEM gomb 5 BAND/i-MENU gomb 6 i-REPEAT/ gomb7 SNOOZE gomb 8 EQ gomb 9 VOLUME+/VOLUME- hangerőszabályozó gombok 10 ALARM 1 gomb 11 ALARM 2 gomb 12 i-ENTER gomb 13 i-SCROLL/PRESET / gombok 14 TUN...
Page 48 - iPod kompatibilitás; Kijelző fényereje; A Rádió Hangolása
48 MAGYARUL iPod kompatibilitás A kereskedelemben kapható iPod típusok nagy száma miatt a teljes kompatibilitás nem garantálható. Az iPod készüléke csatlakoztatása előtt ellenőrizze, hogy a készülék rendelkezik kompatibilis csatlakozóval. A távirányítási funkciók teljes kompatibilitása szintén nem g...
Page 49 - Az Ébresztő Kikapcsolása; Zene lejátszása iPodról; nem
49 MAGYARUL MEGJEGYZÉS: • A kívánt üzemmód kiválasztásához tájéko- zódjon az iPod kézikönyvéből. • Ha a készülékhez nincs iPod csatlakoztatva, akkor TUNER módban fog ébreszteni. • Végül állítsa be az ébresztő hangerejét a / gom- bokkal. • Nyomja meg az ALARM 1 vagy az ALARM 2 gombot, az „ ” vagy a „...
Page 51 - Загальні інструкції з техніки безпеки
51 УКРАЇНСЬКА Загальні інструкції з техніки безпеки Перш ніж використовувати пристрій, уважно про- читайте цей посібник користувача і зберігайте його разом із гарантійним талоном, чеком і, якщо мож- ливо, оригінальною упаковкою включно із вмістом. Якщо ви передаєте пристрій іншій особі, передайте та...
Page 52 - Використання пристрою вперше /
52 УКРАЇНСЬКА 5 Кнопка BAND/i-MENU6 Кнопка i-REPEAT/ 7 Кнопка SNOOZE 8 Кнопка EQ 9 Кнопки регулювання гучності VOLUME+/VOLUME- 10 Кнопка ALARM 1 11 Кнопка ALARM 2 12 Кнопка i-ENTER 13 Кнопки i-SCROLL/PRESET / 14 Кнопки TUNING /SKIP / (пошук вперед/ назад) 15 Кнопка / Використання пристрою вперше / о...
Page 53 - Сумісність із iPod; Налаштування радіо
53 УКРАЇНСЬКА Сумісність із iPod У зв’язку з великим різноманіттям поколінь і моде - лей iPod, доступних у магазинах, повна сумісність не гарантується. Перш ніж під’єднувати iPod, перевірте сумісність його інтерфейсу. Також не може гарантуватись повна сумісність функцій пульта дистанційного керуванн...
Page 54 - Відтворення музики з iPod
54 УКРАЇНСЬКА ПРИМІТКА. • Для вибору потрібного режиму дивіть - ся посібник користувача iPod. • Якщо iPod не під’єднано, будильник пристрою увімкнеться в режимі TUNER. • І нарешті, виберіть рівень гучності для сигналу будильника за допомогою кнопок / . • Натисніть кнопку ALARM 1 або ALARM 2, на дис ...
Page 55 - Заряджання iPod
55 УКРАЇНСЬКА i-MENU/BAND (19/5) Натисніть цю кнопку, щоб відкрити меню iPod або повернутись до попереднього меню. i-ENTER (13/12) Дозволяє активувати функцію або відобразити на - ступне меню. / i-SCROLL / PRESET (10/14) Ця кнопка використовується для прокрутки вгору/ вниз у меню iPod. Заряджання iP...
Page 58 - PERFECT IN FORM AND FUNCTION
MR 4115i Stand 05/1 0 Elektro-technische Vertriebsges. mbH Industriering Ost 40 • 47906 Kempen Telefon 0 21 52/20 06-666 [email protected] GARANTIE-KARTE Garantiebewijs • Carte de garantie Certificato di garanzia • Tarjeta de garantia Cartão de garantia • Guarantee card Garantikort • Karta gwarancyjna ...