Page 2 - Inhalt
Inhalt 2 Deutsch Inhalt Übersicht der Bedienelemente ..................................... Seite 3/4Wandmontage ................................................................. Seite 4Bedienungsanleitung ...................................................... Seite 5Technische Daten ...................
Page 3 - Übersicht der Bedienelemente
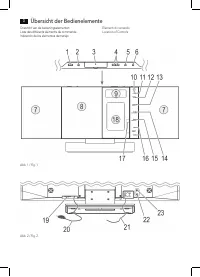
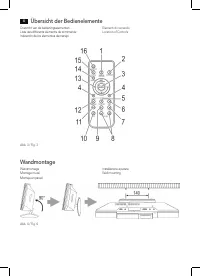
Übersicht der Bedienelemente 3 Overzicht van de bedieningselementen Liste des différents éléments de commande Indicación de los elementos demanejo Elementi di comandoLocation of Controls Abb. 1 / Fig. 1 Abb. 2 / Fig. 2
Page 5 - Deutsch; Bedienungsanleitung; Symbole in dieser Bedienungsanleitung; Kinder und gebrechliche Personen; Spezielle Sicherheitshinweise
Deutsch 5 Bedienungsanleitung Vielen Dank, dass Sie sich für unser Produkt entschieden haben. Wir wünschen Ihnen viel Freude mit dem Gerät. Allgemeine Sicherheitshinweise Lesen Sie vor Inbetriebnahme dieses Gerätes die Bedie-nungsanleitung sehr sorgfältig durch und bewahren Sie diese inkl. Garanties...
Page 7 - kein; iPod/iPhone Kompatibilität; Allgemeine Bedienung
Deutsch 7 Wird die Fernbedienung längere Zeit nicht benutzt, entneh-men Sie bitte die Batterie, um ein „Auslaufen“ von Batterie-säure zu vermeiden. WARNUNG: • Setzen Sie Batterien keiner hohen Wärme oder dem direkten Sonnenlicht aus. Werfen Sie Batterien niemals ins Feuer. Es besteht Explosionsgefah...
Page 8 - Infrarot-Fernbedienung
Deutsch 8 STANDBY/ON (1/16) Schalten Sie das Gerät mit der STANDBY/ON Taste in den Standby-Betrieb (die Uhrzeitanzeige erscheint). Drücken Sie diese Taste erneut, schaltet sich das Gerät wieder ein. HINWEIS: • Drücken Sie im Standby-Modus eine beliebige Taste, um die Uhrzeit für 10 Sekunden anzuzeig...
Page 9 - Radio hören; FM Sender suchen
Deutsch 9 Radio hören FM Sender suchen 1. Drücken Sie die DAB/FM/AUX Taste (12/2) so oft, bis im Display „RADIO INITIALIZE PLEASE WAIT“ erscheint. 2. Sie haben zwei Möglichkeiten einen Sender abzustim- men: - Drücken Sie die / SKIP/TUNE SEARCH Tasten (16/13). - Drücken Sie die SCAN/ENTER (14/13) Tas...
Page 10 - Musik vom iPod/iPhone wiedergeben; So geben Sie eine CD wieder
Deutsch 10 Musik vom iPod/iPhone wiedergeben (iPod/iPhone nicht im Lieferumfang enthalten) 1. Drücken Sie die CD/iPOD/USB/CARD Taste (13/1) so oft, bis im Display „NO iPOD“ erscheint. 2. Drücken Sie die iPOD OPEN/CLOSE (öffnen/schlie- ßen) Taste (6 am Gerät), um das Dock-Anschluss-Fach (18) zu öffne...
Page 11 - Beschreibung der Bedientasten; HINWEIS: Bei iPod/iPhone Musikwiedergabe
Deutsch 11 Halten Sie den CD-Deckel stets geschlossen. HINWEIS: • Bei CDs im MP3 Format, mit Ordner, erscheint beim Wechsel in einen anderen Ordner 001 für das erste Lied des neuen Ordners. • Wenn eine Disk falsch herum eingelegt wird, bzw. keine Disk eingelegt ist, leuchtet die Meldung „CD--READING...
Page 12 - Programmierte Wiedergabe
Deutsch 12 Nur für MP3‘s und CD‘s im MP3-Format: 1 x drücken: Das aktuelle Lied wird ständig wiederholt (im Display erscheint REP_1). 2 x drücken: Die komplette CD wird ständig wiederholt (im Display erscheint REP_ALL). 3 x drücken: Der angewählte Ordner der MP3 CD wird ständig wiederholt (im Displa...
Page 13 - Reinigung und Pflege
Deutsch 13 Bei MP3’s oder CD‘s im MP3 Format: Die Ordner Anzeige „F-000“, neben der Anzeige MEMORY, blinkt im Display. Wählen Sie mit den FOLDER Tasten (4 an der FB) zuerst den gewünsch- ten Ordner aus. Bestätigen Sie die Ordnerwahl mit der ID3/iPOD/MEM/C-ADJ. Taste. 3. Wählen Sie mit den / SKIP/TUN...
Page 14 - Garantie
Deutsch 14 Garantie Garantiebedingungen 1. Gegenüber Verbrauchern gewähren wir bei privater Nutzung des Geräts eine Garantie von 24 Monaten ab Kaufdatum. Ist das Gerät zur gewerblichen Nutzung geeignet, ge- währen wir beim Kauf durch Unternehmer für das Gerät eine Garantie von 12 Monaten. Die Garant...
Page 15 - Entsorgung; Bedeutung des Symbols „Mülltonne“
Deutsch 15 Entsorgung Bedeutung des Symbols „Mülltonne“ Schonen Sie unsere Umwelt, Elektrogeräte gehören nicht in den Hausmüll. Nutzen Sie die für die Entsorgung von Elektrogeräten vorge-sehenen Sammelstellen und geben dort Ihre Elektrogeräte ab, die Sie nicht mehr benutzen werden.Sie helfen damit d...
Page 16 - Nederlands; Gebruiksaanwijzing; Symbolen in deze gebruiksaanwijzing; Kinderen en gehandicapten; Speciale veiligheidsinstructies
Nederlands 16 Gebruiksaanwijzing Dank u voor uw keuze van dit product. We hopen dat u er veel plezier van beleeft. Algemene veiligheidsrichtlijnen Lees deze gebruiksaanwijzing zorgvuldig door voordat u dit apparaat in gebruik neemt, en bewaar hem samen met het Garantiecertificaat, het aankoopbewijs ...
Page 17 - Overzicht van de bedieningsorganen
Nederlands 17 Overzicht van de bedieningsorganen Voorzijde (Fig. 1) 1 STANDBY/ON toets (slaapstand/aan) 2 CD OPEN/CLOSE (openen/sluiten) CD-compartiment 3 USB-poort SD/MMC kaartsleuf 4 VOLUME +/- (volume) toetsen5 ID3/iPOD/MEM/C-ADJ. toets (geheugen/klok)6 iPOD OPEN/CLOSE (openen/sluiten) Docking po...
Page 18 - iPod/iPhone compatibiliteit; Algemene bediening
Nederlands 18 OPMERKING: De 12-uursweergave resulteert in de volgende aandui-ding op het scherm AM = ochtend, PM = middag. 3. Gebruik de / SKIP/TUNE SEARCH toetsen om de uren in te stellen. Bevestig met ID3/iPOD/MEM/C-ADJ.. 4. Gebruik de / SKIP/TUNE SEARCH toetsen om de minuten in te stellen. 5. Dru...
Page 19 - Radio luisteren
Nederlands 19 STANDBY/ON (1/16) Druk de STANDBY/ON toets om het apparaat in de slaap-stand te schakelen (het scherm geeft de tijd aan). Druk deze toets nogmaals om het apparaat in te schakelen. OPMERKING: • Druk in de standby-modus op een willekeurige toets om de tijd voor 10 seconden weer te geven....
Page 20 - Station opslaan; Muziekweergave via de iPod/iPhone; Geef aanvullende DAB informatie weer
Nederlands 20 • <Ensemble Name> Geeft de naam van het station of de omroep weer (bijv. DR Deutschland). • <Ensemble Freq.> Frequentie van het huidige radiostation. • <Audio Bit Rate> Geeft de digitale audio-bitsnelheid weer. • <Sig. Strenght> Geeft de sterkte aan van het ontv...
Page 21 - Het afspelen van een CD; Beschrijving van bedieningstoetsen
Nederlands 21 5. Plaats uw iPod/iPhone in het dock. LET OP: Zorg ervoor dat uw iPod/iPhone rechtop in de aan-sluiting gezet wordt. Zet de iPod/iPhone niet scheef in de aansluiting. Dit kan het dock en/of de iPod/iPhone beschadigen. 6. Druk op de toets (17) om de docking poort te sluiten. OPMERKING: ...
Page 22 - OPMERKING: Tijdens Afspelen van iPod/iPhone
Nederlands 22 EQ (11 op de afstandsbediening) (Voorinstelling voor de toonregeling). Er zijn diverse standen voor de toonregeling beschikbaar (FLAT, CLASSIC, ROCK, POP, JAZZ). OPMERKING: Tijdens Afspelen van iPod/iPhone Muziek Wijzig de EQ instelling op uw iPod/iPhone naar wens voor een optimaal gel...
Page 23 - Programmeren van het afspelen; Voor MP3’s of CD’s in MP3 formaat:
Nederlands 23 SLEEP (7 op de afstandsbediening) Wanneer het apparaat is ingeschakeld, kunt u de tijd instel-len waarna het apparaat naar de slaapstand zal schakelen. De tijd kan ingesteld worden tussen 90 en 10 minuten in stappen van 10 minuten. Druk deze toets herhaaldelijk totdat het scherm de gew...
Page 24 - Verwijdering; Betekenis van het “vuilnisbak”-symbool; geen; Reiniging en onderhoud; Probleemoplossing; Probleem; Technische specificaties
Nederlands 24 Dit apparaat voldoet aan alle huidige CE-richtlijnen, zoals de richtlijn elektromagnetische compatibiliteit en de laagspan-ningsrichtlijn, en is gefabriceerd volgens de meest recente veiligheidsvoorschriften.“Made for iPod” en “Made for iPhone” betekent dat een ap-paraat specifiek is o...
Page 25 - Français; Mode d’emploi; Symboles utilisés dans ce manuel; Directives spéciales de sécurité; Vue avant
Français 25 Mode d’emploi Merci d’avoir choisi notre produit. Nous espérons que vous saurez profiter votre appareil. Indications générales de sécurité Avant d’utiliser cet appareil, lire attentivement ce manuel et le conserver avec le Certificat de Garantie, la facture et, si pos-sible, l’emballage ...
Page 26 - Installation/Introduction
Français 26 7 Haut-parleur 8 Compartiment CD9 Ecran LCD10 Capteur IR pour la télécommande 11 Voyant STANDBY12 Bouton DAB/FM/AUX 13 Bouton CD/iPOD/USB/CARD 14 Touche SCAN/ENTER (lecture/pause/Scan/Entrer) 15 Touche /MENU/INFO 16 Touches / SKIP/TUNE SEARCH (recherche en avant/en arrière) 17 Ouvrir/fer...
Page 27 - Compatibilité iPod/iPhone; Fonctionnement général; Télécommande à infrarouges
Français 27 Compatibilité iPod/iPhone En raison de la variété importante de modèles et de géné - rations d’iPod et d’iPhone sur le marché, la compatibilité absolue ne peut pas être garantie. Avant de connecter un iPod/iPhone, vérifier qu’il a une interface compatible. Une entière compatibilité des f...
Page 28 - Ecouter la radio
Français 28 Port USB Cet appareil a été conçu en conformité avec la technologie USB la plus récente. Compte tenu de la grande variété de supports de stockages USB existant sur le marché, il n‘est pas possible de garantir une compatibilité totale avec tous les supports de stockage USB existants. Il p...
Page 29 - Pour les stations FM :
Français 29 Pour les stations FM : La fréquence radio actuellement préréglée s’affiche sur l’écran et le numéro de l’emplace-ment préréglé clignote. Pour les stations DAB : “Préréglage vide” apparaît sur l’écran si les emplacements préréglés sont vides et que le numéro de l’emplacement préréglé clig...
Page 30 - Chargement de l’iPod/iPhone; Comment lire un CD; Description des boutons de contrôle
Français 30 8. Refermez le compartiment de port d‘accueil. Pour ce faire, appuyez à nouveau sur le bouton iPOD OPEN/CLOSE. 9. Suivre les indications du manuel de votre iPod/iPhone pour l’utilisation des commandes. ATTENTION : Arrêtez la lecture avant de débrancher l‘iPod/iPhone du port, au cas contr...
Page 31 - Pendant la lecture de musique avec l’iPod/iPhone
Français 31 En mode DAB : Maintenez le bouton enfoncé pour régler manuellement une station DAB. REPEAT (14 sur la télécommande) Appuyez 1 fois : (REP_1 s‘allume) L‘intégralité de la piste en cours sera répétée. Appuyez 2 fois : (REP_ALL s‘allume) L‘ensemble du CD sera lu en boucle. Appuyez 3 fois : ...
Page 32 - Lecture programmée; Pour les MP3 ou les CD au format MP3 :
Français 32 1. Utilisez la touche STANDBY/ON pour passer en mode de veille (le heure va s‘afficher). 2. Maintenez le bouton TIMER enfoncé jusqu’à ce que “ON TIME” apparaisse à l’écran. • A l’aide des boutons / SKIP/TUNE SEARCH (16/13), vous pouvez à présent régler l’heure de mise en route, les minut...
Page 33 - Élimination; Signification du symbole de “Poubelle à roulettes”; Nettoyage et entretien; Problème; Données techniques
Français 33 Élimination Signification du symbole de “Poubelle à roulettes” Prendre soin de l’environnement, ne pas jeter des appareils électriques avec les ordures ménagères. Porter les appareils électriques obsolètes ou défectueux dans les centres de récupération municipaux. Aider à éviter les impa...
Page 34 - Español; Manual del usuario; Símbolos en este manual del usuario; Normas especiales de seguridad; Front
Español 34 Manual del usuario Le agradecemos la confianza depositada en este producto y esperamos que disfrute de su uso. Normas generales de seguridad Antes de usar este dispositivo, lea cuidadosamente este manual del usuario y consérvelo junto con el certificado de garantía, el recibo de compra y,...
Page 35 - Instalación/presentación
Español 35 9 Pantalla LCD10 Sensor IR para el mando a distancia 11 Indicador de STANDBY12 Botón DAB/FM/AUX 13 Botón CD/iPOD/USB/CARD 14 Botón SCAN/ENTER (Reproducir/pausa/ Explorar/Entrar) 15 Botón /MENU/INFO (Detener)16 Botones / SKIP/TUNE SEARCH (buscar adelante/atrás) 17 Abrir/cerrar puerto de ac...
Page 36 - Compatibilidad con el iPod/iPhone; Funcionamiento general; Alimentación
Español 36 • Abra el compartimiento de CD (8) pulsando el botón CD OPEN/CLOSE (abrir/cerrar) (2 en el dispositivo). La bandeja de CD se abre hacia la derecha. • Saque, si está presente, el dispositivo de asegurado para transporte del reproductor de CD antes de iniciar el uso. • Pulse el botón CD OPE...
Page 37 - Escuchar la radio
Español 37 Toma de auriculares (22) Cuando escuche por auriculares, use auriculares con una toma estéreo de 3,5 mm, que debe conectar a la toma de auriculares. Se desactivarán los altavoces. Mando a distancia por infrarrojos Funcionamiento inalámbrido desde una distancia de hasta 5 metros. Si el alc...
Page 38 - Guardar emisora; Reproducción música del iPod/iPhone; Mostrar información DAB adicional
Español 38 Guardar emisora 1. Si ha encontrado la emisora deseada, mantenga pulsado el botón ID3/iPOD/MEM/C-ADJ. (5/12). Para emisoras FM: La frecuencia de radio memorizada actual aparecerá en pantalla y parpadeará el número de ubicación preestablecida. Para emisoras DAB: Aparecerá “Memoria vacía” e...
Page 39 - Cómo reproducir un CD; Descripción de los botones de control
Español 39 8. Cierre de nuevo el compartimento de puerto de aco- plamiento. Para ello, pulse de nuevo el botón iPOD OPEN/CLOSE. 9. Siga el manual de su iPod/iPhone para saber el uso de los controles. ATENCIÓN: Detenga la reproducción antes de desconectar el iPod/iPhone del puerto, ya que su iPod/iPh...
Page 40 - Durante la reproducción de música del iPod/iPhone.
Español 40 SELECT/MONO/ST (3 en el mando a distancia) En modo radio FM: Cambia entre STEREO y MONO. En modo DAB: Mantenga pulsado el botón para ajustar manualmente una emisora DAB. REPEAT (14 en el mando) Pulsar x 1: (REP_1 se enciende) La pista actual se repe - tirá por completo. Pulsar x 2: (REP_A...
Page 41 - Reproducción programada; Para MP3 o CD en formato MP3:
Español 41 Para apagar de nuevo la función, pulse el botón SLEEP repe-tidamente hasta que no se muestre nada en la pantalla. TIMER (6 en el mando) Puede programar el dispositivo para que se apague y en-cienda de nuevo pasado un tiempo preestablecido.1. Pulse el botón STANDBY/ON para poner el disposi...
Page 42 - Eliminación; Significado del símbolo “cubo de basura”; Limpieza y mantenimiento; Resolución de problemas; Problema; Especificaciones técnicas
Español 42 “Made for iPod” y “Made for iPhone” indican que un accesorio electrónico está diseñado para conectarse específicamente con iPod o iPhone y ha sido certificado por el desarrollador en el cumplimiento de los estándares de rendimiento de Apple. Apple no se hace responsable del funcionamiento...
Page 43 - Italiano; Manuale dell’utente; Simboli nel manuale dell’utente; Bambini e persone disabili; pericolo di soffocamento!; Linee guide speciali di sicurezza; Lato anteriore
Italiano 43 Manuale dell’utente Grazie per aver scelto il nostro prodotto. Vi auguriamo un buon utilizzo del dispositivo. Linee guida generali sulla sicurezza Prima di usare questo dispositivo, leggere attentamente il manuale dell’utente e conservarlo con il Certificato di Garanzia, lo scontrino e, ...
Page 44 - Installazione/Introduzione
Italiano 44 10 Sensore IR per il telecomando 11 Indicatore STANDBY12 Tasto DAB/FM/AUX 13 Tasto CD/iPOD/USB/CARD 14 Tasto SCAN/ENTER (riproduzione/pausa/Scansione/invio) 15 Tasto /MENU/INFO16 Tasti / SKIP/TUNE SEARCH (ricerca in avanti/all’indietro) 17 Apri/chiudi porta docking18 Vano porta docking V...
Page 45 - Caricamento dell’iPod/iPhone; Funzionamento generale; Telecomando a infrarossi
Italiano 45 Caricamento dell’iPod/iPhone A causa della varietà di modelli e generazioni di iPod e iPho- ne sul mercato, non è possibile garantire una compatibilità completa. Prima di collegare l’iPod/iPhone, assicurarsi che disponga dell’interfaccia compatibile. Non è possibile garantire nemmeno la ...
Page 46 - Porta USB; Ascolto radio; Scansione delle stazioni FM
Italiano 46 Porta USB L’apparecchio è stato progettato secondo la più moderna tecnologia USB. In seguito alla presenza di un’ampia gamma di strumenti di memoria sul mercato, non è possibile assicu - rare compatibilità assoluta con tutti i dispositivi di memorizza-zione USB. In alcuni rari casi posso...
Page 47 - Selezione di una stazione preimpostata; Riproduzione musicale dall’iPod/iPhone; Visualizzazione di alte informazioni DAB
Italiano 47 Selezione di una stazione preimpostata 1. Premere il tasto ID3/iPOD/MEM/C-ADJ..2. Selezionare la posizione preimpostata desiderata con i tasti / SKIP/TUNE SEARCH. 3. Premere nuovamente il tasto ID3/iPOD/MEM/C-ADJ. per riprodurre la stazione radio desiderata. Riproduzione musicale dall’iP...
Page 48 - Caricamento dell’iPod iPod/iPhone; Come riprodurre un CD; Descrizione dei controlli
Italiano 48 Caricamento dell’iPod iPod/iPhone La batteria dell’iPod/iPhone viene caricata non appena l’iPod/ iPhone viene collegato. Per effettuare ciò, l’unità deve essere connessa all’alimentazione. NOTA: • Se l’adattatore dello slot è stato fornito con l’iPod, usarlo per assicurarsi che l‘iPod si...
Page 49 - NOTA: Durante la riproduzione musicale iPod/iPhone
Italiano 49 Premere 3 x: Viene ripetuta continuamente la cartella selezionata del CD in MP3 (il display mostra REP_ALBUM). Utilizzare i tasti FOLDER (4 sul telecomando) per selezionare le single cartello. Premere 4 x: La funzione viene disattivata e il CD viene riprodotto nel modo normale. RANDOM (1...
Page 50 - Riproduzione programma
Italiano 50 3. Dopo aver selezionato il volume di accensione, premere di nuovo il tasto TIMER.Le impostazioni sono visualizzate una dopo un’altra sul display. L’apparecchio di porta nel modo standby. Il display mostra “ ” e si attiva il timer. Al raggiungimento dell’orario impostato, il dispositivo ...
Page 51 - Specifiche tecniche; Smaltimento; Significato del simbolo “Cassonetto con ruote”
Italiano 51 Specifiche tecniche Modello: .......................................................................... MC 4456 iPTensione di alimentazione: ............................... 230-240 V~ 50 Hz Uscita di potenza: ...................................................... 100 W PMPOConsumo di pot...
Page 52 - English; Instruction Manual; Symbols in this user manual; Special safety guidelines
English 52 Instruction Manual Thank you for choosing our product. We hope you will enjoy using the appliance. General Safety Guidelines Before using this device, carefully read this user manual and keep it together with the Warranty Certificate, cashier receipt and if possible, the original package ...
Page 54 - iPod/iPhone Compatibility; General operation; Infrared remote control
English 54 iPod/iPhone Compatibility Due to the large variety of iPod and iPhone models and gen-erations on the market, full compatibility cannot be guaran-teed. Before connecting your iPod/iPhone, ensure that it has a compatible interface.Full compatibility of the remote functions also cannot be gu...
Page 55 - USB port; Listening to the radio; Scan FM stations
English 55 USB port This device has been designed in accordance with the latest USB state of the art technology. Due to the large variety of different USB memory tools on the market it is not possible to provide complete compatibility with all USB storage devices. In some rare cases there might occu...
Page 56 - Select a preset station; Music Playback from iPod/iPhone; Display additional DAB information
English 56 Select a preset station 1. Press the ID3/iPOD/MEM/C-ADJ. button.2. Select the desired preset location with the / SKIP/ TUNE SEARCH buttons. 3. Press the ID3/iPOD/MEM/C-ADJ. button again to play the desired radio station. Music Playback from iPod/iPhone (iPod/iPhone not supplied) 1. Press ...
Page 57 - This is how to play a CD; Description of the control buttons
English 57 iPod/iPhone Charging Your iPod/iPhone battery is charged as soon as the iPod/ iPhone is docked. To do this, the unit must be connected to the mains. NOTE: • If the slot adapter has been supplied with your iPod, use it to ensure that your iPod fits correctly. • Not all iPod/iPhone generati...
Page 59 - Program Playback
English 59 NOTE: If the timer is deactivated, press the TIMER button, TIME ON appears briefly on the display. You will then see the cur - rent settings. The “ ” symbol then appears on the display and the timer is activated ID3/iPOD/MEM/C-ADJ. (5/12) Set the clock, store stations and program playback...
Page 60 - Disposal; Meaning of the “Wheelie Bin” Symbol
English 60 This device complies with all current CE directives, such as electromagnetic compatibility and low voltage directive and is manufactured according to the latest safety regulations. “Made for iPod” and “Made for iPhone” mean that an elec-tronic accessory has been designed to connect specif...