Page 2 - CUSTOMER CARE AND SERVICE
CONTENTS 1. SAFETY INFORMATION...........................................................................................3 2. SAFETY INSTRUCTIONS.......................................................................................... 4 3. PRODUCT DESCRIPTION...........................................
Page 4 - SAFETY INSTRUCTIONS; Installation
• Do not store items on the cooking surfaces. • Metallic objects such as knives, forks, spoons and lids should not be placed on the hob surface since they can get hot. • Do not use a steam cleaner to clean the appliance. • After use, switch off the hob element by its control and do not rely on the p...
Page 5 - Use
• Make sure that a shock protection is installed. • Use the strain relief clamp on the cable. • Make sure the mains cable or plug (if applicable) does not touch the hot appliance or hot cookware, when you connect the appliance to the near sockets • Do not use multi-plug adapters and extension cables...
Page 6 - PRODUCT DESCRIPTION; Cooking surface layout
• Cookware made of cast iron, aluminium or with a damaged bottom can cause scratches on the glass / glass ceramic. Always lift these objects up when you have to move them on the cooking surface. • This appliance is for cooking purposes only. It must not be used for other purposes, for example room h...
Page 7 - Heat setting displays
Sensorfield Function Comment 1 ON / OFF To activate and deactivate the hob. 2 Lock / The Child Safety De-vice To lock / unlock the control panel. 3 STOP+GO To activate and deactivate the function. 4 - Heat setting display To show the heat setting. 5 - Timer indicators of cookingzones To show for whi...
Page 8 - DAILY USE
3.4 OptiHeat Control (3 step Residual heat indicator) WARNING! / / There is a risk of burns from residual heat. The indicator shows the level of the residual heat. The induction cooking zones make the heat necessary for cooking process directly in the bottom of the cookware. The glass ceramic is hea...
Page 11 - HINTS AND TIPS; Cookware
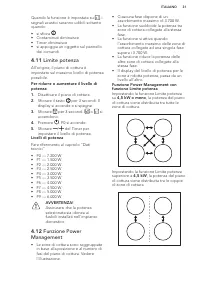
CAUTION! Make sure that the selected power fits to the house installation fuses. 4.12 Power management function • Cooking zones are grouped according to the location and number of the phases in the hob. See the illustration. • Each phase has a maximum electricity loading of 3700 W. • The function di...
Page 12 - Examples of cooking
The cooking zone efficiency is related to the diameter of the cookware. The cookware with a smaller diameter than the minimum receives only a part of the power generated by the cooking zone. Refer to “Technical information” chapter. 5.2 The noises during operation If you can hear: • crack noise: coo...
Page 13 - CARE AND CLEANING; General information; TROUBLESHOOTING
Heat setting Use to: Time(min) Hints 9 - 12 Gentle fry: escalope, veal cor-don bleu, cutlets, rissoles,sausages, liver, roux, eggs,pancakes, doughnuts. as nec-essary Turn halfway through. 12 - 13 Heavy fry, hash browns, loinsteaks, steaks. 5 - 15 Turn halfway through. 14 Boil water, cook pasta, sear...
Page 15 - If you cannot find a; INSTALLATION; Before the installation
Problem Possible cause Remedy The cookware is incorrect. Use the correct cookware.Refer to “Hints and tips”chapter. The diameter of the bottomof the cookware is too smallfor the zone. Use cookware with correctdimensions.Refer to “Technical informa-tion” chapter. and a number come on. There is an err...
Page 16 - Connection cable; Attaching the seal to the
8.2 Built-in hobs Only use the built-in hobs after you assemble the hob into correct built-in units and work surfaces that align to the standards. 8.3 Connection cable • The hob is supplied with the connection cable. • Replace the damaged mains cable only with the spare parts cable. Speak to your lo...
Page 17 - Assembly
8.5 Assembly min.50mm min.500mm min.2mm min. 2 mm A B A 12 mm 28 mm 38 mm B 57 mm 41 mm 31 mm min 30 mm min. 500 mm < 20 mm > 20 mm min. 2 mm A B A 12 mm 28 mm 38 mm B 57 mm 41 mm 31 mm min. 500 mm 514+1mm 490+1mm 560+1mm 584+1mm min. 55mm R10mm R5mm 12mm 7mm min.38 mm min.2 mm ENGLISH 17
Page 18 - Protection box; TECHNICAL INFORMATION; Rating plate
min. 12 mm min. 2 mm 8.6 Protection box If you use a protection box (an additional accessory), the front airflow space of 2 mm and the protective floor directly below the hob are not necessary. The protection box accessory may not be available in some countries. Please contact your local supplier. Y...
Page 19 - Cooking zones specification; ENERGY EFFICIENCY; Product information according to EU 66/2014
9.2 Cooking zones specification Cooking zone Nominal power(maximum heatsetting) [W] Power function[W] Power functionmaximum dura-tion [min] Cookware diam-eter [mm] Left front 2300 3700 10 180 - 210 Left rear 1800 2800 10 145 - 180 Right front 1400 2500 4 125 - 145 Right rear 1800 2800 10 145 - 180 T...
Page 20 - ENVIRONMENT CONCERNS
11. ENVIRONMENT CONCERNS Recycle the materials with the symbol . Put the packaging in applicable containers to recycle it. Help protect the environment and human health and to recycle waste of electrical and electronic appliances. Do not dispose appliances marked with the symbol with the household w...
Page 21 - SERVIZIO CLIENTI E MANUTENZIONE
INDICE 1. INFORMAZIONI PER LA SICUREZZA.................................................................... 22 2. ISTRUZIONI DI SICUREZZA.................................................................................... 23 3. DESCRIZIONE DEL PRODOTTO...................................................
Page 23 - ISTRUZIONI DI SICUREZZA; Installazione
• Non utilizzare un timer esterno o un sistema di controllo remoto distinto per mettere in funzione l'apparecchiatura. • Non lasciare mai il piano di cottura incustodito durante la preparazione di cibi in quanto olio e grassi potrebbero provocare un incendio. • Non tentare mai di spegnere un incendi...
Page 26 - DESCRIZIONE DEL PRODOTTO; Disposizione della superficie di cottura
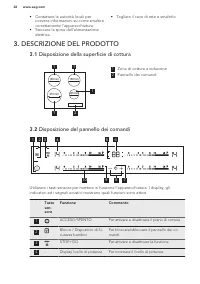
• Contattare le autorità locali per ricevere informazioni su come smaltire correttamente l'apparecchiatura. • Staccare la spina dall'alimentazione elettrica. • Tagliare il cavo di rete e smaltirlo. 3. DESCRIZIONE DEL PRODOTTO 3.1 Disposizione della superficie di cottura 145 mm 180 mm 210 mm 180 mm 1...
Page 27 - Display del livello di potenza
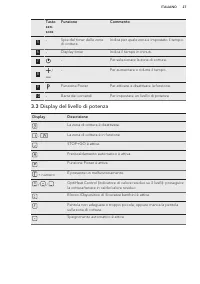
Tastosen-sore Funzione Commento 5 - Spie del timer delle zonedi cottura Indica per quale zona è impostato il tempo. 6 - Display timer Indica il tempo in minuti. 7 - Per selezionare la zona di cottura. 8 / - Per aumentare o ridurre il tempo. 9 Funzione Power Per attivare e disattivare la funzione. 10...
Page 28 - UTILIZZO QUOTIDIANO
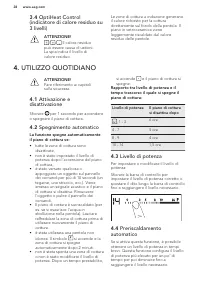
3.4 OptiHeat Control (indicatore di calore residuo su 3 livelli) ATTENZIONE! / / Il calore residuo può essere causa di ustioni. La spia indica il livello di calore residuo. Le zone di cottura a induzione generano il calore richiesto per la cottura direttamente sul fondo della pentola. Il piano in ve...
Page 31 - Limite potenza; Funzione Power
Quando la funzione è impostata su , i segnali acustici saranno udibili soltanto quando:• si sfiora • Contaminuti diminuisce • Timer diminuisce • si appoggia un oggetto sul pannello dei comandi. 4.11 Limite potenza All'origine, il piano di cottura è impostato sul massimo livello di potenza possibile....
Page 32 - CONSIGLI E SUGGERIMENTI UTILI; Pentole
5. CONSIGLI E SUGGERIMENTI UTILI ATTENZIONE! Fare riferimento ai capitoli sulla sicurezza. 5.1 Pentole Per le zone di cottura a induzione, un forte campo elettromagnetico crea calore nelle pentole molto rapidamente. Utilizzare le zone di cottura a induzione con pentole idonee. Materiale delle pentol...
Page 33 - PULIZIA E CURA; Informazioni generali
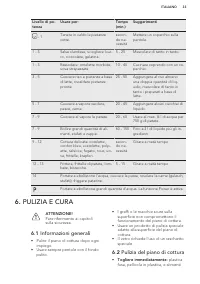
Livello di po-tenza Usare per: Tempo(min.) Suggerimenti - 1 Tenere in caldo le pietanzecotte. secon-do ne-cessità Mettere un coperchio sullapentola. 1 - 3 Salsa olandese, sciogliere: bur-ro, cioccolata, gelatina. 5 - 25 Mescolare di tanto in tanto. 1 - 3 Rassodare: omelette morbide,uova strapazzate....
Page 34 - RISOLUZIONE DEI PROBLEMI
contenenti zucchero. Se non vengono eliminati, potrebbero danneggiare il piano di cottura. Appoggiare lo speciale raschietto sulla superficie in vetro, formando un angolo acuto, e spostare la lama sulla superficie. • Quando il piano di cottura è sufficientemente raffreddato, è possibile rimuovere: i...
Page 36 - Se non è possibile trovare; INSTALLAZIONE; Prima dell'installazione
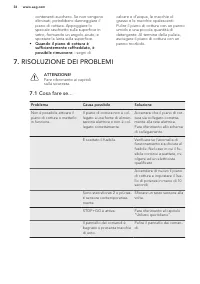
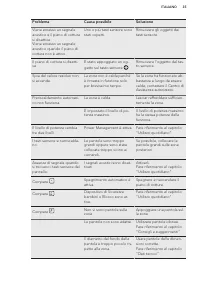
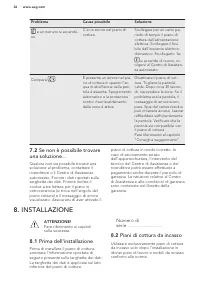
Problema Causa possibile Soluzione e un numero si accendo- no. C'è un errore nel piano dicottura. Scollegare per un certo pe-riodo di tempo il piano dicottura dall'alimentazioneelettrica. Scollegare il fusi-bile dall'impianto elettricodomestico. Ricollegarlo. Se si accende di nuovo, riv- olgersi al ...
Page 37 - Cavo di collegamento; Applicazione del nastro
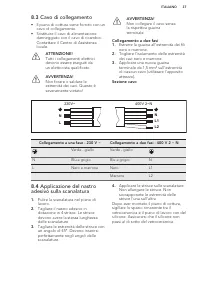
8.3 Cavo di collegamento • Il piano di cottura viene fornito con un cavo di collegamento. • Sostituire il cavo di alimentazione danneggiato con il cavo di ricambio. Contattare il Centro di Assistenza locale. ATTENZIONE! Tutti i collegamenti elettrici devono essere eseguiti da un elettricista qualifi...
Page 38 - Montaggio
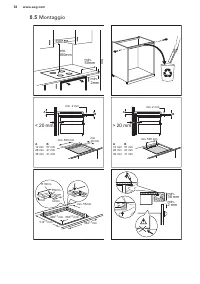
8.5 Montaggio min.50mm min.500mm min.2mm min. 2 mm A B A 12 mm 28 mm 38 mm B 57 mm 41 mm 31 mm min 30 mm min. 500 mm < 20 mm > 20 mm min. 2 mm A B A 12 mm 28 mm 38 mm B 57 mm 41 mm 31 mm min. 500 mm 514+1mm 490+1mm 560+1mm 584+1mm min. 55mm R10mm R5mm 12mm 7mm min.38 mm min.2 mm www.aeg.com 38
Page 39 - DATI TECNICI; Targhetta dei dati
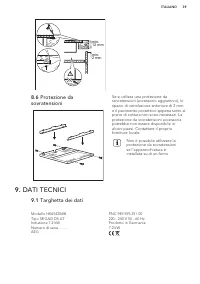
min. 12 mm min. 2 mm 8.6 Protezione da sovratensioni Se si utilizza una protezione da sovratensioni (accessorio aggiuntivo), lo spazio di ventilazione anteriore di 2 mm e il pavimento protettivo appena sotto al piano di cottura non sono necessari. La protezione da sovratensioni accessoria potrebbe n...
Page 40 - Caratteristiche tecniche zone di cottura; EFFICIENZA ENERGETICA; Informazioni prodotto conformi alla norma UE 66/2014
9.2 Caratteristiche tecniche zone di cottura Zona di cottura Potenza nomi- nale (imposta-zione di caloremassima) [W] Funzione Pow-er [W] Funzione Pow-er durata massi-ma [min.] Diametro dellepentole [mm] Anteriore sinis-tra 2300 3700 10 180 - 210 Posteriore sinis-tra 1800 2800 10 145 - 180 Anteriore ...
Page 41 - CONSIDERAZIONI SULL'AMBIENTE
• Posizionare le pentole sulla zona di cottura prima di accenderla. • Sistemare le pentole più piccole sulle zone di cottura più piccole. • Posizionare le pentole direttamente al centro della zona di cottura. • Quando si riscalda l'acqua utilizzare solo la quantità necessaria. • Se possibile, coprir...