Page 2 - CUSTOMER CARE AND SERVICE
CONTENTS 1. SAFETY INFORMATION...........................................................................................3 2. SAFETY INSTRUCTIONS.......................................................................................... 4 3. PRODUCT DESCRIPTION...........................................
Page 4 - SAFETY INSTRUCTIONS; Installation
• Put knives and cutlery with sharp points in the cutlery basket with the points down or in a horizontal position. • Do not keep the appliance door open without supervision to prevent to fall on it. • Before maintenance, deactivate the appliance and disconnect the mains plug from the mains socket. •...
Page 5 - PRODUCT DESCRIPTION
WARNING! Dangerous voltage. • If the water inlet hose is damaged, immediately disconnect the mains plug from the mains socket. Contact the Authorised Service Centre to replace the water inlet hose. 2.4 Use • Do not sit or stand on the open door. • Dishwasher detergents are dangerous. Obey the safety...
Page 6 - CONTROL PANEL; Indicators
5 Rating plate 6 Salt container 7 Air vent 8 Rinse aid dispenser 9 Detergent dispenser 10 Lower basket 11 Upper basket 12 Cutlery drawer 3.1 Beam-on-Floor The Beam-on-Floor is a light that shows on the kitchen floor below the appliance door.• When the programme starts, a red light comes on and stays...
Page 7 - PROGRAMMES
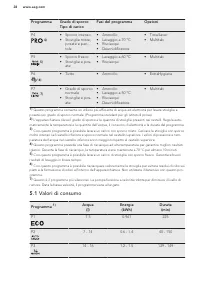
5. PROGRAMMES Programme Degree of soilType of load Programme phases Options P1 1) • Normal soil• Crockery and cutlery • Prewash• Wash 50 °C• Rinses• Dry • ExtraHygiene• TimeSaver• Multitab P2 2) • All• Crockery, cut- lery, pots andpans • Prewash• Wash from 45 °C to 70 °C • Rinses• Dry • Multitab P3 ...
Page 8 - SETTINGS
5.1 Consumption values Programme 1) Water (l) Energy (kWh) Duration (min) P1 7.5 0.961 225 P2 7 - 14 0.6 - 1.4 40 - 150 P3 14 - 16 1.2 - 1.5 139 - 149 P4 10.7 - 14.5 1.4 - 1.6 154 - 170 P5 10 0.9 30 P6 4 0.1 14 P7 9 - 10 1.0 - 1.2 219 - 229 1) The pressure and the temperature of the water, the varia...
Page 9 - The water softener; How to set the water softener
can set the programme selection mode in the following way:Press and hold RESET until the appliance is in programme selection mode. 6.2 The water softener The water softener removes minerals from the water supply, which would have a detrimental effect on the washing results and on the appliance. The ...
Page 11 - OPTIONS; Multitab
• The indicator continues to flash. • The display shows the current setting: = Acoustic signal off. 3. Press to change the setting. = Acoustic signal on. 4. Press the on/off button to confirm the setting. 7. OPTIONS Desired options must be activated every time before you start a programme. It is not...
Page 12 - How to activate ExtraHygiene; BEFORE FIRST USE; The salt container
How to activate ExtraHygiene Press , the related indicator comes on If the option is not applicable to the programme, the related indicator does not come on or it flashes quickly for a few seconds and then goes off. The display shows the updated programme duration. 8. BEFORE FIRST USE 1. Make sure t...
Page 13 - DAILY USE
8.2 How to fill the rinse aid dispenser A B C CAUTION! Only use rinse aid specifically designed for dishwashers. 1. Open the lid ( C ). 2. Fill the dispenser ( B ) until the rinse aid reaches the marking ''MAX''. 3. Remove the spilled rinse aid with an absorbent cloth to prevent too much foam. 4. Cl...
Page 14 - HINTS AND TIPS
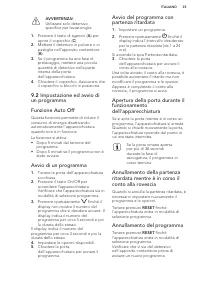
Starting a programme 1. Keep the appliance door ajar. 2. Press the on/off button to activate the appliance. Make sure that the appliance is in programme selection mode. 3. Press repeatedly until the display shows the number of the programme you want to start. The display will show the programme numb...
Page 16 - Unloading the baskets; CARE AND CLEANING; Cleaning the filters
10.6 Unloading the baskets 1. Let the tableware cool down before you remove it from the appliance. Hot items can be easily damaged. 2. First remove items from the lower basket, then from the upper basket. At the end of the programme water can still remain on the sides and on the door of the applianc...
Page 17 - TROUBLESHOOTING
7. Reassemble the filters ( B ) and ( C ). 8. Put back the filter ( B ) in the flat filter ( A ). Turn it clockwise until it locks. CAUTION! An incorrect position of the filters can cause bad washing results and damage to the appliance. 11.2 Cleaning the spray arms Do not remove the spray arms. If t...
Page 19 - The washing and drying results are not satisfactory
Problem and alarm code Possible cause and solution The appliance door is diffi-cult to close. • The appliance is not level. Loosen or tighten the adjust- able feet (if applicable). • Parts of the tableware are protruding from the baskets. Rattling/knocking soundsfrom inside the appliance. • The tabl...
Page 20 - TECHNICAL INFORMATION
Problem Possible cause and solution The dishes are wet. • The programme does not have a drying phase or has a drying phase with low temperature. • The rinse aid dispenser is empty.• The quality of the rinse aid can be the cause.• The quality of the multi-tablets can be the cause. Try a different bra...
Page 21 - ENVIRONMENT CONCERNS
Electrical connection 1) Voltage (V) 200 - 240 Frequency (Hz) 50 / 60 Water supply pressure bar (minimum and maximum) 0.5 - 8 MPa (minimum and maximum) 0.05 - 0.8 Water supply Cold water or hot water 2) max 60 °C Capacity Place settings 13 Power consumption Left-on mode (W) 0.99 Power consumption Of...
Page 22 - SERVIZIO CLIENTI E MANUTENZIONE
INDICE 1. INFORMAZIONI PER LA SICUREZZA.................................................................... 23 2. ISTRUZIONI DI SICUREZZA.................................................................................... 24 3. DESCRIZIONE DEL PRODOTTO...................................................
Page 24 - ISTRUZIONI DI SICUREZZA; Installazione
• Rispettare il numero massimo di 13 coperti. • Se il cavo di alimentazione è danneggiato, deve essere sostituito dal produttore, da un tecnico autorizzato o da una persona qualificata per evitare situazioni di pericolo. • Sistemare i coltelli e le posate appuntite nel cestello portaposate con l’est...
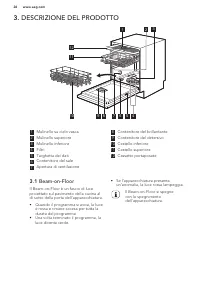
Page 26 - DESCRIZIONE DEL PRODOTTO
3. DESCRIZIONE DEL PRODOTTO 5 4 10 9 6 7 11 12 2 3 1 8 1 Mulinello su cielo vasca 2 Mulinello superiore 3 Mulinello inferiore 4 Filtri 5 Targhetta dei dati 6 Contenitore del sale 7 Apertura di ventilazione 8 Contenitore del brillantante 9 Contenitore del detersivo 10 Cestello inferiore 11 Cestello s...
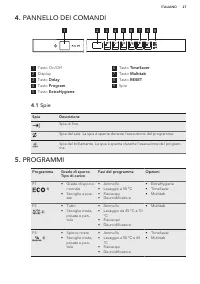
Page 27 - PANNELLO DEI COMANDI; Spie; PROGRAMMI
4. PANNELLO DEI COMANDI 1 2 8 3 4 5 6 7 9 1 Tasto On/Off 2 Display 3 Tasto Delay 4 Tasto Program 5 Tasto ExtraHygiene 6 Tasto TimeSaver 7 Tasto Multitab 8 Tasto RESET 9 Spie 4.1 Spie Spia Descrizione Spia di fine. Spia del sale. La spia è spenta durante l'esecuzione del programma. Spia del brillanta...
Page 28 - Valori di consumo
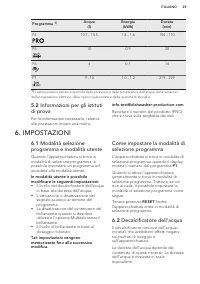
Programma Grado di sporcoTipo di carico Fasi del programma Opzioni P4 4) • Sporco intenso• Stoviglie miste, posate e pen-tole • Ammollo• Lavaggio a 70 °C• Risciacqui• Deumidificatore • TimeSaver• Multitab P5 5) • Sporco fresco• Stoviglie e pos- ate • Lavaggio a 60 °C• Risciacqui • Multitab P6 6) • T...
Page 29 - IMPOSTAZIONI
Programma 1) Acqua (l) Energia (kWh) Durata (min) P4 10.7 - 14.5 1.4 - 1.6 154 - 170 P5 10 0.9 30 P6 4 0.1 14 P7 9 - 10 1.0 - 1.2 219 - 229 1) I valori possono variare a seconda della pressione e della temperatura dell'acqua, delle variazioni dell'alimentazione elettrica, delle opzioni selezionate e...
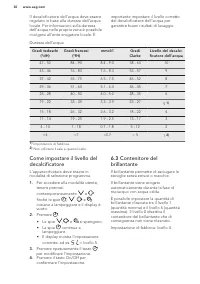
Page 30 - Come impostare il livello del
Il decalcificatore dell'acqua deve essere regolato in base alla durezza dell’acqua locale. Per informazioni sulla durezza dell’acqua nella propria zona è possibile rivolgersi all’ente erogatore locale. È importante impostare il livello corretto del decalcificatore dell'acqua per garantire buoni risu...
Page 32 - OPZIONI
iniziano a lampeggiare e il display è vuoto. 2. Premere • Le spie , e si spengono. • La spia continua a lampeggiare. • Il display mostra l'impostazione corrente: = Segnale acustico non attivo. 3. Premere per cambiare l'impostazione. = Segnale acustico attivo. 4. Premere il tasto On/Off per confermar...
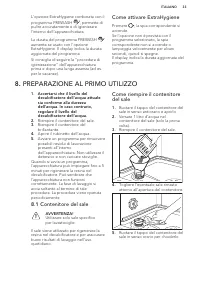
Page 33 - Come attivare ExtraHygiene; PREPARAZIONE AL PRIMO UTILIZZO; Contenitore del sale
L'opzione ExtraHygiene combinata con ilprogramma PREWASH , permette di pulire accuratamente e di igienizzare l'interno dell'apparecchiatura. La durata del programma PREWASH aumenta se usato con l'opzione ExtraHygiene. Il display indica la durata aggiornata del programma.Si consiglia di seguire la &#...
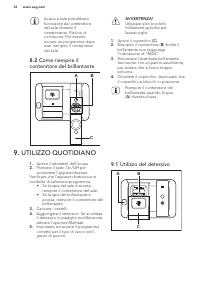
Page 34 - UTILIZZO QUOTIDIANO; Utilizzo del detersivo
Acqua e sale potrebbero fuoriuscire dal contenitore del sale durante il riempimento. Rischio di corrosione. Per evitarlo, avviare un programma dopo aver riempito il contenitore del sale. 8.2 Come riempire il contenitore del brillantante A B C AVVERTENZA! Utilizzare solo prodotti brillantanti specifi...
Page 36 - CONSIGLI E SUGGERIMENTI UTILI
Fine programma Quando al termine del programma si apre la porta, l'apparecchiatura si disattiva automaticamente. Chiudere il rubinetto dell'acqua. 10. CONSIGLI E SUGGERIMENTI UTILI 10.1 Informazioni generali I seguenti suggerimenti garantiranno una pulizia e risultati di asciugatura quotidiani ottim...
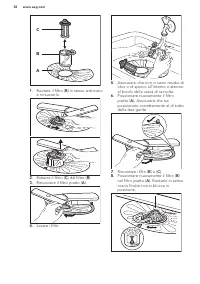
Page 37 - PULIZIA E CURA; Pulizia dei filtri
10.4 Caricare i cestelli • Utilizzare l’apparecchiatura esclusivamente per lavare articoli idonei al lavaggio in lavastoviglie. • Non introdurre nell’apparecchiatura articoli di legno, osso, alluminio, peltro o rame. • Non inserire nell'apparecchiatura oggetti che possano assorbire acqua (spugne, pa...
Page 39 - RISOLUZIONE DEI PROBLEMI
AVVERTENZA! Un’errata posizione dei filtri può comportare scadenti risultati di lavaggio e danni all’apparecchiatura. 11.2 Pulizia dei mulinelli Non rimuovere i mulinelli. Se i fori dei mulinelli sono ostruiti da residui di sporco, liberarli servendosi di un oggetto a punta fine. 11.3 Pulizia estern...
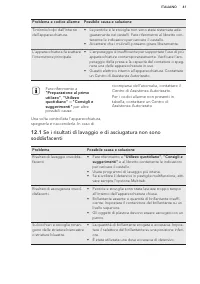
Page 41 - Se i risultati di lavaggio e di asciugatura non sono
Problema e codice allarme Possibile causa e soluzione Tintinnio/colpi dall'internodell'apparecchiatura. • Le pentole e le stoviglie non sono state sistemate ade- guatamente nei cestelli. Fare riferimento al libretto con-tenente le indicazioni per caricare il cestello. • Accertarsi che i mulinelli po...
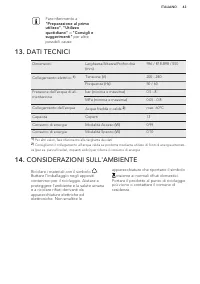
Page 43 - DATI TECNICI; CONSIDERAZIONI SULL'AMBIENTE
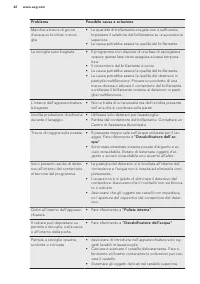
Fare riferimento a "Preparazione al primo utilizzo" , "Utilizzo quotidiano" o "Consigli e suggerimenti" per altre possibili cause. 13. DATI TECNICI Dimensioni Larghezza/Altezza/Profondità(mm) 596 / 818-898 / 550 Collegamento elettrico 1) Tensione (V) 200 - 240 Frequenza (Hz) ...