Page 2 - Welkom bij AEG! Hartelijk dank dat je voor onze apparatuur hebt; INHOUDSOPGAVE; VEILIGHEIDSINFORMATIE; NEDERLANDS
Welkom bij AEG! Hartelijk dank dat je voor onze apparatuur hebt gekozen. Advies over gebruik, brochures, het oplossen van problemen, service- en reparatie- informatie: www.aeg.com/support Wijzigingen voorbehouden. INHOUDSOPGAVE 1. VEILIGHEIDSINFORMATIE...................................................
Page 3 - Algemene veiligheid; NEDERLANDS 3
instructies hebben gekregen over het veilig gebruiken van het apparaat en indien zij de gevaren begrijpen. Kinderen jonger dan 8 jaar en personen met zware en complexe beperkingen dienen altijd uit de buurt van het apparaat te worden gehouden, tenzij ze voortdurend onder toezicht staan. • Houd toezi...
Page 4 - VEILIGHEIDSVOORSCHRIFTEN; NEDERLANDS
deze vervangen teneinde gevaarlijke situaties met elektriciteit te voorkomen. • WAARSCHUWING: Zorg ervoor dat het apparaat is uitgeschakeld voordat u de lamp vervangt om elektrische schokken te voorkomen. • WAARSCHUWING: Het apparaat en de toegankelijke onderdelen ervan worden heet tijdens het gebru...
Page 5 - Elektrische aansluiting; NEDERLANDS 5
Hoogte van de achterkant van het apparaat 576 mm Breedte van de voorkant van het apparaat 595 mm Breedte van de achterkant van het apparaat 559 mm Diepte van het apparaat 569 mm Ingebouwde diepte van het apparaat 548 mm Diepte met open deur 1022 mm Minimumgrootte ventilatie‐ opening. Opening geplaat...
Page 7 - NEDERLANDS 7
bedoeld om bestand te zijn tegen extreme fysieke omstandigheden in huishoudelijke apparaten, zoals temperatuur, trillingen, vochtigheid, of zijn bedoeld om informatie te geven over de operationele status van het apparaat. Ze zijn niet bedoeld voor gebruik in andere toepassingen en zijn niet geschikt...
Page 9 - BESCHRIJVING VAN HET PRODUCT; Algemeen overzicht; Draai aan de knop om de; Draai de regelknop om het in te stellen.; VOOR HET EERSTE GEBRUIK; NEDERLANDS 9
4. BESCHRIJVING VAN HET PRODUCT 4.1 Algemeen overzicht 8 7 11 9 10 5 4 1 2 3 3 3 6 4 1 5 2 1 Bedieningspaneel 2 Knop voor verwarmingsfuncties 3 Aan-uitlampje/symbool 4 Display 5 Bedieningsknop (voor de temperatuur) 6 Temperatuurindicator/symbool 7 Verwarmingselement 8 Lamp 9 Ventilator 10 Inschuifra...
Page 10 - Haal alle accessoires en verwijderbare; Verwarmingsfuncties
6.1 Tijd instellen Wacht bij eerste aansluiting op de stroom totdat het display het volgende weergeeft: "12:00". 1. , - druk hierop om de tijd in te stellen. 2. - Druk hierop om te bevestigen of het ingestelde tijdstip van de dag zal na vijf seconden automatisch worden opgeslagen. 6.2 Eerste...
Page 11 - Verwarmingsfunctie instellen; Draai aan de knop van de; Veiligheidsthermostaat; Stel een verwarmingsfunctie en de
Zie voor bereidingsinstructies het hoofdstuk 'Aanwijzingen en tips', Warmelucht (vochtig) . Kijk voor algemene aanbevelingen voor energiebesparing in het hoofdstuk 'Energie- efficiëntie', Energiebesparingstips. 7.3 Verwarmingsfunctie instellen 1. Draai aan de knop van de verwarmingsfuncties om een v...
Page 12 - Druk op een willekeurige toets om het; DE ACCESSOIRES GEBRUIKEN; Accessoires plaatsen; AANWIJZINGEN EN TIPS
5. Draai de knoppen naar de uitstand. 9.4 Instelling: Kookwekker 1. - druk hier herhaaldelijk op. - knippert. 2. , - druk hierop om de tijd in te stellen. De functie wordt automatisch na 5 sec gestart. Wanneer de ingestelde tijd is verstreken, klinkt er een geluidssignaal. 3. Druk op een willekeurig...
Page 13 - aanbevolen accessoires
Zie het hoofdstuk "Energie-efficiëntie" voor energiebesparingstips.Symbolen gebruikt in de tabellen: Soort voedsel Verwarmingsfunctie Temperatuur Accessoire Inzetniveau Kooktijd (min) 11.2 Warmelucht (vochtig) – aanbevolen accessoires Gebruik donkere en niet-reflecterende bakjes en schalen. ...
Page 14 - Informatie voor testinstituten
Bitterkoekjes, 20 stuks bakplaat of lekschaal 180 2 45 - 55 Muffins, 12 stuks bakplaat of lekschaal 170 2 30 - 40 Hartig gebak, 16 stuks bakplaat of lekschaal 170 2 35 - 45 Zandkoekjes, 20 stuks bakplaat of lekschaal 150 2 40 - 50 Taartjes, 8 stuks bakplaat of lekschaal 170 2 30 - 40 Groenten, gepo‐...
Page 15 - ONDERHOUD EN REINIGING; Opmerkingen over de reiniging; De deur verwijderen en
12. ONDERHOUD EN REINIGING WAARSCHUWING! Raadpleeg de hoofdstukken Veiligheid. 12.1 Opmerkingen over de reiniging Reinigingsmiddelen• Reinig de voorkant van het apparaat uitsluitend met een microvezeldoek met warm water en een mild reinigingsmiddel. Reinig en controleer de deurpakking rond het frame...
Page 16 - Het lampje vervangen; Achterlamp
hem naar voren, verwijder hem dan van zijn plek. 4. Plaats de deur op een zachte doek op een stabiele ondergrond. 5. Pak de deurafdekking aan de bovenkant van de deur aan beide kanten vast en druk deze naar binnen om de klemsluiting te ontgrendelen. 1 2 B 6. Trek de deurlijst naar voren om hem te ve...
Page 17 - Productinformatie en productinformatieblad volgens de EU-
13. PROBLEEMOPLOSSING WAARSCHUWING! Raadpleeg de hoofdstukken Veiligheid. 13.1 Wat moet je doen als ... Neem in alle gevallen die niet in deze tabel staan contact op met een geautoriseerd servicecentrum. Probleem Pauzeren en hervat‐ ten Het apparaat warmt niet op. De zekering is doorgesla‐ gen. Verz...
Page 18 - Restwarmte; MILIEUBESCHERMING
Soort oven Inbouwoven Massa BEB331010M 27.8 kg BES331010M 27.8 kg IEC/EN 60350-1 - Huishoudelijke elektrische kooktoestellen - Deel 1: Fornuizen, ovens, stoomovens en grills - Methoden voor het meten van prestaties. 14.2 Productinformatie voor stroomverbruik en maximale tijd om de toepasselijke modu...
Page 19 - Welcome to AEG! Thank you for choosing our appliance.; CONTENTS; SAFETY INFORMATION
Welcome to AEG! Thank you for choosing our appliance. Get usage advice, brochures, trouble shooter, service and repair information: www.aeg.com/support Subject to change without notice. CONTENTS 1. SAFETY INFORMATION.............................................................................. 19 2....
Page 21 - SAFETY INSTRUCTIONS; Electrical connection
• Always use oven gloves to remove or insert accessories or ovenware. • To remove the shelf supports first pull the front of the shelf support and then the rear end away from the side walls. Install the shelf supports in the opposite sequence. • Do not use a steam cleaner to clean the appliance. • D...
Page 25 - Securing the oven to the cabinet; PRODUCT DESCRIPTION; Turning the appliance on and off; Turn the knob for the heating functions to
3.2 Securing the oven to the cabinet 4. PRODUCT DESCRIPTION 4.1 General overview 8 7 11 9 10 5 4 1 2 3 3 3 6 4 1 5 2 1 Control panel 2 Knob for the heating functions 3 Power lamp / symbol 4 Display 5 Control knob (for the temperature) 6 Temperature indicator / symbol 7 Heating element 8 Lamp 9 Fan 1...
Page 26 - Initial preheating and cleaning; Remove all accessories and removable; Heating functions
5.3 Display A B A. Clock functions B. Timer 6. BEFORE FIRST USE WARNING! Refer to Safety chapters. 6.1 Setting the time After the first connection to the mains, wait until the display shows: "12:00". 1. , - press to set the time. 2. - press to confirm it or the set time of day will be saved ...
Page 27 - Setting a heating function; Turn the knob for the heating functions to; Turn the control knob to select the; ADDITIONAL FUNCTIONS; Safety thermostat; Set a heating function and the
Pizza Function To bake pizza and other dishes that re‐ quire more heat from below. Defrost To defrost food (vegetables and fruit). The defrosting time depends on the amount and size of the frozen food. 7.2 Notes on: Moist Fan Baking This function was used to comply with the energy efficiency class a...
Page 28 - USING THE ACCESSORIES; Inserting accessories
9.4 Setting: Minute Minder 1. - press repeatedly. - flashes. 2. , - press to set the time. The function starts automatically after 5 sec. When the set time ends, the signal sounds. 3. Press any button to stop the signal. 4. Turn the knobs to the off position. 9.5 Cancelling: Clock functions 1. - pre...
Page 29 - recommended accessories; Moist Fan Baking
Accessory Shelf position Cooking time (min) 11.2 Moist Fan Baking - recommended accessories Use dark and non-reflective tins and containers. They have better heat absorption than light colour and reflective dishes. • Pizza pan - dark, non-reflective, diameter 28cm • Baking dish - dark, non-reflectiv...
Page 30 - Information for test institutes; CARE AND CLEANING; Notes on cleaning
Vegetarian omelette pizza pan on wire shelf 180 3 35 - 45 Mediterranean vege‐ tables, 0.7 kg baking tray or dripping pan 180 4 35 - 45 11.4 Information for test institutes Tests according to IEC 60350-1. Small cakes, 20 per tray Conventional Cooking Baking tray 3 170 20 - 35 Small cakes, 20 per tray...
Page 32 - After cleaning, install the glass panel and; Replacing the lamp; Turn off the appliance and wait until it is; Back lamp; Replace the lamp with a suitable 300 °C
9. After cleaning, install the glass panel and the oven door. If the door is installed correctly, you will hear a click when closing the latches. The screen-printing zone must face the inner side of the door. Make sure that after the installation the surface of the glass panel frame on the screen-pr...
Page 33 - ENERGY EFFICIENCY; Energy Labelling and Ecodesign Regulations
Product number (PNC): Serial number (S.N.): 14. ENERGY EFFICIENCY 14.1 Product Information Sheet and Product Information according to EU Energy Labelling and Ecodesign Regulations Supplier's name AEG Model identification BEB331010M 949496348 BES331010M 949496347 Energy Efficiency Index 95.3 Energy e...
Page 34 - ENVIRONMENTAL CONCERNS
minimum 3 - 10 min before the end of cooking. The residual heat inside the appliance will continue to cook.Use the residual heat to keep the food warm or warm up other dishes.Keep food warm Choose the lowest possible temperature setting to use residual heat and keep the food warm. Moist Fan Baking F...
Page 35 - Bienvenue chez AEG ! Nous vous remercions d’avoir choisi l’un de; TABLE DES MATIÈRES; INFORMATION SUR LA SÉCURITÉ
Bienvenue chez AEG ! Nous vous remercions d’avoir choisi l’un de nos appareils. Obtenir des conseils d’utilisation, des brochures, un dépanneur, des informations sur le service et les réparations : www.aeg.com/support Sous réserve de modifications. TABLE DES MATIÈRES 1. INFORMATION SUR LA SÉCURITÉ.....
Page 36 - Sécurité générale
surveillés ou si des instructions relatives à l'utilisation de l'appareil en toute sécurité leur ont été données et s’ils comprennent les risques encourus. Les enfants de moins de 8 ans et les personnes ayant un handicap très important et complexe doivent être tenus à l'écart de l’appareil, à moins ...
Page 37 - CONSIGNES DE SÉCURITÉ
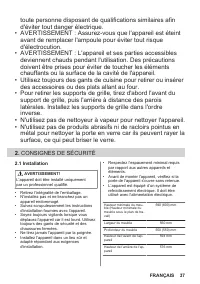
toute personne disposant de qualifications similaires afin d'éviter tout danger électrique. • AVERTISSEMENT : Assurez-vous que l'appareil est éteint avant de remplacer l'ampoule pour éviter tout risque d'électrocution. • AVERTISSEMENT : L'appareil et ses parties accessibles deviennent chauds pendant...
Page 38 - Branchement électrique
Largeur de l’avant de l’ap‐ pareil 595 mm Largeur de l’arrière de l’ap‐ pareil 559 mm Profondeur de l'appareil 569 mm Profondeur d’encastrement de l’appareil 548 mm Profondeur avec porte ou‐ verte 1022 mm Dimensions minimales de l’ouverture de ventilation. Ouverture placée sur la partie inférieure d...
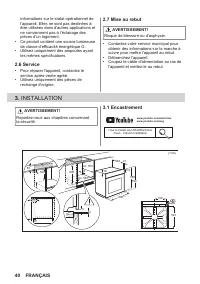
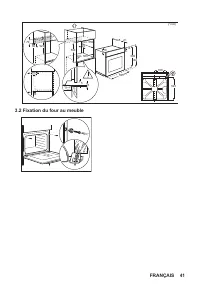
Page 41 - Fixation du four au meuble
min. 550 20 595 +-1 18 590 min. 560 594 589 114 21 548 3 5 70 60 520 60 20 198 523 (*mm) 3.2 Fixation du four au meuble FRANÇAIS 41
Page 42 - BANDEAU DE COMMANDE; Appuyez sur les manettes. Les manettes; Tournez la manette de sélection des; Tournez la manette de commande pour; A. Fonctions de l’horloge
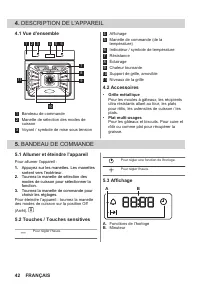
4. DESCRIPTION DE L'APPAREIL 4.1 Vue d’ensemble 8 7 11 9 10 5 4 1 2 3 3 3 6 4 1 5 2 1 Bandeau de commande 2 Manette de sélection des modes de cuisson 3 Voyant / symbole de mise sous tension 4 Affichage 5 Manette de commande (de la température) 6 Indicateur / symbole de température 7 Résistance 8 Écl...
Page 43 - AVANT LA PREMIÈRE UTILISATION; Réglage de l’heure; Retirez tous les accessoires et les; UTILISATION QUOTIDIENNE; Fonctions de cuisson
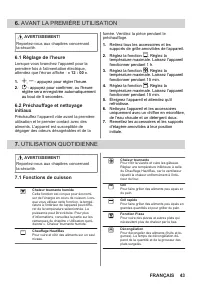
6. AVANT LA PREMIÈRE UTILISATION AVERTISSEMENT! Reportez-vous aux chapitres concernant la sécurité. 6.1 Réglage de l’heure Lorsque vous branchez l'appareil pour la première fois à l'alimentation électrique, attendez que l’écran affiche : « 12 : 00 ». 1. , - appuyez pour régler l’heure. 2. - appuyez ...
Page 44 - Tournez la manette des modes de; Tournez la manette pour sélectionner la; FONCTIONS SUPPLÉMENTAIRES; Ventilateur de refroidissement
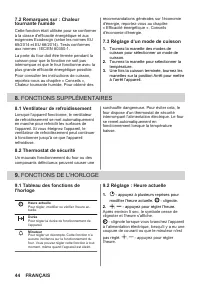
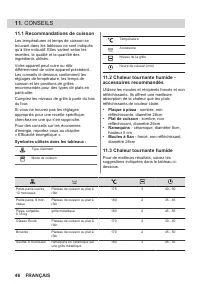
7.2 Remarques sur : Chaleur tournante humide Cette fonction était utilisée pour se conformer à la classe d'efficacité énergétique et aux exigences Ecodesign (selon les normes EU 65/2014 et EU 66/2014). Tests conformes aux normes : IEC/EN 60350-1.La porte du four doit être fermée pendant la cuisson p...
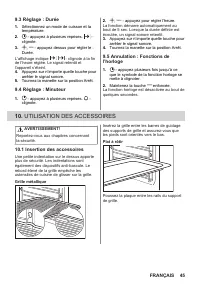
Page 45 - Tournez la manette sur la position Arrêt.; Tournez la manette sur la position Arrêt.; l’horloge; UTILISATION DES ACCESSOIRES; Insertion des accessoires
9.3 Réglage : Durée 1. Sélectionnez un mode de cuisson et la température. 2. - appuyez à plusieurs reprises. - clignote. 3. , - appuyez dessus pour régler le : Durée. L’affichage indique . - clignote à la fin de l’heure réglée. Le signal retentit et l’appareil s’éteint. 4. Appuyez sur n’importe quel...
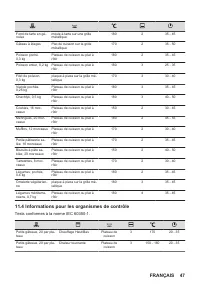
Page 47 - Informations pour les organismes de contrôle
Fond de tarte en gé‐ noise moule à tarte sur une grille métallique 180 2 35 - 45 Gâteau à étages Plat de cuisson sur la grille métallique 170 2 35 - 50 Poisson poché, 0,3 kg Plateau de cuisson ou plat à rôtir 180 2 35 - 45 Poisson entier, 0,2 kg Plateau de cuisson ou plat à rôtir 180 3 25 - 35 Filet...
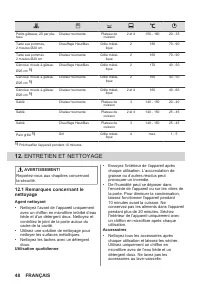
Page 48 - ENTRETIEN ET NETTOYAGE; Remarques concernant le; Utilisation quotidienne
Petits gâteaux, 20 par pla‐ teau Chaleur tournante Plateau de cuisson 2 et 4 150 - 160 20 - 35 Tarte aux pommes, 2 moules Ø20 cm Chauffage Haut/Bas Grille métal‐ lique 2 180 70 - 90 Tarte aux pommes, 2 moules Ø20 cm Chaleur tournante Grille métal‐ lique 2 160 70 - 90 Génoise, moule à gâteauØ26 cm 1)...
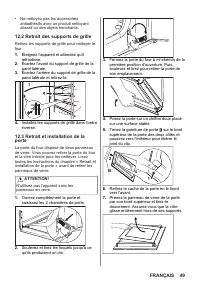
Page 50 - Après le nettoyage, installez le panneau; Remplacement de l’ampoule; Lampe arrière; Tournez le diffuseur en verre pour le; Données de maintenance
8. Nettoyez les vitres à l'eau savonneuse. Essuyez soigneusement les panneaux de verre. Ne passez pas les panneaux en verre au lave-vaisselle. 9. Après le nettoyage, installez le panneau de verre et la porte du four. Si la porte est installée correctement, vous entendrez un clic lors de la fermeture...
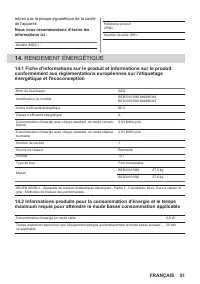
Page 51 - RENDEMENT ÉNERGÉTIQUE; conformément aux réglementations européennes sur l'étiquetage
retirez pas la plaque signalétique de la cavité de l'appareil.Nous vous recommandons d’écrire les informations ici : Modèle (MOD.) : Référence produit (PNC) : Numéro de série (SN) : 14. RENDEMENT ÉNERGÉTIQUE 14.1 Fiche d'informations sur le produit et informations sur le produit conformément aux rég...
Page 52 - Chaleur résiduelle; EN MATIÈRE DE PROTECTION DE L'ENVIRONNEMENT
14.3 Conseils pour économiser l’énergie Les conseils ci-dessous vous aideront à économiser de l'énergie lors de l'utilisation de votre appareil.Assurez-vous que la porte de l'appareil est fermée lorsque l'appareil est en marche. Évitez d'ouvrir l'appareil trop souvent pendant la cuisson. Nettoyez ré...
Page 53 - Willkommen bei AEG! Danke, dass Sie sich für unser Gerät; INHALTSVERZEICHNIS; SICHERHEITSHINWEISE
Willkommen bei AEG! Danke, dass Sie sich für unser Gerät entschieden haben. Um Anwendungshinweise, Prospekte, Informationen zu Fehlerbehebung, Service und Reparatur zu erhalten: www.aeg.com/support Änderungen vorbehalten. INHALTSVERZEICHNIS 1. SICHERHEITSHINWEISE........................................
Page 54 - Allgemeine Sicherheit
Sicherheit zuständige Person beaufsichtigt werden oder von dieser Person Anweisungen erhalten haben, wie das Gerät sicher zu bedienen ist und welche Gefahren bei nicht ordnungsgemäßer Bedienung bestehen. Kinder unter 8 Jahren und Personen mit schweren Behinderungen oder Mehrfachbehinderung sollten v...
Page 55 - SICHERHEITSANWEISUNGEN
• Wenn das Netzkabel beschädigt ist, muss es vom Hersteller, seinem autorisierten Kundenservice oder einer gleichermaßen qualifizierten Person ausgetauscht werden, um Gefahren durch elektrischen Strom zu vermeiden. • WARNUNG: Vergewissern Sie sich, dass das Gerät ausgeschaltet ist, bevor Sie die Lam...
Page 56 - Elektrischer Anschluss
Mindesthöhe des Einbau‐ möbels (Mindesthöhe des Schranks unter der Arbeits‐ platte) 590 (600) mm Schrankbreite 560 mm Schranktiefe 550 (550) mm Höhe der Gerätevordersei‐ te 594 mm Höhe der Geräterückseite 576 mm Breite der Gerätevordersei‐ te 595 mm Breite der Geräterückseite 559 mm Gerätetiefe 569 ...
Page 57 - Reinigung und Pflege
Gesamtleistung (W) Kabelquerschnitt (mm²) maximal 3680 3x1.5 Das Erdungskabel (grün/gelbes Kabel) muss 2 cm länger sein als das braune Phasen- und das blaue Neutralkabel. 2.3 Gebrauch WARNUNG! Verletzungs-, Verbrennungs-, Stromschlag- oder Explosionsgefahr. • Nehmen Sie keine technischen Änderungen ...
Page 60 - GERÄTEBESCHREIBUNG; Geräts; Drehen Sie den Knopf für die
4. GERÄTEBESCHREIBUNG 4.1 Gesamtansicht 8 7 11 9 10 5 4 1 2 3 3 3 6 4 1 5 2 1 Bedienfeld 2 Einstellknopf für die Ofenfunktionen 3 Betriebskontrolllampe/-symbol 4 Display 5 Einstellknopf (für die Temperatur) 6 Temperaturanzeige / -symbol 7 Heizelement 8 Lampe 9 Ventilator 10 Einschubschienen, herausn...
Page 61 - VOR DER ERSTEN INBETRIEBNAHME; Einstellen der Uhrzeit; TÄGLICHER GEBRAUCH
6. VOR DER ERSTEN INBETRIEBNAHME WARNUNG! Siehe Kapitel Sicherheitshinweise. 6.1 Einstellen der Uhrzeit Warten Sie nach dem ersten Anschluss an die Stromversorgung, bis das Display Folgendes anzeigt: "12:00". 1. , - zum Einstellen der Zeit drücken. 2. Bestätigen Sie mit oder warten Sie 5 Sek...
Page 62 - Einstellen einer Ofenfunktion; Drehen Sie nach Beendigung des; Sicherheitsthermostat; Wählen Sie eine Ofenfunktion und die
7.2 Hinweise zu: Feuchte Umluft Diese Funktion wurde zur Einhaltung der Energieeffizienzklasse und der Ökodesign- Anforderungen (gemäß EU 65/2014 und EU 66/2014) verwendet. Tests gemäß: IEC/EN 60350-1.Die Backofentür sollte während des Garvorgangs geschlossen bleiben, damit die Funktion nicht unterb...
Page 63 - VERWENDUNG DES ZUBEHÖRS; Einsetzen des Zubehörs
3. , - drücken zum Einstellen der Dauer. Das Display zeigt . – blinkt, wenn die eingestellte Zeit endet. Das Signal ertönt und das Gerät schaltet sich aus. 4. Drücken Sie eine beliebige Taste, um das Signal abzustellen. 5. Drehen Sie den Knopf in die Aus- Position. 9.4 Einstellung: Kurzzeit-Wecker 1...
Page 64 - TIPPS UND HINWEISE; Zubehör
11. TIPPS UND HINWEISE 11.1 Garempfehlungen Die Temperaturen und Garzeiten in den Tabellen dienen nur als Richtwerte. Sie hängen von den Rezepten sowie der Qualität und Menge der verwendeten Zutaten ab.Ihr Gerät backt oder brät unter Umständen anders als Ihr früheres Gerät. Die Hinweise unten enthal...
Page 65 - Informationen für Prüfinstitute
Fischfilet, 0.3 kg Pizzapfanne auf Kombirost 170 3 30 - 40 Fleisch, pochiert, 0.25 kg Backblech oder tiefes Blech 180 3 35 - 45 Schaschlik0.5kg Backblech oder tiefes Blech 180 3 40 - 50 Plätzchen, 16 Stück Backblech oder tiefes Blech 150 2 30 - 45 Makronen, 20 Stück Backblech oder tiefes Blech 180 2...
Page 66 - REINIGUNG UND PFLEGE; Hinweise zur Reinigung; Schalten Sie das Gerät aus und warten; Setzen Sie die Einhängegitter in; Öffnen Sie die Backofentür vollständig
Mürbeteiggebäck Ober- / Unterhitze Backblech 3 140 - 150 25 - 45 Toast 1) Grill Kombirost 4 Max. 1 - 5 1) Gerät 10 Minuten vorheizen. 12. REINIGUNG UND PFLEGE WARNUNG! Siehe Kapitel Sicherheitshinweise. 12.1 Hinweise zur Reinigung Reinigungsmittel• Reinigen Sie die Vorderseite des Geräts nur mit ein...
Page 67 - Austauschen der Lampe
2. Heben und ziehen Sie die Verriegelungen an, bis sie einrasten. 3. Schließen Sie die Backofentür halb bis zur ersten Öffnungsstellung. Anschließend heben und ziehen Sie die Tür aus der Aufnahme heraus. 4. Legen Sie die Tür auf einer stabilen Oberfläche auf einen weichen Lappen. 5. Fassen Sie die T...
Page 68 - Hintere Lampe; Drehen Sie die Glasabdeckung und; Verordnungen zu Umweltdesign und Energiekennzeichnung
VORSICHT! Halten Sie die Halogenlampe immer mit einem Tuch fest, um zu verhindern, dass Fettrückstände auf der Lampe verbrennen. Hintere Lampe 1. Drehen Sie die Glasabdeckung und nehmen Sie sie ab. 2. Reinigen Sie die Glasabdeckung. 3. Ersetzen Sie die Lampe durch eine geeignete, bis 300 °C hitzebes...
Page 69 - Garen mit Heißluft
Modellbezeichnung BEB331010M 949496348 BES331010M 949496347 Energieeffizienzindex 95.3 Energieeffizienzklasse A Energieverbrauch mit einer Standardbeladung, konventioneller Mo‐ dus 0.93 kWh/Programm Energieverbrauch mit einer Standardbeladung, Umluft-Modus 0.81 kWh/Programm Anzahl der Garräume 1 Wär...
Page 70 - INFORMATIONEN ZUR ENTSORGUNG; Ihre Pflichten als Endnutzer
15. INFORMATIONEN ZUR ENTSORGUNG Ihre Pflichten als Endnutzer Dieses Elektro- bzw. Elektronikgerät ist mit einer durchgestrichenen Abfalltonne auf Rädern gekennzeichnet. Das Gerät darf deshalb nur getrennt vom unsortierten Siedlungsabfall gesammelt und zurückgenommen werden, es darf also nicht in de...
Page 72 - Benvenuto in AEG! Grazie per aver scelto di acquistare questo; INDICE; INFORMAZIONI DI SICUREZZA
Benvenuto in AEG! Grazie per aver scelto di acquistare questo prodotto. Ricevere consigli, scaricare i nostri opuscoli, eliminare eventuali anomalie, ottenere informazioni sull'assistenza e la riparazione: www.aeg.com/support Con riserva di modifiche. INDICE 1. INFORMAZIONI DI SICUREZZA................
Page 73 - Avvertenze di sicurezza generali
I bambini che hanno meno di 8 anni e le persone con disabilità diffuse e complesse vanno tenuti lontani dall’elettrodomestico, a meno che non vi sia una supervisione continua. • Sorvegliare i bambini per assicurarsi che non giochino con l’apparecchiatura. • Tenere gli imballaggi lontano dai bambini ...
Page 74 - ISTRUZIONI DI SICUREZZA
autorizzato o da una persona qualificata per evitare situazioni di pericolo elettrico. • AVVERTENZA: Assicurarsi che l'elettrodomestico sia spento prima di sostituire la lampadina per evitare la possibilità di scosse elettriche. • AVVERTENZA: L’elettrodomestico e le parti accessibili si riscaldano m...
Page 75 - Collegamento elettrico
Larghezza della parte ante‐ riore dell'apparecchiatura 595 mm Larghezza della parte po‐ steriore dell'apparecchiatu‐ ra 559 mm Profondità dell'apparec‐ chiatura 569 mm Profondità di incasso del‐ l'apparecchiatura 548 mm Profondità con porta aperta 1022 mm Dimensioni minime dell'a‐ pertura di ventila...
Page 77 - Illuminazione interna
• Se si utilizza uno spray per il forno, seguire attentamente le istruzioni di sicurezza sulla confezione. 2.5 Illuminazione interna AVVERTENZA! Pericolo di scossa elettrica. • Per quanto riguarda la lampada o le lampade all'interno di questo prodotto e le lampade di ricambio vendute separatamente: ...
Page 78 - Fissaggio nel mobile
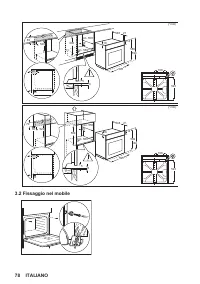
18 594 589 114 21 548 595 +-1 min. 550 20 600 min. 560 3 5 60 20 80 520 60 198 523 (*mm) min. 550 20 595 +-1 18 590 min. 560 594 589 114 21 548 3 5 70 60 520 60 20 198 523 (*mm) 3.2 Fissaggio nel mobile 78 ITALIANO
Page 79 - DESCRIZIONE DEL PRODOTTO; Panoramica generale; PANNELLO DEI COMANDI; Accensione e spegnimento; Ruotare la manopola delle funzioni; Ruotare la manopola di controllo per
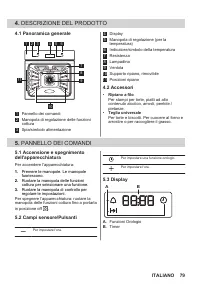
4. DESCRIZIONE DEL PRODOTTO 4.1 Panoramica generale 8 7 11 9 10 5 4 1 2 3 3 3 6 4 1 5 2 1 Pannello dei comandi 2 Manopola di regolazione delle funzioni cottura 3 Spia/simbolo alimentazione 4 Display 5 Manopola di regolazione (per la temperatura) 6 Indicatore/simbolo della temperatura 7 Resistenza 8 ...
Page 80 - PRIMA DI UTILIZZARE L'ELETTRODOMESTICO; Impostazione del tempo; Rimuovere gli accessori e i supporti; UTILIZZO QUOTIDIANO
6. PRIMA DI UTILIZZARE L'ELETTRODOMESTICO AVVERTENZA! Fare riferimento ai capitoli sulla sicurezza. 6.1 Impostazione del tempo Dopo il primo collegamento alla corrente, attendere fino a che sul display non compare: “12:00”. 1. , - premere per impostare l’ora. 2. - premere per confermare oppure l’ora...
Page 81 - Ruotare la manopola delle funzioni di; FUNZIONI AGGIUNTIVE; Ventola di raffreddamento; FUNZIONI DEL TIMER
7.2 Note su: Cottura ventilata umida Questa funzione è stata utilizzata per la conformità alla classe energetica e ai requisiti di ecodesign (secondo la normativa EU 65/2014 e EU 66/2014). Test conformemente a: IEC/EN 60350-1.La porta del forno dovrebbe essere chiusa in fase di cottura, in modo che ...
Page 82 - orologio; UTILIZZO DI ACCESSORI; Inserimento di accessori
9.3 Impostazione: Durata 1. Imposta una funzione di cottura e la temperatura. 2. - premere ripetutamente. - lampeggia. 3. , - premere per impostare: Durata. Il display mostra . - lampeggia al termine del tempo impostato. Viene emesso un segnale acustico e l’apparecchiatura si spegne. 4. Premere un t...
Page 83 - CONSIGLI E SUGGERIMENTI UTILI; Consigli di cottura
11. CONSIGLI E SUGGERIMENTI UTILI 11.1 Consigli di cottura La temperatura e i tempi di cottura specificati nelle tabella sono solo indicativi. Dipendono dalle ricette, dalla qualità e quantità degli ingredienti utilizzati.La nuova apparecchiatura può cuocere o arrostire in modo differente rispetto a...
Page 84 - Informazioni per gli istituti di test
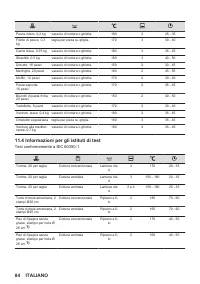
Pesce intero, 0,2 kg vassoio di cottura o ghiotta 180 3 25 - 35 Filetto di pesce, 0,3 kg teglia per pizza su griglia 170 3 30 - 40 Carne lessa, 0,25 kg vassoio di cottura o ghiotta 180 3 35 - 45 Shashlik, 0,5 kg vassoio di cottura o ghiotta 180 3 40 - 50 Dolcetti, 16 pezzi vassoio di cottura o ghiot...
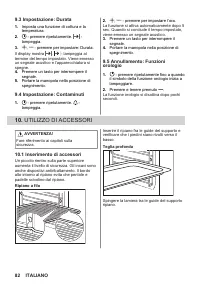
Page 85 - Spegnere l'apparecchiatura e attendere; Estrarre la parte posteriore del supporto; Installare i supporti ripiani seguendo al
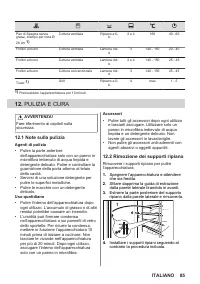
Pan di Spagna senza grassi, stampo per torta Ø26 cm 1) Cottura ventilata Ripiano a fi‐ lo 2 e 4 160 40 - 60 Frollini al burro Cottura ventilata Lamiera dol‐ ci 3 140 - 150 20 - 40 Frollini al burro Cottura ventilata Lamiera dol‐ ci 2 e 4 140 - 150 25 - 45 Frollini al burro Cottura convenzionale Lami...
Page 87 - Sostituzione della lampadina; Lampadina posteriore; Girare il rivestimento di vetro per toglierlo.; RISOLUZIONE DEI PROBLEMI; Dati dell’Assistenza
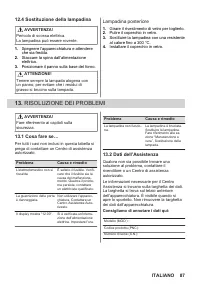
12.4 Sostituzione della lampadina AVVERTENZA! Pericolo di scossa elettrica. La lampadina può essere rovente. 1. Spegnere l'apparecchiatura e attendere che sia fredda. 2. Staccare la spina dall’alimentazione elettrica. 3. Posizionare il panno sulla base del forno. ATTENZIONE! Tenere sempre la lampada...
Page 88 - EFFICIENZA ENERGETICA; energetica
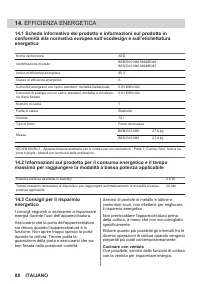
14. EFFICIENZA ENERGETICA 14.1 Scheda informativa del prodotto e informazioni sul prodotto in conformità alla normativa europea sull’ecodesign e sull’etichettatura energetica Nome del fornitore AEG Identificazione modello BEB331010M 949496348 BES331010M 949496347 Indice di efficienza energetica 95.3...
Page 90 - ÍNDICE; INFORMAÇÕES DE SEGURANÇA
Bem-vindo(a) à AEG! Obrigado por escolher o nosso aparelho. Obter conselhos de utilização, folhetos, resolução de problemas e informações sobre assistência e reparações: www.aeg.com/support Sujeito a alterações sem aviso prévio. ÍNDICE 1. INFORMAÇÕES DE SEGURANÇA........................................
Page 92 - INSTRUÇÕES DE SEGURANÇA
• AVISO: Certifique-se de que o aparelho está desligado antes de substituir a lâmpada, para evitar a possibilidade de choque elétrico. • AVISO: O forno e as partes acessíveis ficam quentes durante a utilização. Deve ter cuidado para evitar tocar nas resistências ou na superfície da cavidade do apare...
Page 95 - Assistência técnica
2.6 Assistência técnica • Para reparar o aparelho, contacte o Centro de Assistência Técnica Autorizado. • Utilize apenas peças sobressalentes originais. 2.7 Eliminação AVISO! Risco de ferimentos ou asfixia. • Contacte a sua autoridade municipal para saber como descartar o aparelho corretamente. • De...
Page 96 - Fixação do forno no armário
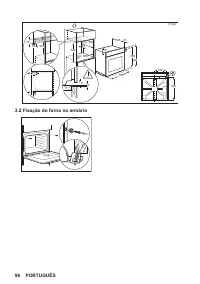
min. 550 20 595 +-1 18 590 min. 560 594 589 114 21 548 3 5 70 60 520 60 20 198 523 (*mm) 3.2 Fixação do forno no armário 96 PORTUGUÊS
Page 97 - Ligar e desligar o aparelho; Rodar o botão de funções de; Rode o botão de controlo para ajustar as; A. Funções do relógio; ANTES DA PRIMEIRA UTILIZAÇÃO
4. DESCRIÇÃO DO PRODUTO 4.1 Visão geral 8 7 11 9 10 5 4 1 2 3 3 3 6 4 1 5 2 1 Painel de commandos 2 Botão para os tipos de aquecimento 3 Luz/símbolo de potência 4 Visor 5 Botão de controlo (para a temperatura) 6 Símbolo/indicador de temperatura 7 Elemento de aquecimento 8 Lâmpada 9 Ventilador 10 Apo...
Page 98 - limpeza; Remova todos os acessórios e apoios; Funções de aquecimento
1. , - premir para definir a hora. 2. - prima para confirmar ou a hora do dia definida será guardada automaticamente após 5 segundos. 6.2 Pré-aquecimento inicial e limpeza Pré-aqueça o aparelho vazio antes da primeira utilização e do contacto com alimentos. O aparelho pode emitir odores e fumos desa...
Page 99 - Definir um tipo de aquecimento; FUNÇÕES ADICIONAIS; Ventoinha de arrefecimento; FUNÇÕES DE RELÓGIO; Tabela das funções de relógio
7.3 Definir um tipo de aquecimento 1. Rode o botão para as funções de aquecimento para selecionar uma função de aquecimento. 2. Rode o botão de controlo para selecionar a temperatura. 3. Quando a cozedura terminar, rode os botões para a posição off (desligado) para desligar o aparelho. 8. FUNÇÕES AD...
Page 100 - relógio; UTILIZAR OS ACESSÓRIOS; Inserir acessórios; SUGESTÕES E DICAS; Recomendações para cozinhar
9.5 Cancelamento: Funções do relógio 1. – premir repetidamente até o símbolo da função do relógio começar a piscar. 2. Prima continuamente . A função do relógio desliga após alguns segundos. 10. UTILIZAR OS ACESSÓRIOS AVISO! Consulte os capítulos relativos à segurança. 10.1 Inserir acessórios Um peq...
Page 102 - Informação para institutos de teste
Macarons, 20 unida‐ des tabuleiro para assar ou tabu‐ leiro para recolha de gordura 180 2 45 - 55 Queques, 12 unida‐ des tabuleiro para assar ou tabu‐ leiro para recolha de gordura 170 2 30 - 40 Pastelaria salgada, 16 unidades tabuleiro para assar ou tabu‐ leiro para recolha de gordura 170 2 35 - 45...
Page 103 - MANUTENÇÃO E LIMPEZA; Notas sobre a limpeza; Desligue o aparelho e aguarde até que; Puxe a parte de trás do apoio para; Instale os apoios para prateleiras na; Remover e instalar a porta
Pão pequeno Ventilado + Resistência Circ Tabuleiro para assar 2 e 4 140 - 150 25 - 45 Pão pequeno Aquecimento convencio‐ nal Tabuleiro para assar 3 140 - 150 25 - 45 Tosta 1) Grelhador Prateleira em grelha 4 máx. 1 - 5 1) Pré-aqueça o aparelho durante 10 minutos. 12. MANUTENÇÃO E LIMPEZA AVISO! Cons...
Page 105 - Substituir a lâmpada; Lâmpada posterior; Rode a proteção de vidro para a retirar.; RESOLUÇÃO DE PROBLEMAS; Dados de assistência técnica
12.4 Substituir a lâmpada AVISO! Risco de choque elétrico. A lâmpada pode estar quente. 1. Desligue o aparelho e aguarde até que esteja frio. 2. Desligue o aparelho da alimentação elétrica. 3. Coloque o pano no chão do forno. CUIDADO! Segure sempre a lâmpada de halogénio com um pano, para evitar que...
Page 106 - EFICIÊNCIA ENERGÉTICA; com os Regulamentos de Rotulagem de Energia e Ecodesign da UE
14. EFICIÊNCIA ENERGÉTICA 14.1 Informação do produto e folheto de informação do produto de acordo com os Regulamentos de Rotulagem de Energia e Ecodesign da UE Nome do fornecedor AEG Identificação do modelo BEB331010M 949496348 BES331010M 949496347 Índice de Eficiência Energética 95.3 Classe de efic...
Page 107 - Ventilado com Resistência; PREOCUPAÇÕES AMBIENTAIS
para 3 a 10 min no mínimo antes do fim da cozedura. O calor residual no interior do aparelho continuará a cozinhar.Utilize o calor residual para manter os alimentos quentes ou aquecer outros pratos.Manter os alimentos quentes Para utilizar o calor residual para manter os alimentos quentes, selecione...
Page 108 - Le damos la bienvenida a AEG. Gracias por elegir nuestro aparato.; CONTENIDO; INFORMACIÓN SOBRE SEGURIDAD
Le damos la bienvenida a AEG. Gracias por elegir nuestro aparato. Obtener consejos, folletos, soluciones a problemas e información de servicio y reparación: www.aeg.com/support Salvo modificaciones. CONTENIDO 1. INFORMACIÓN SOBRE SEGURIDAD....................................................... 108 2...
Page 109 - Instrucciones generales de seguridad
comprendan los riesgos. Es necesario mantener alejados del aparato a los niños de menos de 8 años, así como a las personas con minusvalías importantes y complejas, salvo que estén bajo supervisión continua. • Es necesario vigilar a los niños para que no jueguen con el aparato. • Mantenga todo el mat...
Page 110 - INSTRUCCIONES DE SEGURIDAD
• ADVERTENCIA: Asegúrese de que el aparato está apagado antes de cambiar la bombilla para evitar el riesgo de descarga eléctrica. • ADVERTENCIA: El horno y las piezas accesibles se calientan mucho durante el funcionamiento. Debe tener cuidado para evitar tocar los elementos de calentamiento o la sup...
Page 111 - Conexión eléctrica
Anchura de la parte trasera del aparato 559 mm Fondo del aparato 569 mm Fondo empotrado del apa‐ rato 548 mm Fondo con la puerta abierta 1022 mm Tamaño mínimo de la aber‐ tura de ventilación. Abertu‐ ra situada en la parte trase‐ ra inferior 560x20 mm Longitud del cable de ali‐ mentación. El cable e...
Page 113 - Asistencia tecnica
• Este producto contiene una fuente luminosa de la clase de eficiencia energética G. • Utilice solo bombillas de las mismas características . 2.6 Asistencia tecnica • Para reparar el aparato, póngase en contacto con el centro de servicio autorizado. • Utilice solamente piezas de recambio originales....
Page 114 - Fijación del horno al mueble
min. 550 20 595 +-1 18 590 min. 560 594 589 114 21 548 3 5 70 60 520 60 20 198 523 (*mm) 3.2 Fijación del horno al mueble 114 ESPAÑOL
Page 115 - DESCRIPCIÓN DEL PRODUCTO; Encendido y apagado del; Gire el mando para seleccionar la función; A. Funciones de reloj; ANTES DEL PRIMER USO; Ajuste de la hora
4. DESCRIPCIÓN DEL PRODUCTO 4.1 Resumen general 8 7 11 9 10 5 4 1 2 3 3 3 6 4 1 5 2 1 Panel de control 2 Mando de las funciones de cocción 3 Piloto/símbolo de alimentación 4 Pantalla 5 Mando de control (para la temperatura) 6 Indicador/símbolo de temperatura 7 Resistencia 8 Bombilla 9 Ventilador 10 ...
Page 117 - Ajustar una función de cocción; FUNCIONES ADICIONALES; Ventilador de refrigeración; FUNCIONES DEL RELOJ; Tabla de funciones del reloj
7.3 Ajustar una función de cocción 1. Gire el mando del horno para seleccionar una función de cocción. 2. Gire el mando de control para seleccionar la temperatura. 3. Al terminar la cocción, gire los mandos hasta la posición de apagado para apagar el aparato. 8. FUNCIONES ADICIONALES 8.1 Ventilador ...
Page 118 - USO DE ACCESORIOS; Inserción de accesorios
9.5 Cancelación: Funciones de reloj 1. - pulsa repetidamente hasta que el símbolo de la función de reloj empiece a parpadear. 2. Mantenga pulsado . La función de reloj se apaga después de unos segundos. 10. USO DE ACCESORIOS ADVERTENCIA! Consulte los capítulos sobre seguridad. 10.1 Inserción de acce...
Page 119 - accesorios recomendados
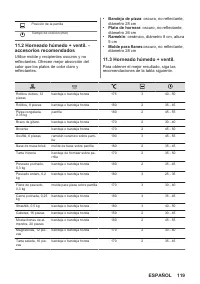
Posición de la parrilla Tiempo de cocción (min) 11.2 Horneado húmedo + ventil. - accesorios recomendados Utilice molde y recipientes oscuros y no reflectantes. Ofrecen mejor absorción del calor que los platos de color claro y reflectantes. • Bandeja de pizza: oscura, no reflectante, diámetro 28 cm •...
Page 120 - Información para institutos de pruebas
Galletas crujientes de masa quebrada, 20 piezas bandeja o bandeja honda 150 2 40 - 50 Tartaletas, 8 piezas bandeja o bandeja honda 170 2 30 - 40 Verduras pochadas, 0,4 kg bandeja o bandeja honda 180 2 35 - 45 Tortilla vegetariana molde para pizza sobre parrilla 180 3 35 - 45 Verduras mediterrá‐ neas...
Page 121 - MANTENIMIENTO Y LIMPIEZA; Notas sobre la limpieza; Extracción e instalación de la
12. MANTENIMIENTO Y LIMPIEZA ADVERTENCIA! Consulte los capítulos sobre seguridad. 12.1 Notas sobre la limpieza Agentes limpiadores• Limpie la parte frontal del aparato solo con un paño de microfibra humedecido en agua tibia y detergente suave. Limpie y compruebe la junta de la puerta alrededor del i...
Page 122 - Cambio de la bombilla; Bombilla trasera
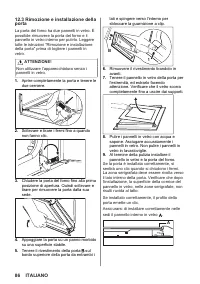
3. Cierre la puerta del horno hasta la primera posición de apertura (a mitad de camino). A continuación, levanta y tira de la puerta para extraerla de su sitio. 4. Coloque la puerta sobre un paño suave en una superficie estable. 5. Sujete el marco de la puerta por el borde superior de la puerta por ...
Page 123 - SOLUCIÓN DE PROBLEMAS; Datos de servicio; EFICACIA ENERGÉTICA; Ficha de información del producto e Información del producto
13. SOLUCIÓN DE PROBLEMAS ADVERTENCIA! Consulte los capítulos sobre seguridad. 13.1 Qué hacer si... En cualquier otro caso no mencionado en esta tabla, le rogamos en ponga en contacto con un Centro de Servicio Autorizado. Problema Causa y solución El aparato no se calienta. Ha saltado el fusible. As...
Page 124 - Calor residual; ASPECTOS MEDIOAMBIENTALES
Volumen 72 l Tipo de horno Horno empotrable Masa BEB331010M 27.8 kg BES331010M 27.8 kg IEC/EN 60350-1 - Aparatos electrodomésticos de cocción - Parte 1: Cocinas, hornos, hornos de vapor y grills - Métodos de medida del rendimiento. 14.2 Información de producto sobre consumo de energía y el tiempo má...