Page 3 - per rISULTATI perFeTTI; insieme ai normali rifiuti domestici. Portare il prodotto al; ASSISTeNZA
3 italian per rISULTATI perFeTTI Grazie per aver scelto di acquistare questo prodotto AeG. Lo abbiamo creato per fornirvi prestazioni impeccabili per molti anni, grazie a tecnologie innovative che vi semplificheranno la vita - funzioni che non troverete sui normali elettrodomestici. Vi invitiamo di ...
Page 4 - coNSIGLI e SUGGerIMeNTI; INSTALLAZIoNe; USo; MANUTeNZIoNe
4 coNSIGLI e SUGGerIMeNTI Questo libretto di istruzioni per l’uso è previsto per più versioni dell’ apparec - chio. É possibile che siano descritti singoli particolari della dotazione, che non riguardano il Vostro apparecchio. INSTALLAZIoNe • Il produttore declina qualsiasi responsabilità per danni ...
Page 5 - cArATTerISTIcHe; ingombro
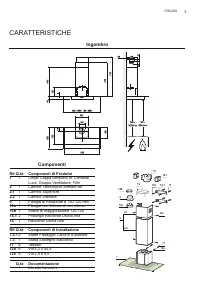
5 ITALIAN cArATTerISTIcHe ingombro Componenti rif. Q.tà Componenti di Prodotto 1 1 corpo cappa completo di: comandi, Luce, Gruppo Ventilatore, Filtri 2 1 camino Telescopico formato da: 2.1 1 camino Superiore 2.2 1 camino Inferiore 9 1 Flangia di Riduzione ø 150-120 mm 10a 1 Flangia con Valvola di no...
Page 6 - foratura Parete e fissaggio Staffe
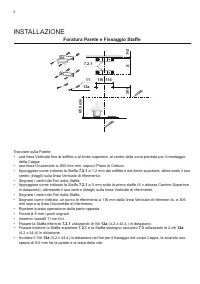
6 INSTALLAZIoNe foratura Parete e fissaggio Staffe Tracciare sulla parete: • una linea Verticale fino al soffitto o al limite superiore, al centro della zona prevista per il montaggio della Cappa; • una linea Orizzontale a: 650 mm min. sopra il Piano di Cottura. • Appoggiare come indicato la Staffa ...
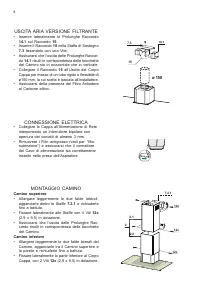
Page 7 - MoNTAGGIo corpo cAppA; coNNeSSIoNI
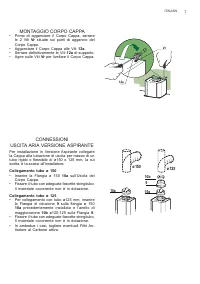
7 italian MoNTAGGIo corpo cAppA • Prima di agganciare il Corpo Cappa, serrare le 2 Viti Vr situate sui punti di aggancio del corpo cappa. • Agganciare il Corpo Cappa alle Viti 12a . • Serrare definitivamente le Viti 12a di supporto. • Agire sulle Viti Vr per livellare il corpo cappa. coNNeSSIoNI USc...
Page 9 - Quadro comandi
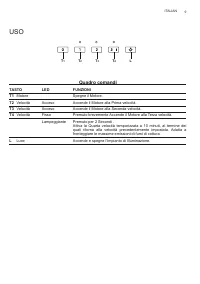
9 italian USo Quadro comandi tAStO LEd fUNZiONit1 Motore Spegne il Motore. t2 Velocità Acceso Accende il Motore alla Prima velocità. t3 Velocità Acceso Accende il Motore alla Seconda velocità. t4 Velocità Fisso Premuto brevemente Accende il Motore alla Terza velocità. Lampeggiante premuto per 2 Seco...
Page 11 - For perFecT reSULTS; facility orcontact your municipal office.; cUSToMer cAre ANd SerVIce
11 english For perFecT reSULTS Thank you for choosing this AeG product. We have created it to give you impeccable performance for many years, with innovative technologies that help make life simpler – features you might not find on ordinary appliances. Please spend a few minutes reading to get the v...
Page 12 - recoMMeNdATIoNS ANd SUGGeSTIoNS; iNStALLAtiON; USE; mAiNtENANCE
12 recoMMeNdATIoNS ANd SUGGeSTIoNS The Instructions for Use apply to several versions of this appliance. Accordingly, you may find descriptions of individual features that do not apply to your specific appliance. iNStALLAtiON • The manufacturer will not be held liable for any damages resulting from ...
Page 13 - cHArAcTerISTIcS; dimensions
13 english cHArAcTerISTIcS dimensions Components ref. Q.ty Product Components 1 1 Hood Body, complete with: controls, Light, Blower, Filters 2 1 Telescopic chimney comprising: 2.1 1 Upper Section 2.2 1 Lower Section 9 1 Reducer Flange ø 150-120 mm 10a 1 dumper 10b 1 Adapting ring ø 120-125 mm 14.1 2...
Page 14 - INSTALLATIoN; Wall drilling and bracket fixing
14 INSTALLATIoN Wall drilling and bracket fixing Wall marking: • Draw a vertical line on the supporting wall up to the ceiling, or as high as practical, at the centre of the area in which the hood will be installed. • Draw a horizontal line at 650 mm above the hob.• Place bracket 7.2.1 on the wall a...
Page 15 - Hood Body MoUNTING; coNNecTIoNS
15 english Hood Body MoUNTING • Before attaching the hood body, tighten the two screws Vr located on the hood body mounting points. • Hook the hood body onto the screws 12a . • Fully tighten the support screws 12a . • Adjust the screws Vr to level the hood body. coNNecTIoNS dUcTed VerSIoN AIr eXHAUS...
Page 17 - USe; Control panel
17 english USe Control panel bUttON LEd fUNCtiONS t1 Motor Turns the motor off. t2 Speed on Turns the Motor on at Speed one. t3 Speed on Turns the Motor on at Speed two. t4 Speed Fixed When pressed briefly, turns the Motor on at Speed three. Flashing pressed for 2 Seconds. Activates Speed four with ...
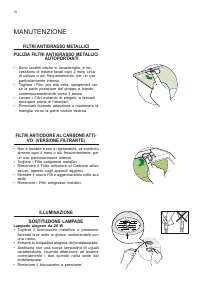
Page 18 - MAINTeNANce; mEtAL grEASE fiLtErS
18 MAINTeNANce mEtAL grEASE fiLtErS CLEANiNg tHE SELf-bEAriNg mEtAL grEASE fiLtErS • The filters must be cleaned every 2 months of operation, or more frequently for particularly heavy usage, and can be washed in a dish - washer. • Remove the filters one at a time by pushing them towards the back of ...
Page 19 - FÜr perFekTe erGeBNISSe; Besuchen Sie den Webshop unter:; UMWeLTTIppS; den entsprechenden Recyclingbehältern.; KUNDENDIENST UND -BETREUUNG; Wir empfehlen die Verwendung von originalersatzteilen.
19 german FÜr perFekTe erGeBNISSe danke, dass Sie sich für dieses AeG produkt entschieden haben. Wir haben es geschaffen, damit Sie viele Jahre von seiner ausgezeichneten Leistung und den innovativen Technologien, die Ihnen das Leben erleichtern, profitieren können. Es ist mit Funktionen ausgestatte...
Page 20 - eMpFeHLUNGeN UNd HINWeISe; fÜr dEN KÜCHENmÖbEL-mONtEUr; fÜr dEN bENUtZEr; WArtUNg
20 eMpFeHLUNGeN UNd HINWeISe Diese Gebrauchsanleitung gilt für mehrere Geräte-Ausführungen. Es ist möglich, dass einzelne Ausstattungsmerkmale beschrieben sind, die nicht auf Ihr Gerät zutreffen. fÜr dEN KÜCHENmÖbEL-mONtEUr • Der Hersteller haftet nicht für Schäden, die auf eine fehlerhafte und unsa...
Page 21 - cHArAkTerISTIkeN; Platzbedarf
21 german cHArAkTerISTIkeN Platzbedarf Komponenten bez. menge Produktkomponenten 1 1 Haubenkörper mit Schaltern, Beleuchtung, Gebläsegruppe, Filter 2 1 Teleskopkamin bestehend aus: 2.1 1 oberer kaminteil 2.2 1 unterer kaminteil 9 1 Reduzierflansch ø 150-120 mm 10a 1 Flansch mit ruckstauklappe ø 150 ...
Page 22 - MoNTAGe; Bohren der Wand und Befestigung der Bügel
22 MoNTAGe Bohren der Wand und Befestigung der Bügel Nachstehende Linien an die Wand zeichnen: • Eine vertikale Linie bis zur Decke oder oberen Begrenzung, und zwar in der Mitte des Bereiches, in dem die Haube montiert werden soll; • Eine horizontale Linie: mit einem minimalen Abstand von 650 mm zur...
Page 23 - MoNTAGe deS HAUBeNkÖrperS; ANScHLÜSSe
23 german MoNTAGe deS HAUBeNkÖrperS • Bevor der Haubenkörper eingehakt wird, die 2 Schrauben Vr bei den Haubenkörper- Anhakpunkten festziehen. • Den Haubenkörper bei den Schrauben 12a einhängen. • Die Halteschrauben 12a definitiv festziehen. • Den Haubenkörper mit Hilfe der Schrauben Vr ausrichten. ...
Page 25 - BedIeNUNG; Schalttafel
25 german BedIeNUNG Schalttafel tAStE LEd fUNKtiONEN t1 Motor Stellt den Motor ab. t2 Betriebsgeschwindigkeit eingeschaltet Schaltet den Motor bei der ersten Betriebsgeschwin digkeit ein. t3 Betriebsgeschwindigkeit eingeschaltet Schaltet den Motor bei der zweiten Betriebsgeschwin digkeit ein. t4 Bet...
Page 26 - WArTUNG; mEtALLfEttfiLtEr
26 WArTUNG mEtALLfEttfiLtEr rEiNigUNg dEr SELbSttrAgENdEN mEtALLfEttfiLtEr • Sie müssen nach 2-monatigem Betrieb bzw. bei starkem Einsatz auch häufiger gereinigt werden, was im Geschirrspüler möglich ist. • Die Filter nacheinander aushaken, indem sie auf die rückseite der Gruppe geschoben und gleich...
Page 27 - poUr deS rÉSULTATS pArFAITS; Visitez notre boutique en ligne; eN MATIÈre de proTecTIoN de L’eNVIroNNeMeNT; conteneurs prévus à cet effet.
27 french poUr deS rÉSULTATS pArFAITS Merci d’avoir choisi ce produit AeG. Nous l’avons conçu pour qu’il vous offre des performances irréprochables pour longtemps, en intégrant des technologies innovantes qui vous simplifient la vie grâce à des caractéristiques que vous ne trouverez pas forcément su...
Page 28 - coNSeILS eT SUGGeSTIoNS
28 coNSeILS eT SUGGeSTIoNS La présente notice d’emploi vaut pour plusieurs versions de l’appareil. elle peut contenir des descriptions d’accessoires ne figurant pas dans votre appareil. iNStALLAtiON • Le fabricant décline toute responsabilité en cas de dommage dû à une installation non correcte ou n...
Page 29 - cArAcTerISTIQUeS; Encombrement
29 french cArAcTerISTIQUeS Encombrement Composants réf. Q.té Composants du produit 1 1 corps Hotte équipé de: comandes, Lumière,Groupe Ventilateur,Filtres 2 1 cheminée Télescopique formée de : 2.1 1 cheminée Supérieure 2.2 1 cheminée Inférieure 9 1 Flasque de Réduction ø 150-120 mm 10 a 1 Buse avec ...
Page 30 - Perçage du mur et fixation des équerres
30 INSTALLATIoN Perçage du mur et fixation des équerres Tracer sur la paroi: • une ligne verticale allant jusqu’au plafond ou à la limite supérieure, au centre de la zone prévue pour le montage de la hotte; • une ligne horizontale à 650 mm min. au-dessus du plan de cuisson.• Poser comme indiqué une ...
Page 31 - MoNTAGe corpS HoTTe; BrANcHeMeNTS
31 french MoNTAGe corpS HoTTe • Avant d’accrocher le corps hotte, serrer les deux vis Vr situées sur les points d’accrochage du corps hotte. • Accrocher le corps hotte aux vis 12a prévues à cet effet. • Serrer définitivement les vis 12a de support. • Agir sur les vis Vr pour niveler le corps hotte. ...
Page 33 - UTILISATIoN; tableau de commandes
33 french UTILISATIoN tableau de commandes tOUCHE VOYANt fONCtiONSt1 Moteur Éteint le moteur. t2 Vitesse Allumé Met le moteur en marche en première vitesse. t3 Vitesse Allumé Met le moteur en marche en seconde vitesse. t4 Vitesse Fixe Appuyé brièvement, met le moteur en troisième vitesse. clignotant...
Page 34 - eNTreTIeN; NEttOYAgE fiLtrES ANti-grAiSSE
34 eNTreTIeN fiLtrES ANti-grAiSSE NEttOYAgE fiLtrES ANti-grAiSSE mEtALLiQUES AUtOPOrtEUrS • Lavables au lave-vaisselle, ils doivent être lavés envi-ron tous les 2 mois d’emploi ou plus fréquemment en cas d’emploi particuliè - rement intense. • Retirer les filtres l’un aprés l’autre, en les poussant ...