Page 2 - KUNDENDIENST UND -BETREUUNG
INHALT 1. SICHERHEITSHINWEISE . . . . . . . . . . . . . . . . . . . . . . . . . . . . . . . . . . . . . . . . . . . . . . . . . . . . . . 3 2. BETRIEB . . . . . . . . . . . . . . . . . . . . . . . . . . . . . . . . . . . . . . . . . . . . . . . . . . . . . . . . . . . . . . . . . . . 5 3. TÄGLICHER ...
Page 3 - SICHERHEITSHINWEISE; Sicherheit von Kindern und
1. SICHERHEITSHINWEISE Lesen Sie zu Ihrer Sicherheit und für dieoptimale Geräteanwendung vor der In-stallation und dem Gebrauch des Gerä-tes die vorliegende Benutzerinformationaufmerksam durch, einschließlich derRatschläge und Warnungen. Es ist wich-tig, dass zur Vermeidung von Fehlernund Unfällen a...
Page 5 - BETRIEB; Einschalten des Geräts
• Das Gerät darf nicht in der Nähe von Heizkörpern oder Kochern installiertwerden. • Vergewissern Sie sich, dass der Netz- stecker des Gerätes nach der Installati-on frei zugänglich ist. • Wenn ein Wasseranschluss vorgese- hen ist, verbinden Sie das Gerät nurmit dem Trinkwasseranschluss. 1.6 Kundend...
Page 6 - TÄGLICHER GEBRAUCH
3. TÄGLICHER GEBRAUCH 3.1 Reinigung des Innenraums Bevor Sie das Gerät in Betrieb nehmen,beseitigen Sie den typischen „Neuge-ruch“ am besten durch Reinigen der In-nenteile mit lauwarmem Wasser und ei-ner neutralen Seife. Sorgfältig nachtrock-nen. Verwenden Sie keine aggressivenReinigungsmittel oder ...
Page 7 - Anbringen der verschiebbaren Schublade; PRAKTISCHE TIPPS UND HINWEISE; Energiespartipps; Hinweise für die Kühlung
3.7 Anbringen der verschiebbaren Schublade Die verschiebbare Schublade kann inverschiedenen Höhen eingesetzt wer-den.Bitte nehmen Sie diese Einstellungenwie folgt vor: 1. Heben Sie die Ablage mit der ver-schiebbaren Schublade an und zie-hen Sie sie aus den Türhalterungen. 2. Nehmen Sie den Haltebüge...
Page 8 - REINIGUNG UND PFLEGE; Regelmäßige Reinigung
4.4 Hinweise zum Einfrieren Im Folgenden finden Sie einige wertvol-le Tipps für einen optimalen Gefriervor-gang:• die maximale Menge an Lebensmit- teln, die innerhalb von 24 Stunden ein-gefroren werden kann. ist auf demTypschild angegeben; • der Gefriervorgang dauert 24 Stun- den. Legen Sie während ...
Page 10 - Stillstandzeiten; Störung
Verwenden Sie bitte niemalsscharfe Gegenstände zum Entfer-nen von Reif und Eis vom Ver-dampfer, da dieser dadurch be-schädigt werden könnte.Versuchen Sie nicht, den Abtau-vorgang durch andere als vomHersteller empfohlene mechani-sche oder sonstige Hilfsmittel zubeschleunigen.Ein Temperaturanstieg de...
Page 12 - MONTAGE; Aufstellung; Umgebungstemperatur; Elektrischer Anschluss
6.1 Ersetzen der Lampe 1. Ziehen Sie den Netzstecker aus derNetzsteckdose. 2. Lösen Sie die Schraube an der Lam-penabdeckung. 3. Nehmen Sie die Lampenabdeckungab (siehe hierzu die Abbildung). 4. Ersetzen Sie die defekte Lampedurch eine Lampe mit der gleichenLeistung, die speziell für Haushalts-gerät...
Page 14 - Montage des Geräts
7.5 Montage des Geräts VORSICHT! Achten Sie darauf, dass sich dasNetzkabel des Geräts frei bewe-gen lässt. Gehen Sie wie folgt vor: x x Schneiden Sie bei Bedarf den Dichtungs-streifen zu und bringen Sie ihn am Gerätan, wie in der Abbildung dargestellt. Ø 2.5 mm 13 mm 1 3 2 Bohren Sie mit einem 2,5-m...
Page 19 - GERÄUSCHE; BRRR; SSSRR; OK
1 2 180˚ 8. GERÄUSCHE Während das Gerät in Betrieb ist, entste-hen bestimmte Geräusche (Kompressorund Kühlkreislauf). BRRR ! HISSS! CLICK! BLUBB! CRACK! SSSRR R! OK DEUTSCH 19
Page 21 - TECHNISCHE DATEN; UMWELTTIPPS
9. TECHNISCHE DATEN Abmessung der Ausspa-rung Höhe 1780 mm Breite 560 mm Tiefe 550 mm Ausfalldauer 20 h Spannung 230-240 V Frequenz 50 Hz Die technischen Informationen befindensich auf dem Typenschild innen links imGerät sowie auf der Energieplakette. 10. UMWELTTIPPS Recyceln Sie Materialien mit dem...
Page 23 - INSTRUCTIONS DE SÉCURITÉ; Sécurité des enfants et
1. INSTRUCTIONS DE SÉCURITÉ Pour votre sécurité et garantir une utili-sation correcte de l'appareil, lisez atten-tivement cette notice, y compris les con-seils et avertissements, avant d'installeret d'utiliser l'appareil pour la premièrefois. Pour éviter toute erreur ou accident,veillez à ce que tou...
Page 24 - Utilisation quotidienne
Si le circuit frigorifique est endomma-gé :– évitez les flammes vives et toute au- tre source d'allumage – aérez soigneusement la pièce où se trouve l'appareil • Ne modifiez pas les spécifications de l'appareil. Si le câble d'alimentationest endommagé, il peut causer uncourt circuit, un incendie et/...
Page 25 - Maintenance; Protection de; FONCTIONNEMENT; Mise en fonctionnement
• Assurez-vous que la prise murale reste accessible après l'installation de l'ap-pareil. • Branchez à l'alimentation en eau pota- ble uniquement. (Si un branchementsur le réseau d'eau est prévu.) 1.6 Maintenance • Les branchements électriques néces- saires à l'entretien de l'appareil doi-vent être r...
Page 26 - UTILISATION QUOTIDIENNE
3. UTILISATION QUOTIDIENNE 3.1 Nettoyage intérieur Avant d'utiliser l'appareil pour la premiè-re fois, nettoyez l'intérieur et tous les ac-cessoires internes avec de l'eau tiède sa-vonneuse pour supprimer l'odeur carac-téristique du "neuf" puis séchez soi-gneusement. N'utilisez pas de produi...
Page 27 - CONSEILS UTILES
3.6 Emplacement des balconnets de la porte Les parois du réfrigérateur sont équi-pées d'une série de glissières afin que les clayettes puissent être positionnéescomme vous le souhaitez. 3.7 Positionnement du bac coulissant Le bac coulissant peut être positionné àdifférentes hauteurs.Pour l'ajuster, ...
Page 28 - ENTRETIEN ET NETTOYAGE; Nettoyage périodique
Bananes, pommes de terre, oignons etail ne se conservent pas au réfrigérateur,s'ils ne sont pas correctement emballés. 4.4 Conseils pour la congélation Pour obtenir les meilleurs résultats, voiciquelques conseils importants :• la quantité maximale de denrées que vous pouvez congeler par 24 heuresest...
Page 30 - EN CAS D'ANOMALIE DE FONCTIONNEMENT; Anomalie
N'utilisez en aucun cas de cou-teau ou tout autre objet tran-chant, d'objet métallique pourgratter la couche de givre. Vouspourriez détériorer irrémédiable-ment l'évaporateur.N'utilisez aucun dispositif méca-nique ou autre moyen artificielpour accélérer le processus dedégivrage hormis ceux recom-man...
Page 32 - Remplacement de l'éclairage; Fermeture de la porte; INSTALLATION; Emplacement; Température ambiante; Branchement électrique
6.1 Remplacement de l'éclairage 1. Débranchez l'appareil de la prisesecteur. 2. Retirez la vis du diffuseur. 3. Retirez le diffuseur (voir l'illustration). 4. Remplacez l'ampoule défectueusepar une ampoule neuve de puissan-ce identique, spécifiquement con-çue pour les appareils électroména-gers. (La...
Page 33 - Réversibilité de la porte; Ventilation
des consignes de sécurité sus-mention-nées.Cet appareil est conforme aux directivescommunautaires. 7.3 Réversibilité de la porte L'appareil est livré avec l'ouverture de laporte à droite. Si vous voulez que la por- te s'ouvre à gauche, conformez-vous auxinstructions ci-dessous avant d'installerl'app...
Page 34 - Installation de l'appareil
7.5 Installation de l'appareil ATTENTION Assurez-vous que le cordon d'ali-mentation n'est pas coincé. Procédez comme suit : x x Si nécessaire, coupez la bande d'étan-chéité adhésive et appliquez-la sur l'ap-pareil, comme indiqué sur la figure. Ø 2.5 mm 13 mm 1 3 2 Percez l'appareil à l'aide d'un emb...
Page 38 - Réversibilité de la porte du congélateur
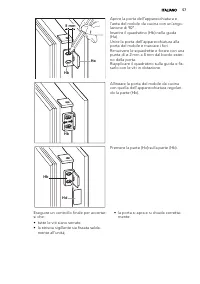
Hb Alignez la porte du meuble de cuisine etcelle de l'appareil en réglant la pièce(Hb). Hb Hd Appuyez la pièce (Hd) sur la pièce (Hb). Procédez à un dernier contrôle pourvous assurer que :• Toutes les vis sont bien serrées.• Le joint d'étanchéité est solidement fi- xé au meuble. • La porte s'ouvre e...
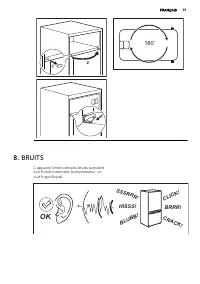
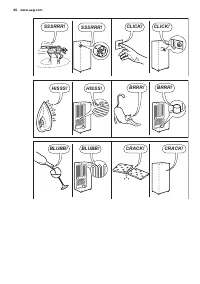
Page 39 - BRUITS
1 2 180˚ 8. BRUITS L'appareil émet certains bruits pendantson fonctionnement (compresseur, cir-cuit frigorifique). BRRR ! HISSS! CLICK! BLUBB! CRACK! SSSRR R! OK FRANÇAIS 39
Page 41 - CARACTÉRISTIQUES TECHNIQUES; EN MATIÈRE DE PROTECTION DE L'ENVIRONNEMENT
9. CARACTÉRISTIQUES TECHNIQUES Dimensions de la niched'encastrement Hauteur 1780 mm Largeur 560 mm Profondeur 550 mm Temps de levée 20 h Tension 230-240 V Fréquence 50 Hz Les caractéristiques techniques figurentsur la plaque signalétique située sur le côté gauche à l'intérieur de l'appareil etsur l'...
Page 42 - SERVIZIO CLIENTI E MANUTENZIONE
INDICE 1. ISTRUZIONI DI SICUREZZA . . . . . . . . . . . . . . . . . . . . . . . . . . . . . . . . . . . . . . . . . . . . . . . . . . . 43 2. USO DELL'APPARECCHIO . . . . . . . . . . . . . . . . . . . . . . . . . . . . . . . . . . . . . . . . . . . . . . . . . . . 45 3. UTILIZZO QUOTIDIANO . . . . ....
Page 43 - ISTRUZIONI DI SICUREZZA; Sicurezza dei bambini e
1. ISTRUZIONI DI SICUREZZA Per garantire un impiego corretto e sicu-ro dell'apparecchio, prima dell'installa-zione e del primo utilizzo leggere con at-tenzione il libretto istruzioni, inclusi isuggerimenti e le avvertenze. Per evitareerrori e incidenti, è importante garantireche tutte le persone che...
Page 45 - UTILIZZO QUOTIDIANO
1.6 Assistenza tecnica • Gli interventi elettrici sull'apparecchia- tura devono essere eseguiti esclusiva-mente da elettricisti qualificati o dapersonale competente. • Gli interventi di assistenza devono es- sere eseguiti esclusivamente da tecni-ci autorizzati e utilizzando solo ricambioriginali. 1....
Page 47 - CONSIGLI E SUGGERIMENTI UTILI
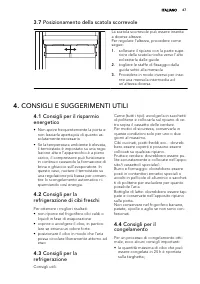
3.7 Posizionamento della scatola scorrevole La scatola scorrevole può essere inseritaa diverse altezze.Per regolare l'altezza, procedere comesegue: 1. sollevare il ripiano con la parte supe-riore della scatola rivolta verso l'altoed estrarla dalle guide 2. togliere le staffe di fissaggio dallaguida ...
Page 48 - PULIZIA E CURA; Pulizia periodica
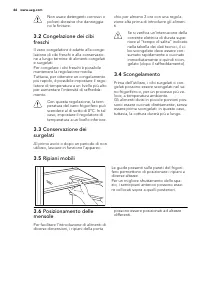
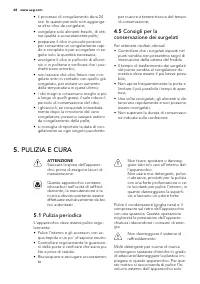
• il processo di congelamento dura 24 ore. In questo periodo non aggiunge-re altro cibo da congelare; • congelare solo alimenti freschi, di otti- ma qualità e accuratamente puliti; • preparare il cibo in piccole porzioni per consentire un congelamento rapi-do e completo e per scongelare in se-guito ...
Page 49 - Periodi di inutilizzo
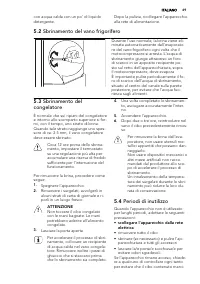
con acqua calda con un po' di liquidodetergente. Dopo la pulizia, ricollegare l'apparecchioalla rete di alimentazione. 5.2 Sbrinamento del vano frigorifero Durante l'uso normale, la brina viene eli-minata automaticamente dall'evaporato-re del vano frigorifero ogni volta che ilmotocompressore si arre...
Page 50 - COSA FARE SE...; Problema
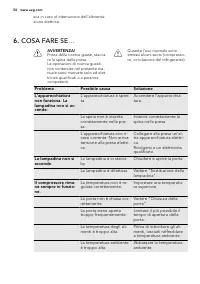
sca in caso di interruzione dell'alimenta-zione elettrica. 6. COSA FARE SE… AVVERTENZA! Prima della ricerca guasti, stacca-re la spina dalla presa.Le operazioni di ricerca guastinon contenute nel presente ma-nuale sono riservate solo ad elet-tricisti qualificati o a personecompetenti. Durante l'uso ...
Page 51 - Sostituzione della lampadina; Chiusura della porta
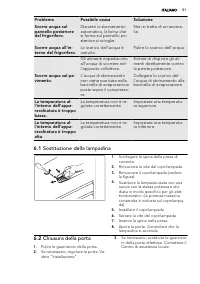
Problema Possibile causa Soluzione Scorre acqua sulpannello posterioredel frigorifero. Durante lo sbrinamentoautomatico, la brina chesi forma sul pannello po-steriore si scioglie. Non si tratta di un'anoma-lia. Scorre acqua all'in-terno del frigorifero. Lo scarico dell'acqua èostruito. Pulire lo sca...
Page 52 - INSTALLAZIONE; Luogo d'installazione; Temperatura ambiente; Collegamento elettrico
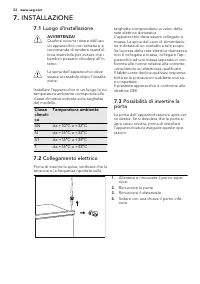
7. INSTALLAZIONE 7.1 Luogo d'installazione AVVERTENZA! Qualora occorra ritirare dall'usoun apparecchio con serratura, siraccomanda di rendere quest'ul-tima inservibile per evitare che ibambini possano chiudersi all'in-terno. La spina dell'apparecchio deveessere accessibile dopo l'installa-zione. Ins...
Page 53 - Requisiti di ventilazione
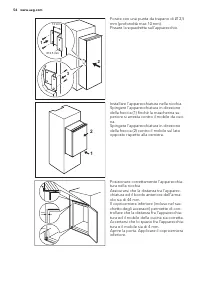
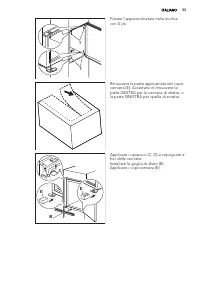
Sul lato opposto: 1. Serrare il perno inferiore. 2. Installare il distanziale. 3. Installare la porta. 4. Serrare il perno superiore. 7.4 Requisiti di ventilazione 5 cm min. 200 cm 2 min. 200 cm 2 Il flusso d'aria dietro l'apparecchiaturadeve essere sufficiente. 7.5 Installazione dell’apparecchiatur...
Page 58 - Reversibilità della porta del congelatore; RUMORI
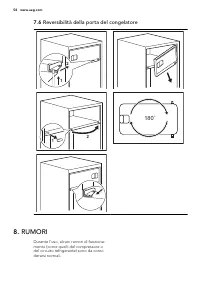
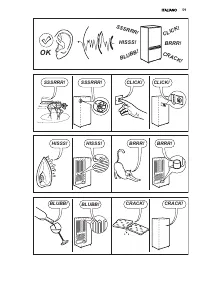
7.6 Reversibilità della porta del congelatore 1 2 1 2 180˚ 8. RUMORI Durante l'uso, alcuni rumori di funziona-mento (come quelli del compressore odel circuito refrigerante) sono da consi-derarsi normali. 58 www.aeg.com
Page 60 - DATI TECNICI; CONSIDERAZIONI AMBIENTALI
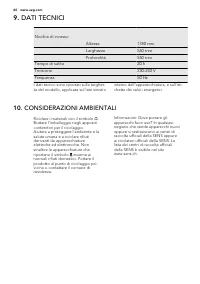
9. DATI TECNICI Nicchia di incasso Altezza 1780 mm Larghezza 560 mm Profondità 550 mm Tempo di salita 20 h Tensione 230-240 V Frequenza 50 Hz I dati tecnici sono riportati sulla targhet-ta del modello, applicata sul lato sinistro interno dell'apparecchiatura, e sull'eti-chetta dei valori energetici....
Page 61 - CUSTOMER CARE AND SERVICE
CONTENTS 1. SAFETY INSTRUCTIONS . . . . . . . . . . . . . . . . . . . . . . . . . . . . . . . . . . . . . . . . . . . . . . . . . . . . . 62 2. OPERATION . . . . . . . . . . . . . . . . . . . . . . . . . . . . . . . . . . . . . . . . . . . . . . . . . . . . . . . . . . . . . . . 64 3. DAILY USE . . ...
Page 62 - SAFETY INSTRUCTIONS; Children and vulnerable
1. SAFETY INSTRUCTIONS In the interest of your safety and to en-sure the correct use, before installingand first using the appliance, read thisuser manual carefully, including its hintsand warnings. To avoid unnecessary mis-takes and accidents, it is important toensure that all people using the appl...
Page 64 - OPERATION; DAILY USE
1.7 Environment Protection This appliance does not containgasses which could damage theozone layer, in either its refriger-ant circuit or insulation materials.The appliance shall not be dis-carded together with the urbanrefuse and rubbish. The insula-tion foam contains flammable gases: the appliance...
Page 66 - HELPFUL HINTS AND TIPS
3.7 Positioning the sliding box The sliding box can be placed at differ-ent heights.Do make these adjustments proceed asfollow: 1. lift the shelf with the sliding box up-wards and out of the holders in thedoor 2. remove the retaining bracket out ofthe guide under the shelf 3. Reverse the above opera...
Page 67 - CARE AND CLEANING; Periodic cleaning
zen and to make it possible subse-quently to thaw only the quantity re-quired; • wrap up the food in aluminium foil or polythene and make sure that thepackages are airtight; • do not allow fresh, unfrozen food to touch food which is already frozen,thus avoiding a rise in temperature ofthe latter; • ...
Page 68 - Periods of non-operation
5.2 Defrosting the refrigerator Frost is automatically eliminated fromthe evaporator of the refrigerator com-partment every time the motor compres-sor stops, during normal use. The de-frost water drains out through a drainhole into a special container at the backof the appliance, over the motor com-...
Page 69 - WHAT TO DO IF...; Problem
6. WHAT TO DO IF… WARNING! Before troubleshooting, discon-nect the mains plug from themains socket.Only a qualified electrician orcompetent person must do thetroubleshooting that is not in thismanual. There are some sounds duringnormal use (compressor, refriger-ant circulation). Problem Possible cau...
Page 70 - Replacing the lamp; Closing the door
Problem Possible cause Solution Products prevent that wa-ter flows into the watercollector. Make sure that productsdo not touch the rearplate. Water flows on theground. The melting water outletdoes not flow in the evap-orative tray above thecompressor. Attach the melting wateroutlet to the evaporati...
Page 71 - Positioning; Ambient temperature; Electrical connection
7. INSTALLATION 7.1 Positioning WARNING! If you are discarding an old appli-ance that has a lock or catch onthe door, you must ensure that itis made unusable to preventyoung children being trapped in-side. The appliance shall have theplug accessible after installation. Install this appliance at a lo...
Page 72 - Ventilation requirements
On the opposite side: 1. Tighten the lower pin. 2. Install the spacer. 3. Install the door. 4. Tighten the upper pin. 7.4 Ventilation requirements 5 cm min. 200 cm 2 min. 200 cm 2 The airflow behind the appliance mustbe sufficient. 7.5 Installing the appliance CAUTION! Make sure that the mains cable...
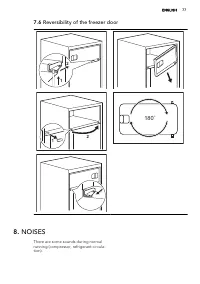
Page 77 - Reversibility of the freezer door; NOISES
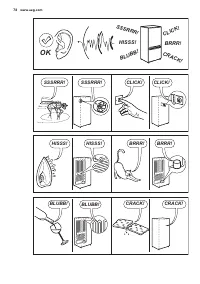
7.6 Reversibility of the freezer door 1 2 1 2 180˚ 8. NOISES There are some sounds during normalrunning (compressor, refrigerant circula-tion). ENGLISH 77
Page 79 - TECHNICAL DATA; ENVIRONMENT CONCERNS
9. TECHNICAL DATA Dimension of the recess Height 1780 mm Width 560 mm Depth 550 mm Rising Time 20 h Voltage 230-240 V Frequency 50 Hz The technical information are situated inthe rating plate on the internal left sideof the appliance and in the energy label. 10. ENVIRONMENT CONCERNS Recycle the mate...