Page 2 - REPARATUR- UND KUNDENDIENST
INHALTSVERZEICHNIS 1. SICHERHEITSINFORMATIONEN............................................................................ 3 2. SICHERHEITSANWEISUNGEN................................................................................ 4 3. BETRIEB............................................................
Page 4 - SICHERHEITSANWEISUNGEN; Montage
• Betreiben Sie in den Lebensmittelfächern des Geräts keine anderen als die vom Hersteller empfohlenen Elektrogeräte. • Reinigen Sie das Gerät nicht mit einem Wasser- oder Dampfstrahl. • Reinigen Sie das Gerät mit einem weichen, feuchten Tuch. Verwenden Sie ausschließlich Neutralreiniger. Benutzen S...
Page 6 - BETRIEB; Einschalten des Geräts; ERSTE INBETRIEBNAHME; Reinigen des Innenraums
• Trennen Sie das Gerät von der Stromversorgung. • Schneiden Sie das Netzkabel ab, und entsorgen Sie es. • Entfernen Sie die Tür, um zu verhindern, dass sich Kinder oder Haustiere in dem Gerät einschließen. • Der Kältekreislauf und die Isolierungsmaterialien dieses Gerätes sind ozonfreundlich. • Die...
Page 7 - TÄGLICHER GEBRAUCH; Positionierung der
ACHTUNG! Verwenden Sie keine Reinigungsmittel oder Scheuerpulver, da diese die Oberfläche beschädigen. 5. TÄGLICHER GEBRAUCH WARNUNG! Siehe Kapitel Sicherheitshinweise. 5.1 Positionierung der Türablagen Die Türablagen können in verschiedener Höhe positioniert werden; damit ermöglichen sie das Lagern...
Page 8 - TIPPS UND HINWEISE
5.4 Lagern von gefrorenen Lebensmitteln Lassen Sie das Gerät vor der ersten Inbetriebnahme oder nach einer Zeit, in der das Gerät nicht benutzt wurde, mindestens 2 Stunden lang mit höherer Einstellung laufen, bevor Sie Lebensmittel in das Gefrierfach legen. Kam es zum Beispiel durch einen Stromausfa...
Page 10 - REINIGUNG UND PFLEGE; Allgemeine Warnhinweise
7. REINIGUNG UND PFLEGE WARNUNG! Siehe Kapitel Sicherheitshinweise. 7.1 Allgemeine Warnhinweise ACHTUNG! Ziehen Sie vor jeder Wartungsmaßnahme immer den Netzstecker aus der Steckdose. Dieses Gerät enthält Kohlenwasserstoffe in seinem Kältekreislauf. Aus diesem Grund dürfen die Wartung und das Nachfü...
Page 12 - FEHLERSUCHE
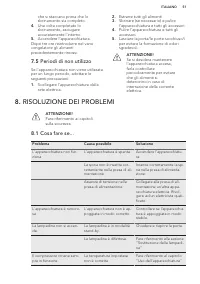
8. FEHLERSUCHE WARNUNG! Siehe Kapitel Sicherheitshinweise. 8.1 Was tun, wenn ... Störung Mögliche Ursache Lösung Das Gerät funktioniert über-haupt nicht. Das Gerät ist abgeschaltet. Schalten Sie das Gerät ein. Der Netzstecker wurde nichtrichtig in die Steckdose ge-steckt. Stecken Sie den Netzstecker...
Page 13 - Austauschen der Lampe
Störung Mögliche Ursache Lösung Die Temperatur ist nichtrichtig eingestellt. Siehe Kapitel „Betrieb“. Der Kompressor schaltetsich nicht sofort ein, nach-dem Sie gedrückt oder dieTemperatur auf einen ande-ren Wert eingestellt haben. Dies ist normal, keine Stö-rung. Der Kompressor schaltetsich erst na...
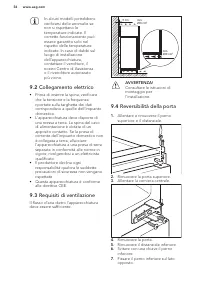
Page 14 - Schließen der Tür; MONTAGE; Standort; Elektrischer Anschluss
3. Ersetzen Sie die alte Lampe durch eine Lampe mit der gleichen Leistung (die maximal erlaubte Leistung steht auf der Lampenabdeckung), die speziell für Haushaltsgeräte vorgesehen ist. 4. Bringen Sie die Lampenabdeckung an. 5. Ziehen Sie die Schraube an der Lampenabdeckung fest. 6. Stecken Sie den ...
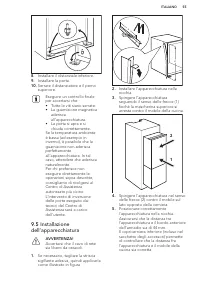
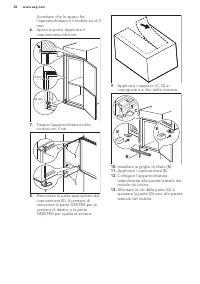
Page 16 - Montage des Geräts
Führen Sie eine Endkontrolle durch, um sicherzustellen, dass: • Alle Schrauben fest angezogen sind; • Die Magnetdichtung am Gerät anliegt. • Die Tür ordnungsgemäß öffnet und schließt. Bei niedrigen Umgebungstemperaturen (z. B. im Winter) kann es vorkommen, dass die Türdichtung nicht richtig am Gerät...
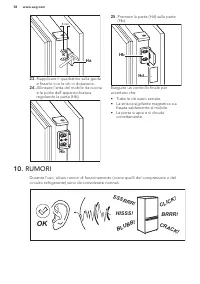
Page 19 - GERÄUSCHE; BRRR; OK
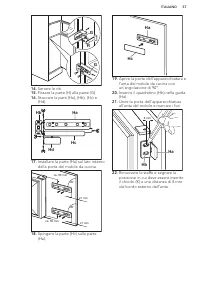
schrauben Sie es mit den mitgelieferten Schrauben fest. 24. Richten Sie die Tür des Einbaumöbels und die Gerätetür mit Teil (Hb) aus. Hb 25. Drücken Sie Teil (Hd) auf Teil (Hb). Hb Hd Führen Sie eine Endkontrolle durch, um sicherzustellen, dass:• Alle Schrauben fest angezogen sind; • Der Dichtungsst...
Page 20 - TECHNISCHE DATEN; Technische Daten
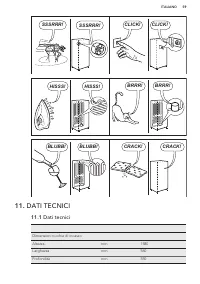
BRRR! BRRR! HISSS! HISSS! BLUBB! BLUBB! CRACK! CRACK! 11. TECHNISCHE DATEN 11.1 Technische Daten Abmessungen der Einbaunische Höhe mm 1580 Breite mm 560 Tiefe mm 550 Lagerzeit bei Störung Stunden 20 Spannung Volt 230 - 240 Frequenz Hz 50 Die technischen Daten befinden sich auf dem Typenschild auf de...
Page 21 - GARANTIE; UMWELTTIPPS
12. CH GARANTIE Kundendienst Servicestellen Industriestrasse 10 5506 Mägenwil Le Trési 6 1028 Préverenges Via Violino 11 6928 Manno Morgenstrasse 131 3018 Bern Zürcherstrasse 204E 9000 St. Gallen Seetalstrasse 11 6020 Emmenbrücke St. Jakob-Turm Birsstrasse 320B 4052 Basel Comercialstrasse 19 7000 Ch...
Page 24 - INSTRUCTIONS DE SÉCURITÉ; Installation
• N'endommagez pas le circuit frigorifique. • N'utilisez pas d'appareils électriques à l'intérieur des compartiments de conservation des aliments de l'appareil, sauf s'ils sont du type recommandé par le fabricant. • Ne pulvérisez pas d'eau ni de vapeur pour nettoyer l'appareil. • Nettoyez l'appareil...
Page 26 - FONCTIONNEMENT; Mise en marche; PREMIÈRE UTILISATION; Nettoyage de l'intérieur
• Retirez la porte pour empêcher les enfants et les animaux de s'enfermer dans l'appareil. • Le circuit frigorifique et les matériaux d'isolation de cet appareil préservent la couche d'ozone. • La mousse isolante contient un gaz inflammable. Contactez votre service municipal pour obtenir des informa...
Page 27 - UTILISATION QUOTIDIENNE
5. UTILISATION QUOTIDIENNE AVERTISSEMENT! Reportez-vous aux chapitres concernant la sécurité. 5.1 Mise en place des balconnets de la porte Selon la taille des emballages des aliments conservés, les balconnets de la porte peuvent être positionnés à différentes hauteurs. 1. Faites glisser le balconnet...
Page 28 - CONSEILS
le compartiment réfrigérateur ou à température ambiante en fonction du temps disponible pour cette opération.Les petites portions peuvent même être cuites sans décongélation préalable : la cuisson sera cependant un peu plus longue. 5.6 Production de glaçons Cet appareil est équipé d'un ou plusieurs ...
Page 29 - ENTRETIEN ET NETTOYAGE; Avertissements généraux
• Bouteilles : elles doivent être munies d'un bouchon et être placées sur le porte-bouteilles (si installé) ou dans le balconnet à bouteilles de la porte. • Bananes, pommes de terre, oignons et ail ne doivent pas être mis dans le réfrigérateur, s'ils ne sont pas emballés. 6.5 Conseils pour la congél...
Page 31 - EN CAS D'ANOMALIE DE FONCTIONNEMENT; En cas d'anomalie de fonctionnement
AVERTISSEMENT! Ne touchez pas les produits congelés et les surfaces givrées avec les mains humides. Risque de brûlures ou d'arrachement de la peau. 3. Laissez la porte ouverte. Le dégivrage peut être accéléré en plaçant un récipient d'eau chaude dans le compartiment congélateur. Retirez également le...
Page 33 - Remplacement de
Problème Cause probable Solution Des aliments empêchentl'eau de s'écouler dans le ré-servoir d'eau. Assurez-vous que les pro-duits ne touchent pas la pla-que arrière. De l'eau coule sur le sol. Le tuyau d'évacuation del'eau de dégivrage n'est pasraccordé au bac d'évapora-tion situé au-dessus du com-...
Page 34 - INSTALLATION
8.3 Fermeture de la porte 1. Nettoyez les joints de la porte. 2. Si nécessaire, ajustez la porte. Reportez-vous au chapitre « Installation ». 3. Si nécessaire, remplacez les joints de porte défectueux. Contactez le service après-vente agréé. 9. INSTALLATION 9.1 Installation Cet appareil peut être in...
Page 35 - Installation de l'appareil
2. Retirez la porte supérieure. 3. Desserrez la charnière intermédiaire. 4. Démontez la porte. 5. Retirez l'entretoise inférieure. 6. Desserrez le pivot inférieur à l'aide d'une clé. 7. Serrez le pivot inférieur sur le côté opposé. 8. Installez l'entretoise inférieure. 9. Mettez en place la porte. 1...
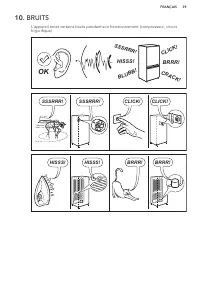
Page 39 - BRUITS
10. BRUITS L'appareil émet certains bruits pendant son fonctionnement (compresseur, circuit frigorifique). BRRR ! HISSS! CL IC K! BL UB B! CR AC K! SSSR R R! OK CLICK! CLICK! SSSRRR! SSSRRR! BRRR! BRRR! HISSS! HISSS! FRANÇAIS 39
Page 40 - CARACTÉRISTIQUES TECHNIQUES; Caractéristiques techniques
BLUBB! BLUBB! CRACK! CRACK! 11. CARACTÉRISTIQUES TECHNIQUES 11.1 Caractéristiques techniques Dimensions de la niche d'encastre-ment Hauteur mm 1580 Largeur mm 560 Profondeur mm 550 Autonomie de fonctionnement Heures 20 Tension Volts 230 - 240 Fréquence Hz 50 Les caractéristiques techniques figurent ...
Page 41 - EN MATIÈRE DE PROTECTION DE
Points de Service Morgenstrasse 131 3018 Bern Zürcherstrasse 204E 9000 St. Gallen Seetalstrasse 11 6020 Emmenbrücke St. Jakob-Turm Birsstrasse 320B 4052 Basel Comercialstrasse 19 7000 Chur Points de vente de rechange Industriestrasse 10, 5506 Mägenwil,Tel. 0848 848 111 Conseil technique/Vente Badene...
Page 42 - SERVIZIO CLIENTI E MANUTENZIONE
INDICE 1. INFORMAZIONI PER LA SICUREZZA.................................................................... 43 2. ISTRUZIONI DI SICUREZZA.................................................................................... 44 3. USO DELL'APPARECCHIATURA...................................................
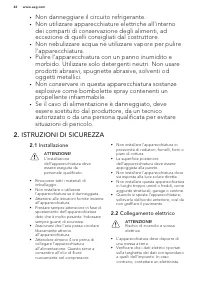
Page 44 - ISTRUZIONI DI SICUREZZA; Installazione
• Non danneggiare il circuito refrigerante. • Non utilizzare apparecchiature elettriche all'interno dei comparti di conservazione degli alimenti, ad eccezione di quelli consigliati dal costruttore. • Non nebulizzare acqua né utilizzare vapore per pulire l'apparecchiatura. • Pulire l'apparecchiatura ...
Page 46 - USO DELL'APPARECCHIATURA; Accensione; PRIMO UTILIZZO
rimangano chiusi all’interno dell’apparecchiatura. • Il circuito refrigerante e i materiali di isolamento di questa apparecchiatura rispettano l'ozono. • La schiuma isolante contiene gas infiammabili. Contattare le autorità locali per ricevere informazioni su come smaltire correttamente l'apparecchi...
Page 47 - UTILIZZO QUOTIDIANO
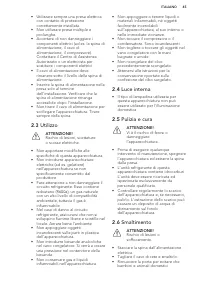
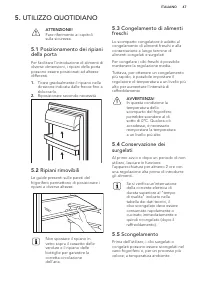
5. UTILIZZO QUOTIDIANO ATTENZIONE! Fare riferimento ai capitoli sulla sicurezza. 5.1 Posizionamento dei ripiani della porta Per facilitare l'introduzione di alimenti di diverse dimensioni, i ripiani della porta possono essere posizionati ad altezze differenti. 1. Tirare gradualmente il ripiano nella...
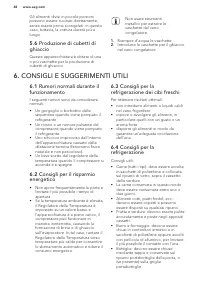
Page 48 - CONSIGLI E SUGGERIMENTI UTILI
Gli alimenti divisi in piccole porzioni possono essere cucinati direttamente, senza essere prima scongelati: in questo caso, tuttavia, la cottura durerà più a lungo. 5.6 Produzione di cubetti di ghiaccio Questa apparecchiatura è dotata di una o più vaschette per la produzione di cubetti di ghiaccio....
Page 49 - PULIZIA E CURA
• Non conservare in frigorifero banane, patate, cipolle o aglio non confezionati. 6.5 Consigli per il congelamento Consigli importanti per un congelamento ottimale:• la quantità massima di alimenti congelabile in 24 ore è riportata sulla targhetta dei dati del modello; • il processo d congelamento d...
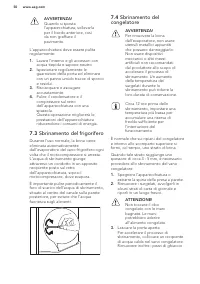
Page 51 - Periodi di non utilizzo; RISOLUZIONE DEI PROBLEMI
che si staccano prima che lo sbrinamento sia completo. 4. Una volta completato lo sbrinamento, asciugare accuratamente l'interno. 5. Accendere l’apparecchiatura. Dopo tre ore reintrodurre nel vano congelatore gli alimenti precedentemente rimossi. 7.5 Periodi di non utilizzo Se l'apparecchiatura non ...
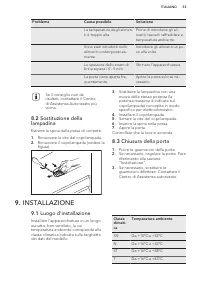
Page 53 - Sostituzione della; INSTALLAZIONE; Luogo d'installazione
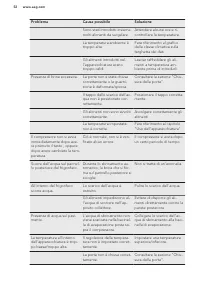
Problema Causa possibile Soluzione La temperatura degli alimen-ti è troppo alta. Prima di introdurre gli ali-menti, lasciarli raffreddare atemperatura ambiente. Sono stati introdotti moltialimenti contemporanea-mente. Introdurre gli alimenti un po-co alla volta. Lo spessore dello strato dibrina supe...
Page 58 - RUMORI
Ha K 8 mm 23. Riapplicare il quadratino sulla guida e fissarlo con le viti in dotazione. 24. Allineare l'anta del mobile da cucina e la porta dell'apparecchiatura regolando la parte (Hb). Hb 25. Premere la parte (Hd) sulla parte (Hb). Hb Hd Eseguire un controllo finale per accertarsi che:• Tutte le ...
Page 59 - DATI TECNICI; Dati tecnici
CLICK! CLICK! SSSRRR! SSSRRR! BRRR! BRRR! HISSS! HISSS! BLUBB! BLUBB! CRACK! CRACK! 11. DATI TECNICI 11.1 Dati tecnici Dimensioni nicchia di incasso Altezza mm 1580 Larghezza mm 560 Profondità mm 550 ITALIANO 59
Page 60 - GARANZIA; CONSIDERAZIONI SULL'AMBIENTE
Tempo di risalita Ore 20 Tensione Volt 230 - 240 Frequenza Hz 50 I dati tecnici sono riportati sulla targhetta dei dati applicata sul lato esterno o interno dell'apparecchiatura e sull'etichetta dei valori energetici. 12. CH GARANZIA Servizio clienti Servizio dopo vendita Industriestrasse 10 5506 Mä...
Page 62 - CUSTOMER CARE AND SERVICE
CONTENTS 1. SAFETY INFORMATION.........................................................................................63 2. SAFETY INSTRUCTIONS........................................................................................ 64 3. OPERATION.......................................................
Page 64 - SAFETY INSTRUCTIONS
• Do not use water spray and steam to clean the appliance. • Clean the appliance with a moist soft cloth. Only use neutral detergents. Do not use abrasive products, abrasive cleaning pads, solvents or metal objects. • Do not store explosive substances such as aerosol cans with a flammable propellant...
Page 65 - OPERATION; Switching on
• Do not change the specification of this appliance. • Do not put electrical appliances (e.g. ice cream makers) in the appliance unless they are stated applicable by the manufacturer. • Be careful not to cause damage to the refrigerant circuit. It contains isobutane (R600a), a natural gas with a hig...
Page 66 - Temperature regulation; FIRST USE; Cleaning the interior; DAILY USE; Positioning the door
3.3 Temperature regulation The temperature is regulated automatically. A medium setting is generally the most suitable. However, the exact setting should be chosen keeping in mind that the temperature inside the appliance depends on: • room temperature, • how often the door is opened, • the quantity...
Page 67 - HINTS AND TIPS; Normal operating sounds
5.2 Movable shelves The walls of the refrigerator are equipped with a series of runners so that the shelves can be positioned as desired. Do not move the glass shelf above the vegetable drawer and the bottle shelf to ensure correct air circulation. 5.3 Freezing fresh food The freezer compartment is ...
Page 69 - CARE AND CLEANING; General warnings
7. CARE AND CLEANING WARNING! Refer to Safety chapters. 7.1 General warnings CAUTION! Unplug the appliance before carrying out any maintenance operation. This appliance contains hydrocarbons in its cooling unit; maintenance and recharging must therefore only be carried out by authorized technicians....
Page 70 - Periods of non-operation; TROUBLESHOOTING
About 12 hours prior to defrosting, set a lower temperature, in order to build up sufficient chill reserve for the interruption in operation. A certain amount of frost will always form on the freezer shelves and around the top compartment.Defrost the freezer when the frost layer reaches a thickness ...
Page 72 - Replacing the lamp; Positioning
Problem Possible cause Solution The door is not closed cor-rectly. Refer to "Closing the door". The food products' tempera-ture is too high. Let the food products tem-perature decrease to roomtemperature before storage. Many food products arestored at the same time. Store less food products ...
Page 73 - Electrical connection
Climateclass Ambient temperature T +16°C to + 43°C Some functional problems might occur for some types of models when operating outside of that range. The correct operation can only be guaranteed within the specified temperature range. If you have any doubts regarding where to install the appliance,...
Page 74 - Installing the appliance
8. Install the lower spacer. 9. Install the door. 10. Tighten the spacer and the upper pin. Do a final check to make sure that: • All screws are tightened. • The magnetic seal adheres to the cabinet. • The door opens and closes correctly. If the ambient temperature is cold (i.e. in Winter), the gask...
Page 77 - NOISES
Hb Hd Do a final check to make sure that:• All screws are tightened. • The sealing strip is attached tightly to the cabinet. • The door opens and closes correctly. 10. NOISES There are some sounds during normal running (compressor, refrigerant circulation). BRRR ! HISSS! CL IC K! BL UB B! CR AC K! S...
Page 78 - TECHNICAL INFORMATION; Technical data
BRRR! BRRR! HISSS! HISSS! BLUBB! BLUBB! CRACK! CRACK! 11. TECHNICAL INFORMATION 11.1 Technical data Dimensions of the recess Height mm 1580 Width mm 560 Depth mm 550 Rising time Hours 20 Voltage Volts 230 - 240 Frequency Hz 50 The technical information are situated in the rating plate, on the extern...
Page 79 - GUARANTEE; ENVIRONMENT CONCERNS
12. CH GUARANTEE Customer Service Centres Point of Service Industriestrasse 10 5506 Mägenwil Le Trési 6 1028 Préverenges Via Violino 11 6928 Manno Morgenstrasse 131 3018 Bern Zürcherstrasse 204E 9000 St. Gallen Seetalstrasse 11 6020 Emmenbrücke St. Jakob-Turm Birsstrasse 320B 4052 Basel Comercialstr...