Page 2 - KUNDENDIENST UND -BETREUUNG
INHALT 1. SICHERHEITSHINWEISE . . . . . . . . . . . . . . . . . . . . . . . . . . . . . . . . . . . . . . . . . . . . . . . . . . . . . . 3 2. GERÄTEBESCHREIBUNG . . . . . . . . . . . . . . . . . . . . . . . . . . . . . . . . . . . . . . . . . . . . . . . . . . . . . 6 3. BEDIENFELD . . . . . . . . ...
Page 3 - SICHERHEITSHINWEISE; Sicherheit von Kindern und
1. SICHERHEITSHINWEISE Lesen Sie zu Ihrer Sicherheit und für dieoptimale Geräteanwendung vor der In-stallation und dem Gebrauch des Gerä-tes die vorliegende Benutzerinformationaufmerksam durch, einschließlich derRatschläge und Warnungen. Es ist wich-tig, dass zur Vermeidung von Fehlernund Unfällen a...
Page 7 - TÄGLICHER GEBRAUCH
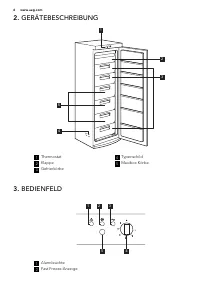
3 Pilot Light 4 Temperaturregler 5 Fast Freeze-Taste 3.1 Einschalten Stecken Sie den Stecker in die Netz-steckdose.Drehen Sie den Temperaturregler imUhrzeigersinn auf eine mittlere Einstel-lung.Die Betriebsanzeige und die Alarmanzei-ge leuchten. 3.2 Ausschalten des Geräts Drehen Sie den Temperaturre...
Page 8 - Auftauen; PRAKTISCHE TIPPS UND HINWEISE; Normale
lung Fast Freeze laufen, bevor Sie Le-bensmittel in den Gefrierraum legen.Sollen große Mengen an Lebensmittelnaufbewahrt werden, entfernen Sie alleSchubladen bis auf die unterste aus demGerät und legen Sie die Lebensmittelauf die Verdampferablagen, um die opti-male Leistung zu erhalten. Kam es zum B...
Page 9 - REINIGUNG UND PFLEGE; Reinigung des Innenraums
• die einzufrierenden Lebensmittelporti- onen sollten stets luftdicht in Alumini-umfolie oder in lebensmittelechte Ge-frierbeutel verpackt werden, um sowenig Luft wie möglich in der Verpa-ckung zu haben; • achten Sie beim Hineinlegen von fri- schen, noch ungefrorenen Lebensmit-teln darauf, dass dies...
Page 12 - FEHLERSUCHE; Problem
7. FEHLERSUCHE WARNUNG! Ziehen Sie vor der Fehlersucheimmer den Netzstecker aus derSteckdose.Die Fehlersuche, die in der vor-liegenden Benutzerinformationnicht beschrieben ist, darf nurvon einem qualifizierten Elektri-ker oder einer kompetenten Per-son durchgeführt werden. Problem Mögliche Ursache A...
Page 13 - Schließen der Tür; MONTAGE; Aufstellung; Umgebungstemperatur
Problem Mögliche Ursache Abhilfe Die Fast Freeze -Funktionist eingeschaltet. Siehe hierzu „Fast Freeze -Funktion“. Die Temperatur imGefrierraum ist zuhoch. Der Temperaturregler istnicht richtig eingestellt. Stellen Sie eine niedrigereTemperatur ein. Es wurden zu viele Pro-dukte auf einmal einge-legt...
Page 16 - GERÄUSCHE; OK
5 4 • Schrauben Sie den oberen Bolzen (4) ab und an der gegenüberliegendenSeite an. (5) • Bringen Sie die Tür wieder an.• Bringen Sie die beiden unteren Schar- niere an und ziehen Sie sie fest. • Setzen Sie die Sockelblende (8) wieder ein. 180° • Bringen Sie den Griff auf der gegen- überliegenden Se...
Page 18 - TECHNISCHE DATEN; UMWELTTIPPS
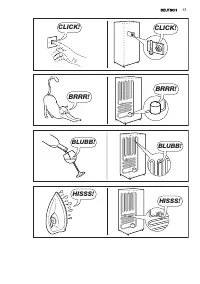
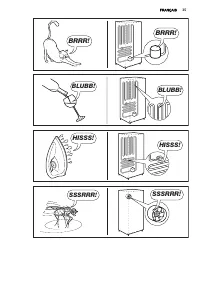
SSSRRR! SSSRRR! CRACK! CRACK! 10. TECHNISCHE DATEN Abmessungen Höhe 1850 mm Breite 600 mm Tiefe 660 mm Lagerzeit bei Störung 25 Std. Spannung 230 - 240 V Frequenz 50 Hz Die technischen Daten befinden sich aufdem Typenschild im Innern des Gerätes auf der linken Seite sowie auf der Ener-gieplakette. 1...
Page 21 - INSTRUCTIONS DE SÉCURITÉ; Sécurité des enfants et
1. INSTRUCTIONS DE SÉCURITÉ Pour votre sécurité et garantir une utili-sation correcte de l'appareil, lisez atten-tivement cette notice, y compris les con-seils et avertissements, avant d'installeret d'utiliser l'appareil pour la premièrefois. Pour éviter toute erreur ou accident,veillez à ce que tou...
Page 22 - Utilisation quotidienne
AVERTISSEMENT Les éventuelles réparations ouinterventions sur votre appareil,ainsi que le remplacement du câ-ble d'alimentation, ne doiventêtre effectuées que par un pro-fessionnel qualifié. 1. Ne branchez pas le cordon d'ali-mentation à une rallonge. 2. Assurez-vous que la prise n'estpas écrasée ou...
Page 25 - UTILISATION QUOTIDIENNE
3 Pilot Light 4 Thermostat 5 Interrupteur Fast Freeze 3.1 Mise en marche Branchez l'appareil à une prise murale.Tournez le thermostat dans le sens desaiguilles d'une montre sur une positionmédiane.Le voyant lumineux et le voyant Alarmes'allument. 3.2 Désactivation Pour mettre à l'arrêt l'appareil, t...
Page 26 - CONSEILS UTILES
En cas de décongélation acci-dentelle, due par exemple à unecoupure de courant, si la coupu-re a duré plus de temps que pré-vu au paragraphe « Autonomiede fonctionnement » du chapitreCaractéristiques techniques, con-sommez rapidement les alimentsdécongelés ou cuisez-les immé-diatement avant de les r...
Page 27 - Conseils pour la; ENTRETIEN ET NETTOYAGE; Nettoyage intérieur; Nettoyage périodique
• les aliments maigres se conservent mieux et plus longtemps que les ali-ments gras ; le sel réduit la durée deconservation des aliments • la température très basse à laquelle se trouvent les bâtonnets glacés, s'ilssont consommés dès leur sortie ducompartiment congélateur, peut pro-voquer des brûlur...
Page 28 - Dégivrage du congélateur
De nombreux détergents pour la cuisinerecommandés par les fabricants contien-nent des produits chimiques qui peuventattaquer/endommager les pièces enplastique utilisées dans cet appareil. Ilest par conséquent recommandé d'utili-ser seulement de l'eau chaude addition-née d'un peu de savon liquide pou...
Page 30 - EN CAS D'ANOMALIE DE FONCTIONNEMENT; Anomalie
7. EN CAS D'ANOMALIE DE FONCTIONNEMENT AVERTISSEMENT Avant de résoudre les problè-mes, débranchez l'appareil.La résolution des problèmes, nonmentionnés dans le présent ma-nuel, doit être exclusivementconfiée à un électricien qualifiéou une personne compétente. Anomalie Cause possible Solution L'appa...
Page 31 - Fermeture de la porte; INSTALLATION; Emplacement; Température ambiante
Anomalie Cause possible Solution La température ducongélateur est tropélevée. Le thermostat n'est pasréglé correctement. Sélectionnez une tempéra-ture plus basse. Trop de produits ont étéintroduits simultanément. Introduisez moins de pro-duits en même temps. Les produits sont tropprès les uns des au...
Page 32 - Branchement électrique
8.2 Emplacement A B 100 mm min 20 mm L'appareil ne doit pas être installé prèsd'une source de chaleur telle qu'un ra-diateur, une chaudière, la lumière direc-te du soleil, etc. Assurez-vous que l'aircircule librement à l'arrière de l'appareil.Pour garantir un rendement optimal sil'appareil est insta...
Page 34 - BRUITS
180° • Installez la poignée sur le côté opposé et placez les caches en plastique (four-nis dans la pochette contenant la noti-ce d'utilisation) dans les orifices vides. • Faites une dernière vérification pour vous assurer que :– Toutes les vis sont bien serrées.– La porte s'ouvre et se ferme correc-...
Page 36 - CARACTÉRISTIQUES TECHNIQUES; EN MATIÈRE DE PROTECTION DE L'ENVIRONNEMENT
CRACK! CRACK! 10. CARACTÉRISTIQUES TECHNIQUES Dimension Hauteur 1850 mm Largeur 600 mm Profondeur 660 mm Autonomie de fonction-nement 25 h Tension 230 - 240 V Fréquence 50 Hz Les caractéristiques techniques figurentsur la plaque signalétique située sur le côté gauche à l'intérieur de l'appareil etsu...
Page 37 - SERVIZIO CLIENTI E MANUTENZIONE
INDICE 1. ISTRUZIONI DI SICUREZZA . . . . . . . . . . . . . . . . . . . . . . . . . . . . . . . . . . . . . . . . . . . . . . . . . . . 38 2. DESCRIZIONE DEL PRODOTTO . . . . . . . . . . . . . . . . . . . . . . . . . . . . . . . . . . . . . . . . . . . . . . 41 3. PANNELLO DEI COMANDI . . . . . . . ...
Page 38 - ISTRUZIONI DI SICUREZZA; Sicurezza dei bambini e
1. ISTRUZIONI DI SICUREZZA Per garantire un impiego corretto e sicu-ro dell'apparecchio, prima dell'installa-zione e del primo utilizzo leggere con at-tenzione il libretto istruzioni, inclusi isuggerimenti e le avvertenze. Per evitareerrori e incidenti, è importante garantireche tutte le persone che...
Page 42 - UTILIZZO QUOTIDIANO
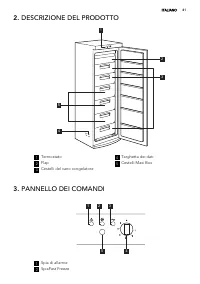
3 Pilot Light 4 Regolatore della temperatura 5 Fast FreezeInterruttore 3.1 Accensione Inserire la spina nella presa a muro.Impostare il regolatore di temperaturaad un livello medio, ruotandolo in sensoorario.La spia pilota e la spia di allarme si ac-cendono. 3.2 Spegnimento Per spegnere l’apparecchi...
Page 43 - CONSIGLI E SUGGERIMENTI UTILI
In caso di sbrinamento acciden-tale, per esempio a causa diun'interruzione dell'alimentazio-ne elettrica, se l'alimentazionemanca per un periodo superioreal valore indicato nella tabelladei dati tecnici sotto "Tempo dirisalita", il cibo scongelato deveessere consumato rapidamente ocucinato i...
Page 44 - PULIZIA E CURA; Pulizia periodica
5.4 Consigli per la conservazione dei surgelati Per ottenere risultati ottimali• Controllare che i surgelati esposti nei punti vendita non presentino segni diinterruzione della catena del freddo • Il tempo di trasferimento dei surgelati dal punto vendita al congelatore do-mestico deve essere il più ...
Page 46 - RISOLUZIONE DEI PROBLEMI; Problema
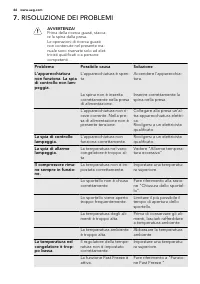
7. RISOLUZIONE DEI PROBLEMI AVVERTENZA! Prima della ricerca guasti, stacca-re la spina dalla presa.Le operazioni di ricerca guastinon contenute nel presente ma-nuale sono riservate solo ad elet-tricisti qualificati o a personecompetenti. Problema Possibile causa Soluzione L'apparecchiaturanon funzio...
Page 47 - Chiusura della porta; INSTALLAZIONE; Posizionamento; Temperatura ambiente
Problema Possibile causa Soluzione La temperatura nelcongelatore è trop-po alta. Il regolatore della tempe-ratura non è impostatocorrettamente. Impostare una temperatu-ra inferiore. Sono stati introdotti moltialimenti contemporanea-mente. Introdurre gli alimenti unpoco alla volta. I prodotti sono tr...
Page 50 - RUMORI
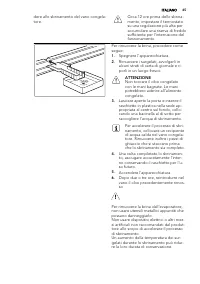
180° • Montare la maniglia sul lato opposto, mettere nei fori rimasti liberi le coper-ture in plastica che si trovano nel sac-chetto delle istruzioni d'uso. • Eseguire un controllo finale per accer- tarsi che:– Tutte le viti siano serrate.– La porta si apra e si chiuda corretta- mente. Se la tempera...
Page 52 - DATI TECNICI; CONSIDERAZIONI AMBIENTALI
CRACK! CRACK! 10. DATI TECNICI Dimensioni Altezza 1850 mm Larghezza 600 mm Profondità 660 mm Tempo di risalita 25 h Tensione 230 - 240 V Frequenza 50 Hz I dati tecnici sono riportati sulla targhet-ta del modello, applicata sul lato sinistro interno dell'apparecchiatura, e sull'eti-chetta dei valori ...
Page 53 - CUSTOMER CARE AND SERVICE
CONTENTS 1. SAFETY INSTRUCTIONS . . . . . . . . . . . . . . . . . . . . . . . . . . . . . . . . . . . . . . . . . . . . . . . . . . . . . 54 2. PRODUCT DESCRIPTION . . . . . . . . . . . . . . . . . . . . . . . . . . . . . . . . . . . . . . . . . . . . . . . . . . . . 56 3. CONTROL PANEL . . . . . . ...
Page 54 - SAFETY INSTRUCTIONS; Children and vulnerable
1. SAFETY INSTRUCTIONS In the interest of your safety and to en-sure the correct use, before installingand first using the appliance, read thisuser manual carefully, including its hintsand warnings. To avoid unnecessary mis-takes and accidents, it is important toensure that all people using the appl...
Page 56 - PRODUCT DESCRIPTION
1.6 Service • Any electrical work required to do the servicing of the appliance should becarried out by a qualified electrician orcompetent person. • This product must be serviced by an authorized Service Centre, and onlygenuine spare parts must be used. 1.7 Environment Protection This appliance doe...
Page 57 - CONTROL PANEL; Switching on
3. CONTROL PANEL 5 2 3 1 4 1 Alarm Light 2 Fast Freeze Indicator 3 Pilot Light 4 Temperature Regulator 5 Fast Freeze Switch 3.1 Switching on Insert the plug into the wall socket.Turn the Temperature regulator clock-wise to a medium setting.The Pilot light and the Alarm light willlight up. 3.2 Switch...
Page 58 - DAILY USE; Freezing fresh food; HELPFUL HINTS AND TIPS; Normal Operating Sounds; Hints for energy saving
4. DAILY USE 4.1 Freezing fresh food The freezer compartment is suitable forfreezing fresh food and storing frozenand deep-frozen food for a long time.To freeze fresh food activate the FastFreezing function at least 24 hours be-fore placing the food to be frozen in thefreezer compartment.Place the f...
Page 59 - CARE AND CLEANING; Cleaning the interior
5.3 Hints for freezing To help you make the most of the freez-ing process, here are some importanthints:• the maximum quantity of food which can be frozen in 24 hrs. is shown onthe rating plate; • the freezing process takes 24 hours. No further food to be frozen shouldbe added during this period; • ...
Page 60 - Defrosting the freezer
Clean the condenser (black grill) and thecompressor at the back of the appliancewith a brush. This operation will improvethe performance of the appliance andsave electricity consumption. Take care of not to damage thecooling system. Many proprietary kitchen surface clean-ers contain chemicals that c...
Page 62 - TROUBLESHOOTING
7. TROUBLESHOOTING WARNING! Before troubleshooting, discon-nect the mains plug from themains socket.Only a qualified electrician orcompetent person must do thetroubleshooting that is not in thismanual. Problem Possible cause Solution The appliance doesnot operate. The Pi-lot light does notflash. The...
Page 63 - Closing the door; Positioning; Ambient temperature
Problem Possible cause Solution The temperature inthe freezer is toohigh. The temperature regula-tor is not set correctly. Set a lower temperature. Many products are storedat the same time. Store less products at thesame time. Products are too near toeach other. Store products so thatthere is cold a...
Page 66 - NOISES
180° • Fit the handle on the opposite side and put the plastic caps (contained inthe instructions bag) in the free holes. • Do a final check to make sure that: – All screws are tightened.– The door opens and closes correctly. If the ambient temperature is cold (i.e. inWinter), the gasket may not fit...
Page 68 - TECHNICAL DATA; ENVIRONMENT CONCERNS
CRACK! CRACK! 10. TECHNICAL DATA Dimension Height 1850 mm Width 600 mm Depth 660 mm Rising Time 25 h Voltage 230 - 240 V Frequency 50 Hz The technical information are situated inthe rating plate on the internal left sideof the appliance and in the energy label. 11. ENVIRONMENT CONCERNS Recycle the m...