Page 2 - REPARATUR- UND KUNDENDIENST; SICHERHEITSHINWEISE; Lesen Sie vor der Montage und dem Gebrauch des
INHALTSVERZEICHNIS 1. SICHERHEITSHINWEISE............................................................................................. 2 2. SICHERHEITSANWEISUNGEN...................................................................................4 3. BETRIEB..............................................
Page 4 - SICHERHEITSANWEISUNGEN; Montage
• Betreiben Sie in den Lebensmittelfächern des Geräts keine anderen als die vom Hersteller empfohlenen Elektrogeräte. • Reinigen Sie das Gerät nicht mit einem Wasser- oder Dampfstrahl. • Reinigen Sie das Gerät mit einem weichen, feuchten Tuch. Verwenden Sie ausschließlich Neutralreiniger. Benutzen S...
Page 6 - BETRIEB; Bedienfeld
2.5 Service • Wenden Sie sich zur Reparatur des Geräts an einen autorisierten Kundendienst. • Verwenden Sie ausschließlich Originalersatzteile. 2.6 Entsorgung WARNUNG! Verletzungs- und Erstickungsgefahr. • Trennen Sie das Gerät von der Stromversorgung. • Schneiden Sie das Netzkabel ab, und entsorgen...
Page 7 - TÄGLICHER GEBRAUCH
Die rote Kontrolllampe erlischt einige Stunden später, um anzuzeigen, dass die eingestellte Temperatur erreicht ist. Sie bleibt ausgeschaltet, um darauf hinzuweisen, dass alles in Ordnung ist. Sie leuchtet wieder, wenn die Gefrierraumtemperatur zu stark ansteigt, z. B. nachdem die Tür geöffnet wurde...
Page 8 - Auftauen; TIPPS UND HINWEISE; Normale
Kam es zum Beispiel durch einen Stromausfall, der länger dauerte als der in der Tabelle mit den technischen Daten angegebene Wert (siehe „Lagerzeit bei Störung“), zu einem ungewollten Abtauen, dann müssen die aufgetauten Lebensmittel sehr rasch verbraucht oder sofort gekocht und nach dem Abkühlen er...
Page 9 - REINIGUNG UND PFLEGE; Allgemeine Warnhinweise
5.4 Hinweise zur Lagerung gefrorener Lebensmittel So erzielen Sie die besten Ergebnisse mit Ihrem Gerät:• Vergewissern Sie sich, dass die gefrorenen Lebensmittel vom Händler angemessen gelagert wurden. • Achten Sie unbedingt darauf, die eingekauften gefrorenen Lebensmittel in der kürzest möglichen Z...
Page 11 - FEHLERSUCHE
1. Trennen Sie das Gerät von der Netzstromversorgung. 2. Entnehmen Sie alle Lebensmittel. 3. Tauen Sie das Gerät ab (falls erforderlich). Reinigen Sie das Gerät und alle Zubehörteile. 4. Lassen Sie die Tür(en) offen, um das Entstehen unangenehmer Gerüche zu vermeiden. WARNUNG! Möchten Sie bei einer ...
Page 12 - Schließen der Tür
Störung Mögliche Ursache Abhilfe Zu starke Reif- und Eisbil-dung. Die Tür ist nicht richtig ge-schlossen oder die Dichtunghat sich verformt/ist ver-schmutzt. Siehe „Schließen der Tür“. Der Wasserablaufstopfensitzt nicht richtig. Setzen Sie den Wasserab-laufstopfen richtig ein. Die Lebensmittel sind ...
Page 13 - MONTAGE; Aufstellung; Ausrichten
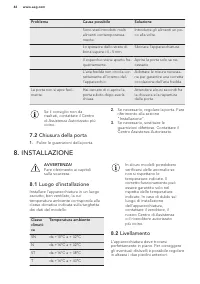
8. MONTAGE WARNUNG! Siehe Kapitel Sicherheitshinweise. 8.1 Aufstellung Installieren Sie dieses Gerät in einem trockenen, gut belüfteten Raum, an dem die Umgebungstemperatur mit der Klimaklasse übereinstimmt, die auf dem Typenschild des Geräts angegeben ist. Klima-klasse Umgebungstemperatur SN +10 °C...
Page 16 - Elektrischer Anschluss; TECHNISCHE DATEN; Technische Daten; GARANTIE
Führen Sie eine Endkontrolle durch, um sicherzustellen, dass: • Alle Schrauben fest angezogen sind; • Die Magnetdichtung am Gerät anliegt. • Die Tür ordnungsgemäß öffnet und schließt. Bei niedrigen Umgebungstemperaturen (z. B. im Winter) kann es vorkommen, dass die Türdichtung nicht richtig am Gerät...
Page 17 - UMWELTTIPPS
Servicestellen Morgenstrasse 131 3018 Bern Zürcherstrasse 204E 9000 St. Gallen Seetalstrasse 11 6020 Emmenbrücke Schlossstrasse 1 4133 Pratteln Comercialstrasse 19 7000 Chur Ersatzteilverkauf Industriestrasse 10, 5506 Mägenwil, Tel. 0848 848 111 Fachberatung/Verkauf Badenerstrasse 587, 8048 Zürich, ...
Page 18 - INFORMATIONS DE SÉCURITÉ; soigneusement les instructions fournies. Le fabricant ne
TABLE DES MATIÈRES 1. INFORMATIONS DE SÉCURITÉ............................................................................... 18 2. CONSIGNES DE SÉCURITÉ......................................................................................20 3. FONCTIONNEMENT............................................
Page 20 - CONSIGNES DE SÉCURITÉ; Installation
• Ne pulvérisez pas d'eau ni de vapeur pour nettoyer l'appareil. • Nettoyez l'appareil avec un chiffon doux humide. Utilisez uniquement des produits de nettoyage neutres. N'utilisez pas de produits abrasifs, de tampons à récurer, de solvants ni d'objets métalliques. • Ne conservez aucune substance e...
Page 22 - FONCTIONNEMENT; Bandeau de commande
3. FONCTIONNEMENT 3.1 Bandeau de commande 1 2 3 5 4 1 Voyant vert 2 Voyant rouge 3 Thermostat 4 Position Demi-charge 5 Position Charge pleine 3.2 Mise en marche Après l'installation, attendez 4 heures avant de brancher l'appareil.Insérez la fiche dans la prise murale. 1. Tournez le thermostat dans l...
Page 23 - UTILISATION QUOTIDIENNE; Congeler les aliments frais; Conservation d'aliments
• tournez le thermostat vers MIN pour obtenir le niveau de froid minimal. • tournez le thermostat vers MAX pour obtenir le niveau de froid maximal. Si vous devez congeler de petites quantités d'aliments, le réglage Demi-charge est le plus adapté. Si vous devez congeler de grandes quantités d'aliment...
Page 24 - CONSEILS
5. CONSEILS 5.1 Bruits normaux de fonctionnement Les bruits suivants sont normaux lorsque l'appareil est en cours de fonctionnement :• Un léger gargouillis lorsque le liquide réfrigérant est pompé. • Un ronronnement et un bruit de pulsation provenant du compresseur lorsque le liquide réfrigérant est...
Page 25 - ENTRETIEN ET NETTOYAGE; Avertissements généraux
6. ENTRETIEN ET NETTOYAGE AVERTISSEMENT! Reportez-vous aux chapitres concernant la sécurité. 6.1 Avertissements généraux ATTENTION! Débranchez l'appareil avant toute opération d'entretien et de nettoyage. Cet appareil contient des hydrocarbures dans son circuit de réfrigération ; l'entretien et la r...
Page 26 - EN CAS D'ANOMALIE DE FONCTIONNEMENT
Mettez le thermostat sur la température la plus basse 12 heures avant d'effectuer le dégivrage afin d'assurer une réserve de froid suffisante. Une certaine quantité de givre se forme toujours sur les clayettes du congélateur et autour du compartiment supérieur.Dégivrez le congélateur lorsque l'épais...
Page 27 - En cas d'anomalie de fonctionnement
7.1 En cas d'anomalie de fonctionnement Problème Cause probable Solution L'appareil ne fonctionne pasdu tout. L'appareil est éteint. Mettez l'appareil en marche. La fiche du câble d'alimenta-tion n'est pas correctementinsérée dans la prise de cou-rant. Branchez correctement la fi-che du câble d'alim...
Page 28 - Fermeture de la porte; INSTALLATION; Positionnement
Problème Cause probable Solution La température à l'intérieurde l'appareil est trop basse/élevée. Le thermostat n'est pas ré-glé correctement. Augmentez/réduisez la tem-pérature. La porte n'est pas ferméecorrectement. Reportez-vous au chapitre« Fermeture de la porte ». La température des produitsest...
Page 31 - Branchement électrique
10. Serrez la charnière. 11. Mettez le panneau supérieur en place. 12. Appuyez sur l'avant du panneau. 13. Vissez les deux vis à l'arrière. 14. Retirez et installez la poignée sur le côté opposé. 1 2 3 ATTENTION! Remettez l'appareil en place, mettez-le de niveau, attendez au moins quatre heures puis...
Page 32 - CARACTÉRISTIQUES TECHNIQUES; Caractéristiques techniques
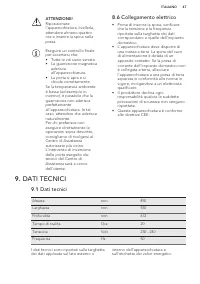
9. CARACTÉRISTIQUES TECHNIQUES 9.1 Caractéristiques techniques Hauteur mm 850 Largeur mm 550 Profondeur mm 612 Autonomie de fonctionnement Heures 20 Tension Volts 230 - 240 Fréquence Hz 50 Les caractéristiques techniques figurent sur la plaque signalétique située sur le côté intérieur ou extérieur d...
Page 33 - EN MATIÈRE DE PROTECTION DE
11. EN MATIÈRE DE PROTECTION DE L'ENVIRONNEMENT Recyclez les matériaux portant lesymbole . Déposez les emballages dans les conteneurs prévus à cet effet. Contribuez à la protection de l'environnement et à votre sécurité, recyclez vos produits électriques et électroniques. Ne jetez pas les appareilsp...
Page 34 - SERVIZIO CLIENTI E MANUTENZIONE; INFORMAZIONI DI SICUREZZA; Leggere attentamente le istruzioni fornite prima di
INDICE 1. INFORMAZIONI DI SICUREZZA............................................................................... 34 2. ISTRUZIONI DI SICUREZZA...................................................................................... 36 3. FUNZIONAMENTO.....................................................
Page 36 - ISTRUZIONI DI SICUREZZA; Installazione
• Non nebulizzare acqua né utilizzare vapore per pulire l'apparecchiatura. • Pulire l'apparecchiatura con un panno inumidito e morbido. Utilizzare solo detergenti neutri. Non usare prodotti abrasivi, spugnette abrasive, solventi od oggetti metallici. • Non conservare in questa apparecchiatura sostan...
Page 38 - FUNZIONAMENTO; Pannello dei comandi
come smaltire correttamente l'apparecchiatura. • Non danneggiare i componenti dell'unità refrigerante che si trovano vicino allo scambiatore di calore. 3. FUNZIONAMENTO 3.1 Pannello dei comandi 1 2 3 5 4 1 Spia verde 2 Spia rossa 3 Regolatore della temperatura 4 Posizione Mezzo Carico 5 Posizione Pi...
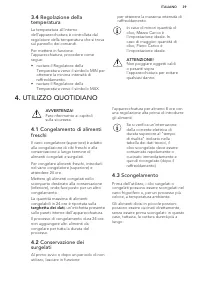
Page 39 - UTILIZZO QUOTIDIANO
3.4 Regolazione della temperatura La temperatura all'interno dell'apparecchiatura è controllata dal regolatore della temperatura che si trova sul pannello dei comandi.Per mettere in funzione l'apparecchiatura, procedere come segue:• ruotare il Regolatore della Temperatura verso il simbolo MIN per ot...
Page 42 - Periodi di non utilizzo; RISOLUZIONE DEI PROBLEMI
AVVERTENZA! Non toccare il cibo congelato con le mani bagnate. Le mani potrebbero aderire all'alimento congelato. 3. Lasciare aperta la porta ed inserire il raschietto in plastica nella sede appropriata al centro sul fondo, collocando una bacinella al di sotto per raccogliere l'acqua di sbrinamento....
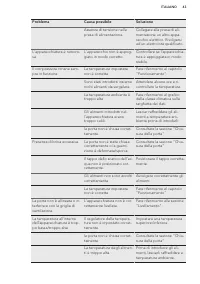
Page 44 - Chiusura della porta; INSTALLAZIONE; Luogo d'installazione; Livellamento
Problema Causa possibile Soluzione Sono stati introdotti moltialimenti contemporanea-mente. Introdurre gli alimenti un po-co alla volta. Lo spessore dello strato dibrina supera i 4 - 5 mm. Sbrinare l'apparecchiatura. Il coperchio viene aperto fre-quentemente. Aprire la porta solo se ne-cessario. L'a...
Page 47 - Collegamento elettrico; DATI TECNICI; Dati tecnici
ATTENZIONE! Riposizionare l'apparecchiatura, livellarla, attendere almeno quattro ore e inserire la spina nella presa. Eseguire un controllo finale per accertarsi che: • Tutte le viti siano serrate. • La guarnizione magnetica aderisca all’apparecchiatura. • La porta si apra e si chiuda correttamente...
Page 48 - GARANZIA; CONSIDERAZIONI SULL'AMBIENTE
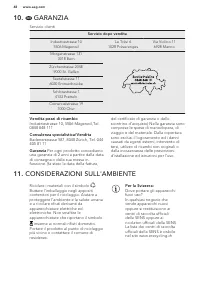
10. CH GARANZIA Servizio clienti Servizio dopo vendita Industriestrasse 10 5506 Mägenwil Le Trési 6 1028 Préverenges Via Violino 11 6928 Manno Morgenstrasse 131 3018 Bern Zürcherstrasse 204E 9000 St. Gallen Seetalstrasse 11 6020 Emmenbrücke Schlossstrasse 1 4133 Pratteln Comercialstrasse 19 7000 Chu...
Page 49 - CUSTOMER CARE AND SERVICE; SAFETY INFORMATION; Before the installation and use of the appliance,
CONTENTS 1. SAFETY INFORMATION........................................................................................... 49 2. SAFETY INSTRUCTIONS...........................................................................................51 3. OPERATION..................................................
Page 51 - SAFETY INSTRUCTIONS
• Do not store explosive substances such as aerosol cans with a flammable propellant in this appliance. • If the supply cord is damaged, it must be replaced by the manufacturer, its Authorised Service Centre or similarly qualified persons in order to avoid a hazard. 2. SAFETY INSTRUCTIONS 2.1 Instal...
Page 52 - OPERATION; Control panel
flames and sources of ignition in the room. Ventilate the room. • Do not let hot items to touch the plastic parts of the appliance. • Do not put soft drinks in the freezer compartment. This will create pressure on the drink container. • Do not store flammable gas and liquid in the appliance. • Do no...
Page 53 - DAILY USE; Freezing fresh food
5 Full Loaded position 3.2 Switching on Leave the appliance to stand upright for 4 hours after installation.Insert the plug into the wall socket. 1. Turn the Temperature Regulator clockwise to a medium setting. The Green Indicator Light will light up and remain lit until the appliance is switched of...
Page 54 - Storage of frozen food; HINTS AND TIPS; Normal operating sounds
rating plate , a label located on the inside of the appliance.The freezing process lasts 24 hours: during this period do not add other food to be frozen. 4.2 Storage of frozen food When first starting-up or after a period out of use, before putting the products in the compartment let the appliance r...
Page 55 - CARE AND CLEANING; General warnings
• lean foods store better and longer than fatty ones; salt reduces the storage life of food; • water ices, if consumed immediately after removal from the freezer compartment, can possibly cause the skin to be freeze burnt; • it is advisable to show the freezing in date on each individual pack to ena...
Page 57 - TROUBLESHOOTING
7. TROUBLESHOOTING WARNING! Refer to Safety chapters. 7.1 What to do if... Problem Possible cause Solution The appliance does not op-erate. The appliance is switchedoff. Switch on the appliance. The mains plug is not con-nected to the mains socketcorrectly. Connect the mains plug tothe mains socket ...
Page 58 - Closing the door; Positioning
Problem Possible cause Solution The temperature in the ap-pliance is too low/too high. The temperature regulator isnot set correctly. Set a higher/lower tempera-ture. The door is not closed cor-rectly. Refer to "Closing the door". The food products' tempera-ture is too high. Let the food pro...
Page 61 - Electrical connection; TECHNICAL DATA; Technical data
11. Put the top in position. 12. Push front the top. 13. Screw both screws on the rear side. 14. Remove and install the handle on the opposite side. 1 2 3 CAUTION! Reposition, level the appliance, wait for at least four hours and then connect it to the power socket. Do a final check to make sure tha...
Page 62 - GUARANTEE; ENVIRONMENTAL CONCERNS
Width mm 550 Depth mm 612 Rising time Hours 20 Voltage Volts 230 - 240 Frequency Hz 50 The technical information is situated in the rating plate, on the external or internal side of the appliance and in the energy label. 10. CH GUARANTEE Customer Service Centres Point of Service Industriestrasse 10 ...