AEG 10091 - User Manual
AEG 10091 – User Manual, read for free online in PDF format. We hope this helps you resolve any issues you may have. If you have further questions, please contact us through the contact form.


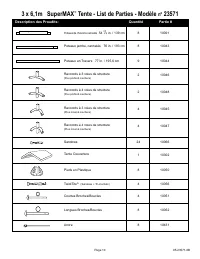
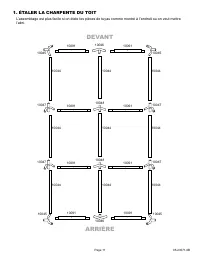
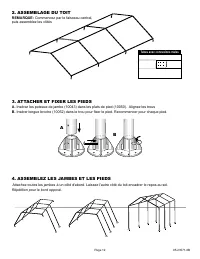
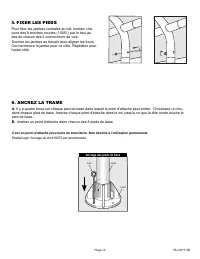
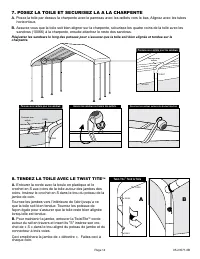


Table of Contents:
- Page 2 – PROPER ANCHORING AND INStAllAtION OF FRAME:; YEAR FOR COvER FABRIC, END PANELS AND FRAMEWORk
- Page 3 – Base Feet
- Page 4 – lAY OUt ROOF FRAME; REAR
- Page 5 – ASSEMBlE ROOF FRAME; Start with the center beam,; AttACH FEEt tO lEGS; Repeat for opposite side.; Swedged Tube Connections
- Page 6 – SECURE tHE lEGS; To secure the center legs to the roof assembly, insert; This is a temporary spike anchor. Not intended for permanent use.; Anchoring Base Feet
- Page 7 – PlACE COvER AND SECURE tO CANOPY FRAME; tIGHtEN tHE COvER WItH tWISt tItE; Tighten Cover
- Page 8 – SUPERMAXTM tENtE; lES tRADUCtIONS FRANçAISES D'INStRUCtION D'ASSEMBlAGE; DESCRIPtION
- Page 9 – ENtREtIEN Et NEttOYAGE:
- Page 10 – no; Quantité
- Page 11 – étAlER lA CHARPENtE DU tOIt; DEvANt
- Page 12 – ASSEMBlAGE DU tOIt; Commencez par le faisceau central,; AttACHER Et FIXER lES PIEDS; Répétition pour le bord opposé.; Tubes avec connexions males
- Page 13 – FIXER lES PIEDS; Pour fixer les jambes centrales au toit, insérez cha; ShelterLogic; Ancrage des pieds de base
- Page 14 – POSEz lA tOIlE Et SECURISEz lA A lA CHARPENtE; tENDEz lA tOIlE AvEC lE tWISt tItE; Tend la Toile
- Page 15 – SUPERMAX CANOPY; Instrucciones de Ensamble; DESCRIPCIÓN
- Page 16 – AÑO PARA LA TELA DE LA CUBIERTA, LOS PANELES DE EXTREMO Y EL MARCO
- Page 17 – Cantidad; Postes
- Page 18 – desea colocar el cobertizo.; DIAGRAMA DE lA EStRUCtURA DEl tECHO
- Page 19 – ENSAMBlE lOS PIES A lAS PIERNAS; Repetición para la cara opuesta.
- Page 20 – ASEGURE lAS PIERNAS; Para asegurar las patas del toldo al ensamble del; Este es un anclaje temporal. No se recomienda para uso permanente.; Asegure los pies
- Page 21 – COlOqUE lA tOlDO Y ASEGURElA Al MARCO; quede apretada y uniforme en el marco.; Paneles con orificios para; APRIEtE lA CUBIERtA CON tWISt tItE; Apriete la Carpa Twist-Tite
05-23571-0B
Page 1
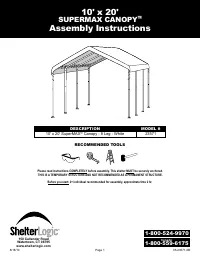
10' x 20'
SUPERMAX CANOPY™
Assembly Instructions
DESCRIPtION
MODEl #
10
'
x 20
'
SuperMAX™ Canopy - 8 Leg - White
23571
Before you start: 2+ individual recommended for assembly, approximate time 2 hr.
Please read instructions COMPLETELY before assembly. This shelter MUST be securely anchored.
THIS IS A TEMPORARY STRUCTURE AND NOT RECOMMENDED AS A PERMANENT STRUCTURE.
150 Callender Road
Watertown, CT 06795
www.shelterlogic.com
1-800-524-9970
1-800-559-6175
Canada:
RECOMMENDED tOOlS
8/18/10
"Loading the manual" means you need to wait until the file loads and becomes available for online reading. Some manuals are very large, and the time they take to appear depends on your internet speed.
Other Manuals for AEG 10091
Summary
05-23571-0B Page 2 Risk of fire. Do not smoke or use open flame devices (including grills, fire pits, deep fryers, smokers or lanterns) in or around the shelter. DO NOT store flammable liquids (gasoline, kerosene, propane, etc.) in or around your shelter. Do not expose top or sides of the shelter to...
05-23571-0B Page 3 10' x 20' SuperMAX ™ Canopy - Parts List - Model # 23571 Quantity Part # Bungee Cords Description of Parts: Swedged Rafter Poles 54 3 / 4 in. / 139 cm Swedged Leg Poles 76 in. / 193 cm Base Feet Short Pins with Rings Long Pins with Rings TwistTite ™ set (bungees + 'S'-hook) 4 - Wa...
05-23571-0B Page 4 1. lAY OUt ROOF FRAME REAR FRONt 10045 10045 10047 10047 10045 10045 10047 10047 10044 10044 10044 10044 10044 10044 10044 10044 10044 10046 10046 10048 10048 10091 10091 10091 10091 10091 10091 10091 10091 Assembly is easiest if the parts are spread out as shown at the location y...